
Introduction
There’s something incredibly comforting about the aroma of fresh bread baking in the oven, especially when it’s mingled with the savory scents of garlic and rosemary. It’s a smell that promises warmth, togetherness, and pure, uncomplicated joy. This recipe for Rosemary Garlic Pull Apart Bread delivers on that promise in the most deliciously interactive way, creating a centerpiece that’s as fun to eat as it is to make. It’s the perfect shareable appetizer or side dish that will have everyone reaching for more.
So, what exactly is this glorious creation? Rosemary Garlic Pull Apart Bread is a soft, fluffy yeast bread that you bake in a loaf pan. The magic happens because you stack small, butter-coated dough pieces in the pan, allowing them to bake together into one cohesive loaf that you can easily pull apart into individual servings. Its uniqueness lies in that interactive experience; it turns a simple side dish into a fun, communal event at the dinner table. This recipe perfectly aligns with our mission to create approachable, from-scratch food that brings people together. It uses simple, wholesome ingredients to create something truly spectacular, much like our favorite Homemade Focaccia Bread. The best part is that you don’t need to be an expert baker to achieve fantastic results. This bread is surprisingly simple to master, and the step-by-step process is incredibly rewarding. It’s the kind of impressive bake that will make you feel like a professional, especially when you serve it alongside a cozy meal like our Creamy Tuscan Chicken.
Why I Love This Recipe
I absolutely love this recipe because it never fails to impress. The moment I bring that golden, fragrant loaf to the table, everyone’s eyes light up. There’s a genuine sense of accomplishment when I pull it apart to reveal the soft, buttery, herb-infused layers inside. It reminds me of big family gatherings where food is the centerpiece of connection and conversation. For me, this Rosemary Garlic Pull Apart Bread is more than a recipe; it’s a guaranteed way to create a warm and memorable moment.
Health and Nutrition
Why it’s good for your body
Rosemary Garlic Pull Apart Bread delivers fantastic flavor and real health benefits because it uses powerful, functional ingredients. Fresh rosemary contains rosmarinic acid and carnosic acid, which act as antioxidants so they help protect your cells from free radical damage. Garlic also provides major advantages since it is rich in allicin, a compound that supports heart health and boosts your immune system.
Olive oil serves as the primary fat source in this recipe, and it is packed with heart-healthy monounsaturated fats. These fats can reduce inflammation and promote healthy cholesterol levels. Even though it is bread, the carbohydrates supply your body with essential energy for daily activities. Rosemary Garlic Pull Apart Bread is a tasty way to nourish your body while treating your taste buds.
How it fits in a healthy lifestyle
Rosemary Garlic Pull Apart Bread fits beautifully into a balanced diet when you enjoy it in moderation. Think of it as a flavorful side dish rather than the main course, and pair a small portion with a protein-rich salad or a hearty soup for a complete meal. This strategy helps you control portions while still savoring the incredible taste. For specific dietary needs, you can easily make swaps. Use a quality gluten-free flour blend to make it gluten-free.
Healthy eating focuses on balance and enjoyment, and this bread supports that philosophy because you make it with whole, recognizable ingredients. You avoid unnecessary preservatives and control exactly what goes into your food. It is perfect for sharing at gatherings, turning a simple meal into a joyful social experience. For more inspiration on building nutritious meals, check out our guide to a balanced weekly meal plan. Enjoying Rosemary Garlic Pull Apart Bread is a delightful part of a mindful lifestyle.
How to Prepare This Dish
Steps and time-saving tips
First, grab a large mixing bowl and whisk together the warm milk, sugar, and yeast. Let this mixture sit for about five to ten minutes until it becomes frothy. Meanwhile, you can melt the butter and finely chop the fresh rosemary. Next, stir the melted butter, salt, and two cups of flour into the yeast mixture. Gradually add the remaining flour until a soft dough forms. Turn the dough onto a floured surface and knead it for five minutes until smooth and elastic. For a time-saving tip, use a stand mixer with a dough hook to do the kneading for you. After that, place the dough in a greased bowl, cover it, and let it rise in a warm spot until it doubles in size, which typically takes about an hour. While the dough rises, you can prepare the garlic butter filling by mixing softened butter with minced garlic, chopped rosemary, and a pinch of salt. Finally, roll the dough out, spread the filling, cut it into squares, and stack them in your pan for that signature pull-apart effect before the final rise and bake.
Mistakes I’ve made and learned from
I have definitely made my share of mistakes with this Rosemary Garlic Pull Apart Bread. Initially, I used yeast that was too old, which resulted in a dense, flat loaf that barely rose. Now, I always test my yeast in the warm liquid first to ensure it’s active and bubbly. Another common error I made was rolling the dough too thin before adding the garlic butter, causing the layers to tear and the filling to leak out during baking. I learned that a slightly thicker rectangle holds the layers much better. For more on working with yeast, check out my guide on understanding yeast. Also, if you love the flavor combination here, you might enjoy my garlic herb focaccia, which uses a similar technique.
Cultural Connection and Variations
Where this recipe comes from
This recipe feels like a warm hug from an Italian grandmother, even though its exact origins are a bit of a delicious mystery. The heart of it lies in the classic flavor pairing found across the Mediterranean, where fragrant rosemary and pungent garlic grow abundantly. In many households, a simple version of this bread would be a staple, often torn from a larger loaf at the family table to soak up every last bit of sauce from a Sunday supper.
While the combination is timeless, the pull-apart format itself is a more modern, Americanized twist. It transforms the experience from a side dish into a spectacular, shareable centerpiece. The method of cutting the dough into squares and layering them in a pan creates those irresistible buttery edges, making every piece a perfect, soft bite. This style of baking is deeply communal, echoing the spirit of gathering around a table for a meal. You can almost hear the laughter and conversation that a warm loaf of Rosemary Garlic Pull Apart Bread inspires.
How it fits in today’s cooking
Rosemary Garlic Pull Apart Bread has secured its place as a modern classic because it is both a comfort food and a showstopper. It fits seamlessly into today’s cooking routines, whether you need a quick weeknight side to elevate a simple bowl of soup or a guaranteed crowd-pleaser for a holiday feast. Its interactive, shareable nature makes it a star at potlucks and dinner parties alike.
Contemporary cooks are also putting their own creative spins on it. Some are incorporating whole wheat flour for a nuttier flavor, while others are stuffing the layers with different cheeses or even a sprinkle of chili flakes for heat. It’s the perfect companion to a cozy, home-cooked meal, much like a classic hearty beef stew. For a lighter, yet equally impressive spread, it also pairs wonderfully with a fresh creamy Tuscan chicken. This adaptability ensures that the beloved Rosemary Garlic Pull Apart Bread will continue to be a cherished recipe for generations to come.
Taste and Texture
What makes it delicious
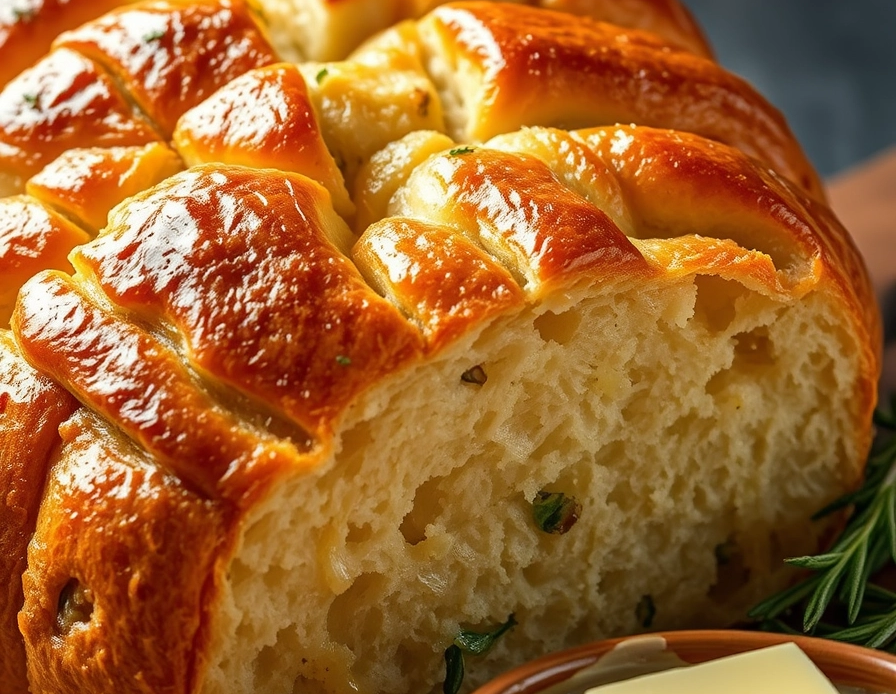
This Rosemary Garlic Pull Apart Bread is a true sensory delight, starting with its intoxicating aroma. As it bakes, the earthy, pine-like fragrance of fresh rosemary melds with the pungent, savory scent of roasted garlic, which fills your kitchen completely. When you pull apart a warm piece, you reveal a soft, cloud-like interior that is incredibly tender and airy. Each fluffy pillow of dough is generously coated in a rich, savory butter infusion, so every single bite bursts with flavor. The top and edges develop a wonderfully crisp, golden-brown crust that provides a satisfying crunch, while the inside remains supremely chewy and soft. The roasted garlic becomes subtly sweet and mellow, so it perfectly complements the herbal notes without overpowering them. A final sprinkle of flaky sea salt cuts through the richness, because it creates a beautifully balanced and utterly irresistible experience. This Rosemary Garlic Pull Apart Bread is the ultimate comfort food, even though it is simple to make.
Boosting the flavor
You can easily boost the flavor of your Rosemary Garlic Pull Apart Bread with a few simple tweaks. For a richer, more complex taste, try mixing grated parmesan or sharp cheddar cheese into the butter mixture before slathering it on the dough balls. If you love a little heat, a pinch of red pepper flakes or a sprinkle of chili crisp adds a wonderful spicy kick. Fresh herbs are always best, although you can also experiment with other woody varieties like thyme or even a touch of sage. Consider serving it with a side of warm marinara sauce for dipping, because the tangy tomato flavor pairs beautifully with the garlic and herbs. For an even more decadent treat, a drizzle of our easy honey butter right after baking adds a touch of sweetness. Finally, remember that the quality of your olive oil matters immensely, so using a robust, high-quality extra virgin olive oil makes a significant difference, much like it does in our favorite focaccia bread recipe.
Tips for Success
Best practices for results
Always use fresh rosemary for the most potent and aromatic flavor in your Rosemary Garlic Pull Apart Bread, although you can use dried rosemary in a pinch. Use room temperature ingredients, especially the milk and eggs, because this allows the yeast to activate properly and the dough to rise evenly. Generously butter the bundt pan and ensure you coat every layer of dough with the garlic herb butter for an incredibly flavorful and golden-brown finish. For the best texture and to make the dough easier to handle, always chill it for the recommended time before shaping, as this prevents the butter from melting too quickly.
Mistakes to avoid
A common error is using yeast that is too hot, which will kill it and prevent your dough from rising, so always use a thermometer to ensure your liquid is between 105°F and 115°F. Another frequent mistake is not allowing the dough to proof in a warm enough place, even though this step is crucial for a light and airy final product. Avoid over-measuring your flour, because packing it into the cup will result in a dense and dry loaf; instead, fluff the flour and spoon it into the measuring cup for accuracy. Finally, do not skip the step of brushing the finished loaf with melted butter immediately after baking, as this adds an extra layer of flavor and keeps the Rosemary Garlic Pull Apart Bread moist. For more guidance on working with yeast, our comprehensive guide on how to make homemade bread is an excellent resource, and you can find more inspiration for savory baked goods with our popular cheesy garlic bread recipe.
Serving and Pairing Suggestions
How to serve this dish
Present your freshly baked Rosemary Garlic Pull Apart Bread on a rustic wooden board or in a woven basket lined with a checkered cloth for a truly inviting, family-style feel. Consequently, this approach encourages everyone to reach in and tear off their own warm, fragrant piece. For a beautiful finishing touch, garnish the top with a few extra sprigs of fresh rosemary and a light sprinkle of flaky sea salt just before serving.
This dish is incredibly versatile for any event. For instance, it makes a stunning centerpiece at a holiday feast or a special Sunday brunch. Alternatively, it transforms a simple weeknight dinner like our classic Creamy Tuscan Chicken into a celebratory meal. Ultimately, the intoxicating aroma of Rosemary Garlic Pull Apart Bread promises a warm and memorable dining experience.
What goes well with it
Pair this savory bread with a rich, velvety tomato soup for the ultimate comfort food combination. The acidic, sweet notes of the soup cut beautifully through the rich, herby butter, creating a perfect flavor balance with every dunk.
For beverages, a crisp, chilled glass of Sauvignon Blanc complements the garlic and herbal notes wonderfully. Meanwhile, a hearty Italian red blend stands up to the robust flavors, especially if you are serving it alongside a main course like our Hearty Beef Bolognese.
Finally, do not forget a side of high-quality extra virgin olive oil or a balsamic glaze for dipping. These simple additions provide a delightful contrast and enhance the overall Mediterranean vibe of the meal.
Pull apart bread is typically made from a simple yeast dough that is rolled into small balls. These balls are then coated in a flavorful mixture—in this case, melted butter infused with fresh rosemary and minced garlic—and layered in a loaf pan before baking. This method creates the signature “pull apart” texture of the Rosemary Garlic Pull Apart Bread.
To reheat pull apart bread and restore its soft texture, wrap it in aluminum foil and warm it in a 350°F oven for 10-15 minutes. For a crispier top, unwrap it for the last few minutes of heating. Avoid the microwave, as it can make the bread chewy.
Garlic bread is a versatile side that pairs well with pasta dishes, soups, stews, and salads. This Rosemary Garlic Pull Apart Bread is especially delicious served alongside a hearty tomato soup, a creamy pasta alfredo, or as part of an Italian-inspired feast.
Yes, you can freeze garlic bread. After your Rosemary Garlic Pull Apart Bread has cooled completely, wrap it tightly in plastic wrap and then aluminum foil before placing it in the freezer. Thaw it in the refrigerator overnight and reheat it in the oven for best results.
Rosemary Garlic Pull Apart Bread
Make a flavorful pull apart bread using this delicious rosemary-infused yeasted dough. You can use your favorite cheese in the filling. I love and usually use shredded parmesan.
- Prep Time: 3 hrs
- Cook Time: 50 mins
- Total Time: 4 hrs
- Yield: 1 1x
- Method: Bread
- Cuisine: American
Ingredients
- 2 teaspoons Platinum Yeast from Red Star*
- 1 Tablespoon granulated sugar
- 3/4 cup (180ml) whole milk
- 3 Tablespoons (43g) unsalted butter, softened to room temperature
- 1 large egg
- 2 and 1/3 cups (291g) all-purpose flour (spooned & leveled), plus more as needed*
- 1 teaspoon salt
- 1 teaspoon garlic powder
- 1 Tablespoon finely chopped fresh rosemary (or 2 teaspoons dried)
- 5 Tablespoons (71g) unsalted butter, extra soft (see note)
- 1 Tablespoon finely chopped fresh rosemary (or 2 teaspoons dried)
- 1 Tablespoon finely chopped fresh parsley (or 2 teaspoons dried)
- 2 garlic cloves, minced or 1/2 teaspoon garlic powder
- 1/4 teaspoon salt
- 3/4 cup (95g) shredded parmesan, mozzarella, or white cheddar cheese (or your favorite shredded cheese)
- 1 Tablespoon (14g) unsalted butter, melted
- coarse or flaky sea salt for sprinkling
Instructions
- Make the dough: Place the yeast and sugar in the bowl of a stand mixer fitted with a dough hook or paddle attachment. Or, if you do not own a stand mixer, a regular large mixing bowl. Heat the milk on the stove or in the microwave until warm to touch, about 110°F (43°C). Pour warm milk on top of yeast/sugar. Whisk gently to combine, then loosely cover with a clean kitchen towel and allow to sit for 5-10 minutes. The mixture will be frothy after 5-10 minutes.
- If you do not have a mixer, you can mix the dough together with a wooden spoon or silicone spatula in this step: Add the butter, egg, flour, salt, garlic powder, and rosemary. Beat on low speed until the dough comes together and pulls away from the sides of the bowl, about 3 minutes. If the dough isn't pulling away from the sides of the bowl, add a little more flour, a Tablespoon at a time. Dough will be soft.
- Knead the dough: Keep the dough in the mixer (and switch to the dough hook if using the paddle) and beat for an additional 5 full minutes, or knead by hand on a lightly floured surface for 5 full minutes. (If you're new to bread-baking, my How to Knead Dough video tutorial can help here.) If the dough becomes too sticky during the kneading process, sprinkle 1 Tablespoon of flour at a time on the dough or on the work surface/in the bowl to make a soft, slightly tacky dough. Do not add more flour than you need because you do not want a dry dough. After kneading, the dough should still feel a little soft. Poke it with your finger—if it slowly bounces back, your dough is ready to rise. You can also do a "windowpane test" to see if your dough has been kneaded long enough: tear off a small (roughly golfball-size) piece of dough and gently stretch it out until it's thin enough for light to pass through it. Hold it up to a window or light. Does light pass through the stretched dough without the dough tearing first? If so, your dough has been kneaded long enough and is ready to rise. If not, keep kneading until it passes the windowpane test.
- 1st Rise: Shape the kneaded dough into a ball. Place the dough in a greased bowl (I use nonstick spray to grease) and cover with plastic wrap or aluminum foil. Place in a slightly warm environment to rise until doubled in size, around 60-90 minutes. (If desired, use my warm oven trick for rising. See my answer to Where Should Dough Rise? in my Baking with Yeast Guide.)
- As the dough rises, prepare the filling in the next step and grease a 9×5-inch loaf pan.
- Make the filling: In a medium bowl, mix the soft butter, rosemary, parsley, garlic, and salt together. If the butter is soft enough, you can just mix it all together with a spoon or fork. You can use an electric mixer if that's easier too. Cover tightly and set aside until ready to use. (Don't refrigerate unless making well in advance. It's easiest to spread on the dough when at room temperature. If refrigerated, let it come to room temperature before spreading on dough pieces.)
- Assemble the bread: Punch down the dough to release the air. Place dough on a lightly floured work surface. Divide it into 12 equal pieces, each about 1/4 cup of dough and a little larger than a golf ball. Using lightly floured hands, flatten each into a circle that's about 4 inches in diameter. The circle doesn't have to be perfectly round. I do not use a rolling pan to flatten, but you certainly can if you want. Spread 1-2 teaspoons of filling mixture onto each. Sprinkle each with 1 Tablespoon of cheese. Fold circles in half and line in prepared baking pan, round side up. See photos above for a visual.
- 2nd Rise:
- 2nd Rise: Cover with plastic wrap or aluminum foil and allow to rise once again in a slightly warm environment until puffy, about 45 minutes.
- Adjust the oven rack to the lower third position then preheat oven to 350°F (177°C).
- Bake until golden brown, about 50 minutes. If you find the top of the loaf is browning too quickly, tent with aluminum foil. (Don't be alarmed if there's melted butter around the sides of the bread as it bakes, it will seep into the bread before it finishes.) Remove from the oven and place the pan on a wire rack. If desired, brush with melted butter for topping and sprinkle with sea salt.
- Cool for 10 minutes in the pan, then remove from the pan and serve warm.
- Cover and store leftovers at room temperature for up to 2 days or in the refrigerator for up to 1 week. Since the bread is extra crispy on the exterior, it will become a little hard after day 1. Reheat in a 300°F (149°C) oven for 10-15 minutes until interior is soft again or warm in the microwave.
Notes
1. Make Ahead Instructions: Freeze baked and cooled bread for up to 3 months. Thaw at room temperature or overnight in the refrigerator and warm in the oven to your liking. The dough can be prepared through step 4, then after it has risen, punch it down to release the air, cover it tightly, then place in the refrigerator for up to 2 days. Continue with step 5. To freeze the dough, prepare it through step 4. After it has risen, punch it down to release the air. Wrap in plastic wrap and place in a freezer-friendly container for up to 3 months. When ready to use, thaw the dough overnight in the refrigerator. Then let the dough sit at room temperature for about 30 minutes before continuing with step 5. (You may need to punch it down again if it has some air bubbles.) 2. Special Tools (affiliate links): Electric Stand Mixer or Large Glass Mixing Bowl with Wooden Spoon / Silicone Spatula | 9×5-inch Loaf Pan | Cooling Rack | Flaky Sea Salt 3. Yeast: I always use Platinum Yeast from Red Star, an instant yeast. If using active dry yeast, the rise times could be slightly longer. Reference my Baking with Yeast Guide for answers to common yeast FAQs. 4. Flour: Feel free to use the same amount of bread flour instead of all-purpose flour. You can also try swapping out 1 cup of flour for whole wheat flour. Do not replace all of the flour with whole wheat flour—just 1 cup. 5. Extra Soft Butter for Filling: Have you ever read my page about room temperature butter? Room temperature butter for baking should still be cool to the touch. You want room temperature butter for the dough. However, for the filling, you want extra soft butter so you can easily spread it onto the flattened dough without tearing the dough. Feel free to microwave it for 10-15 seconds to help it get extra soft.
