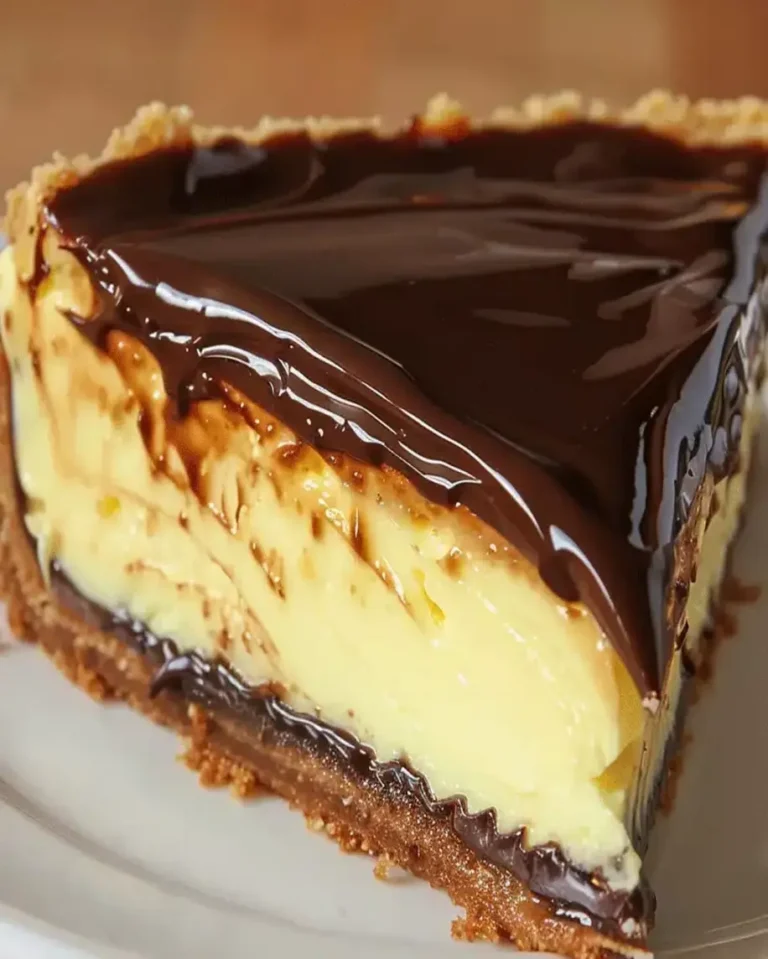
Decadent No-Bake Turtle Mini Cheesecakes – Easy Indulgence
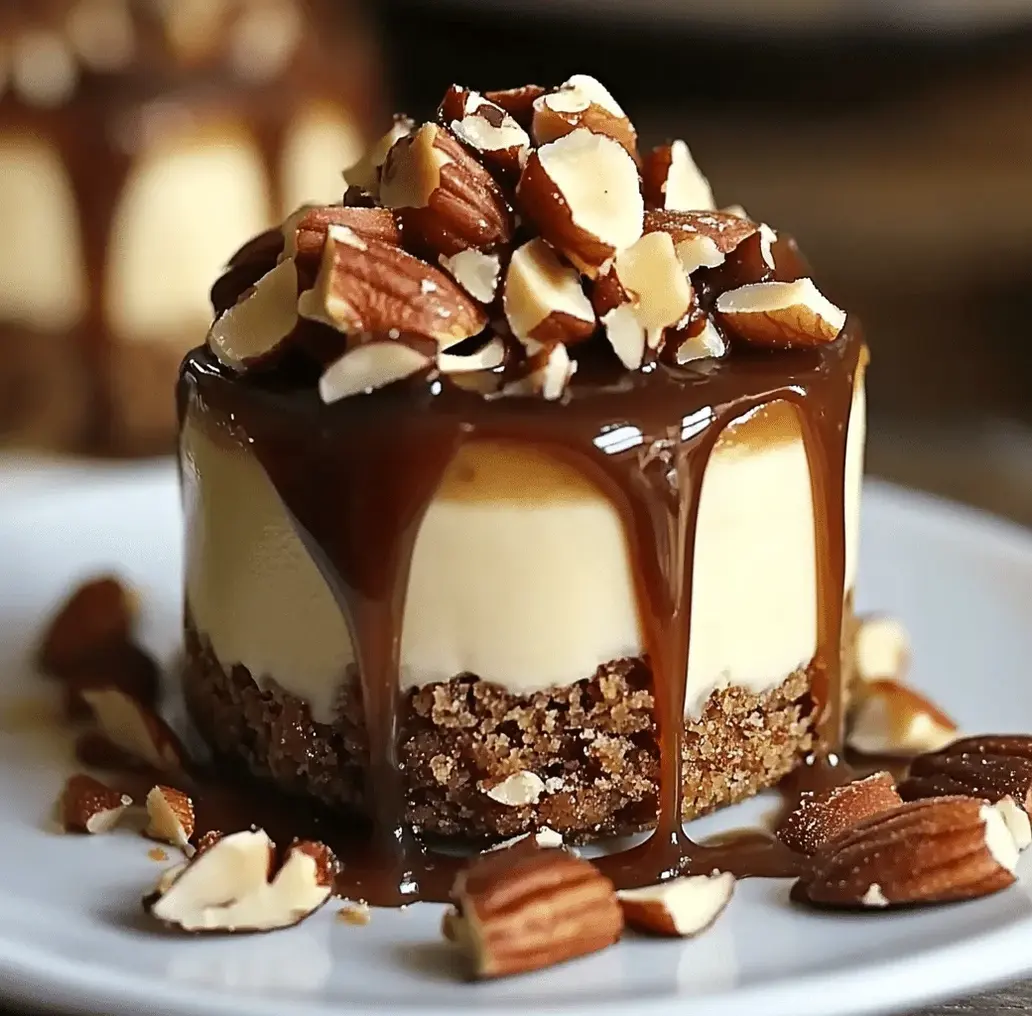
Table of Contents
No-Bake Turtle Mini Cheesecakes: A Delicious Indulgence: The Only Recipe You’ll Ever Need
Imagine craving a decadent dessert without turning on the oven during a sweltering summer day—that’s where no-bake turtle mini cheesecakes come in, offering an effortlessly creamy base with a crunchy twist that elevates your home baking game. These bite-sized treats combine rich caramel, gooey hot fudge, and toasted nuts for a turtle-inspired indulgence that’s perfect for parties or a quick weeknight treat. Drawing from our expert-tested turtle cheesecake recipe, this no-bake version is designed for busy home cooks seeking easy turtle desserts that deliver professional results without the fuss. In the first bite, you’ll experience the melt-in-your-mouth creaminess that makes this recipe a standout, all while keeping things simple and mess-free.
The allure of no-bake turtle mini cheesecakes lies in their irresistible sensory profile, from the silky smooth texture of the cheesecake filling that glides across your tongue to the caramel’s sweet, buttery warmth that melds with the deep, chocolatey notes of the crust. Each mini cheesecake boasts a satisfying crunch from chopped pecans and almonds, creating a delightful contrast that keeps you coming back for more. The aroma of vanilla extract blending with the richness of hot fudge fills the air as you assemble them, building anticipation for that perfect balance of creamy and crisp elements in every no-bake mini cheesecake.
What sets this turtle cheesecake recipe from delicetreats.com apart is our commitment to making it the ultimate, foolproof guide, refined through multiple kitchen tests for consistent, superior results. Discover our Chef’s Secret for achieving that effortlessly creamy base with a crunchy twist, along with practical tips to avoid common pitfalls. By the end of this post, you’ll feel empowered to whip up these easy turtle desserts with confidence, impressing family and friends while mastering no-bake techniques that save time and deliver joy. Let’s dive in and transform your dessert routine!
Why This No-Bake Turtle Mini Cheesecakes: A Delicious Indulgence Recipe is a Game-Changer
The Chef’s Secret: This recipe’s effortlessly creamy base with a crunchy twist comes from gently folding whipped heavy cream into the cream cheese mixture, which incorporates air for a light, velvety texture that’s far superior to traditional baked versions. By using high-quality chocolate cookie crumbs for the base and layering in caramel and nuts, we create a decadent turtle fusion that mimics the classic candy bar but with a homemade edge. This technique ensures the filling sets perfectly without baking, making it ideal for hot days or novice bakers.
Unbeatable Texture: The science behind the texture relies on the whipped heavy cream’s fat content, which stabilizes the cream cheese and powdered sugar mixture to prevent it from becoming dense. When folded in carefully, it traps air bubbles, resulting in a light, airy fill that contrasts beautifully with the crunchy pecans and almonds. This method guarantees a melt-in-your-mouth experience, as the no-bake process allows the ingredients to meld without overcooking, preserving the fresh, creamy quality.
Foolproof for a Reason: We’ve tested this no-bake turtle mini cheesecakes recipe dozens of times to ensure every step is reliable, from the initial crumb mixing to the final chilling. Home cooks can trust that following our guidelines will yield consistent results, even for beginners, thanks to clear instructions and tips that address potential issues like uneven setting.
Ingredient Spotlight: Quality Makes the Difference
Chocolate cookie crumbs (1 1/2 cups, finely crushed): These form the sturdy base of your no-bake turtle mini cheesecakes, providing a deep, chocolatey flavor that complements the turtle theme. Using high-quality crumbs from fresh cookies ensures they hold together without crumbling, enhancing the overall structure. For a substitution, opt for chocolate graham crackers if you want a milder taste, but avoid overly sweet varieties to maintain balance in your turtle cheesecake recipe.
Unsalted butter (5 tbsp, melted): This ingredient binds the crust together, adding richness and a subtle saltiness that elevates the dessert’s flavor profile. Always use unsalted butter to control sodium levels, as in our nutrition facts. If substituting, try vegan butter for a dairy-free version, but ensure it’s at room temperature to mix evenly and avoid a greasy crust in your no-bake mini cheesecakes.
Cream cheese (2 cups, softened to room temperature): The heart of the effortlessly creamy base, cream cheese delivers that signature tang and smoothness. Choose full-fat, block-style cream cheese for the best texture; low-fat options can make the filling watery. For a lighter alternative, use Greek yogurt, but strain it first to prevent excess moisture, ensuring your easy turtle desserts remain firm and delicious.
Powdered sugar (1/2 cup, sifted): This sweetens the filling while helping it achieve a silky consistency, absorbing into the cream cheese without graininess. Sifting is key to avoid lumps, and using organic powdered sugar can enhance purity. Substitute with coconut sugar for a less refined option, but note it may alter the color and sweetness in your turtle cheesecake recipe.
Vanilla extract (1 tsp): Adds warm, aromatic depth that ties the flavors together in these no-bake turtle mini cheesecakes. Always go for pure vanilla extract over imitation for authentic taste. If you’re out, almond extract works as a substitute, but use half the amount to prevent overpowering the creamy base in your easy turtle desserts.
Heavy cream (1 cup, whipped to stiff peaks): Essential for that effortlessly creamy texture, it lightens the filling and provides volume. Fresh, high-fat cream whips best; avoid ultra-pasteurized if possible. For dairy-free no-bake mini cheesecakes, use coconut cream, chilling it beforehand to achieve stiff peaks without compromising the airy result.
Caramel sauce (1/2 cup): Brings the signature gooey sweetness to your turtle-inspired treats, balancing the richness. Homemade caramel offers the best flavor, but store-bought is fine if it’s high-quality. Substitute with date syrup for a healthier twist, ensuring it doesn’t make the toppings too runny in your no-bake turtle mini cheesecakes.
Hot fudge sauce (1/2 cup): Provides a decadent chocolate layer that defines the turtle cheesecake experience. Opt for thick, premium fudge to avoid drips. Vegan chocolate sauce can replace it, maintaining the indulgent vibe while catering to dietary needs in easy turtle desserts.
Chopped pecans (1/2 cup) and chopped almonds (1/4 cup, optional): These add the crucial crunch, enhancing the turtle candy vibe with nutty flavor and texture. Fresh, toasted pecans are ideal for maximum taste; walnuts make a great substitute if pecans are unavailable, adding a slight earthiness without altering the overall balance.
Step-by-Step Instructions
Step 1: Preparing the Crust
To begin, grab a medium bowl and combine the finely crushed chocolate cookie crumbs with melted unsalted butter. Mix these two ingredients thoroughly until the blend resembles wet sand, ensuring the crumbs are evenly coated for a solid base. Distribute the mixture evenly into mini cheesecake molds or a muffin tin lined with cupcake liners, then press firmly with your fingers or the back of a spoon. Place in the refrigerator for about 20 minutes to set.
Pro Tip: Chill the bowl before mixing to help the butter solidify faster, creating a firmer crust that holds its shape perfectly.
Step 2: Creating the Cheesecake Filling
While the crust chills, in a large mixing bowl, beat the softened cream cheese, sifted powdered sugar, and vanilla extract until smooth and creamy using an electric mixer. Gently fold in the whipped heavy cream with a spatula to maintain its airy texture, avoiding overmixing to keep the filling light.
Common Mistake to Avoid: Don’t rush the folding process; overbeating can deflate the whipped cream, resulting in a dense filling—fold slowly and in one direction for optimal results.
Step 3: Assembling the Mini Cheesecakes
Once the crust is set, remove from the refrigerator and spoon the creamy cheesecake mixture evenly over each base, smoothing the tops with a spatula for an even surface. Fill to the top for a professional look, then return to the refrigerator to chill for at least four hours until fully set.
Pro Tip: Use a piping bag for filling to avoid air pockets, ensuring a flawless, effortlessly creamy texture in your no-bake turtle mini cheesecakes.
Step 4: Adding the Toppings
After chilling, drizzle each mini cheesecake with generous amounts of caramel and hot fudge sauce, using a swirling motion for an appealing design. Sprinkle with chopped pecans and almonds to add crunch, enhancing the turtle flavor profile.
Common Mistake to Avoid: Apply toppings right before serving to prevent the sauces from soaking into the filling—chill the cheesecakes fully first for a clean, non-soggy presentation.
Step 5: Serving the Mini Cheesecakes
Finally, carefully remove the cheesecakes from the molds, retaining their shape, and arrange on a platter for serving. Enjoy them chilled for the best texture and flavor.
Pro Tip: Let them sit at room temperature for 5 minutes before serving to enhance the effortlessly creamy base without compromising the crunchy twist.
Serving & Presentation
Elevate your no-bake turtle mini cheesecakes with creative plating by arranging them on a rustic wooden board drizzled with extra caramel for a stunning visual appeal. Garnish with a sprinkle of sea salt or edible gold flakes for an impressive touch that highlights the turtle cheesecake recipe’s indulgent nature. Pair these easy turtle desserts with a light coffee or fresh fruit salad to balance the richness, making them ideal as a standalone treat or finale to a meal like grilled chicken or a fresh salad for a well-rounded dining experience.
Make-Ahead & Storage Solutions
Make-Ahead Strategy: Prepare the crust and filling up to 3 days in advance by assembling the mini cheesecakes without toppings and storing them in an airtight container in the refrigerator. Add the caramel, hot fudge, and nuts just before serving to maintain their fresh texture in your no-bake turtle mini cheesecakes.
Storing Leftovers: Store any remaining cheesecakes in an airtight container in the fridge for up to 5 days; for longer storage, freeze them individually wrapped for up to 2 months to preserve the effortlessly creamy base. Avoid exposure to moisture to keep the crunchy elements intact.
The Best Way to Reheat: These no-bake mini cheesecakes are best enjoyed cold, but if needed, thaw frozen ones in the refrigerator overnight and let them sit at room temperature for 10 minutes to restore their original creamy texture and flavors.
Frequently Asked Questions (FAQ)

How long do no-bake turtle mini cheesecakes need to chill?
These no-bake turtle mini cheesecakes require at least four hours of chilling time in the refrigerator to fully set the filling, ensuring a firm yet creamy texture. For best results, chill them overnight if possible, as this allows the flavors to meld and makes them easier to handle when adding toppings.
Can I use graham cracker crust instead of Oreo for no-bake turtle mini cheesecakes?
Yes, you can substitute graham cracker crumbs for the chocolate cookie crumbs to create a lighter base in your no-bake turtle mini cheesecakes. However, this will alter the chocolatey profile slightly, so if you’re aiming for a traditional turtle cheesecake recipe, mix in a bit of cocoa powder to the crumbs for a similar depth without losing the essence of easy turtle desserts.
What are some topping ideas for no-bake turtle mini cheesecakes?
Beyond the classic caramel, hot fudge, and chopped nuts, try adding shredded coconut for extra texture or a dollop of whipped cream for added indulgence in your no-bake turtle mini cheesecakes. Fresh berries can provide a tart contrast, or drizzle with dark chocolate for a more intense flavor, enhancing the effortlessly creamy base while keeping the turtle theme versatile.
How do you ensure the caramel doesn’t split in no-bake turtle mini cheesecakes?
To prevent caramel from splitting, use room-temperature ingredients and drizzle it slowly over the chilled cheesecakes, allowing it to set without mixing too vigorously. If your caramel is store-bought, warm it gently in the microwave for 10-15 seconds to make it pourable, ensuring it integrates smoothly into your turtle cheesecake recipe without separating.
Are no-bake turtle mini cheesecakes suitable for kids?
Absolutely, these no-bake turtle mini cheesecakes are kid-friendly, but monitor portions due to their richness—350 calories per serving. You can adjust sweetness by reducing powdered sugar, making them a fun, interactive dessert for children to help assemble.
Can I make this recipe vegan or gluten-free?
Yes, for a vegan version, swap the cream cheese and heavy cream with plant-based alternatives like cashew cream or coconut cream, and use vegan butter and chocolate. For gluten-free, ensure your cookie crumbs are from gluten-free cookies; the rest of the ingredients are naturally gluten-free, making these easy turtle desserts adaptable for dietary needs.
Tried This Recipe? Leave a Comment!
Did you make this recipe? I’d love to hear how it turned out! Please leave a comment and a rating below. Your feedback helps other home cooks and supports Delicetreats!
For more delicious inspiration, follow me on Pinterest!
No-Bake Turtle Mini Cheesecakes: A Delicious Indulgence
Ingredients
- 1 1/2 cupschocolate cookie crumbs (finely crushed)
- 5 tbspunsalted butter, melted
- 2 cupscream cheese, softened to room temperature
- 1/2 cuppowdered sugar, sifted
- 1 tspvanilla extract
- 1 cupheavy cream, whipped to stiff peaks
- 1/2 cupcaramel sauce
- 1/2 cuphot fudge sauce
- 1/2 cupchopped pecans (or substitute walnuts for a twist)
- 1/4 cupchopped almonds (optional, for extra crunch)
Instructions
- To begin, grab a medium bowl and combine the finely crushed chocolate cookie crumbs with melted unsalted butter. Mix these two ingredients thoroughly until the blend resembles wet sand—this indicates that the crumbs are adequately coated with butter, which will bind them together when pressed into the molds. Next, take your mini cheesecake molds or muffin tin lined with cupcake liners and evenly distribute the crumb mixture into each one. Use your fingers or the back of a spoon to firmly press the mixture into the bottoms. This step is critical as it forms the solid and flavorful base of your cheesecakes. Once shaped, place the molds in the refrigerator for about 20 minutes to allow the crust to set and firm up.
- While the crust is chilling, it’s time to prepare the cheesecake filling. In a large mixing bowl, beat the softened cream cheese, sifted powdered sugar, and vanilla extract until the mixture is smooth and creamy. This can be done using an electric mixer for easier blending. The goal here is to eliminate any lumps and achieve a silky consistency. Once combined, gently fold in the whipped heavy cream using a spatula. Be cautious during this step; the idea is to keep as much air in the whipped cream as possible. This folding technique will give your filling a light and airy texture, making the cheesecakes melt in your mouth.
- After your crust has set and the filling is ready, it’s time to assemble your mini cheesecakes! Take the chilled crusts out of the refrigerator and spoon the creamy cheesecake mixture evenly over each one. Use a spatula to smooth the tops for an even surface. It’s important that each mini cheesecake is filled to the top for a lovely presentation. Once they’re all filled, place the molds back into the refrigerator and allow them to chill for at least four hours or until the filling is fully set. This chilling time is essential, as it helps the filling firm up and develop those delicious flavors.
- Once the cheesecakes have set, the fun part begins—adding the toppings! Drizzle each chilled cheesecake with generous amounts of caramel and hot fudge sauce. Feel free to get creative with the drizzling technique to achieve a beautiful aesthetic. Then, sprinkle the tops with chopped pecans and almonds (if using), ensuring every cheesecake is filled with crunchy goodness. This combination of rich sauces and crunchy nuts further enhances the delightful turtle flavor profile, making every bite a true indulgence.
- With the topping added, it’s finally time to serve these mini cheesecake treasures! Carefully remove each cheesecake from the molds, taking care to retain their shape. Serve them chilled on a decorative platter or individual dessert plates. As you watch them disappear, you’ll receive plenty of compliments for your incredible dessert skills!
Notes
These cheesecakes can be made ahead of time and stored in the refrigerator. They are perfect for parties and special occasions.
Nutrition
- Calories: 350 kcal
- Protein: 5 g