Angel Food Cake Recipe
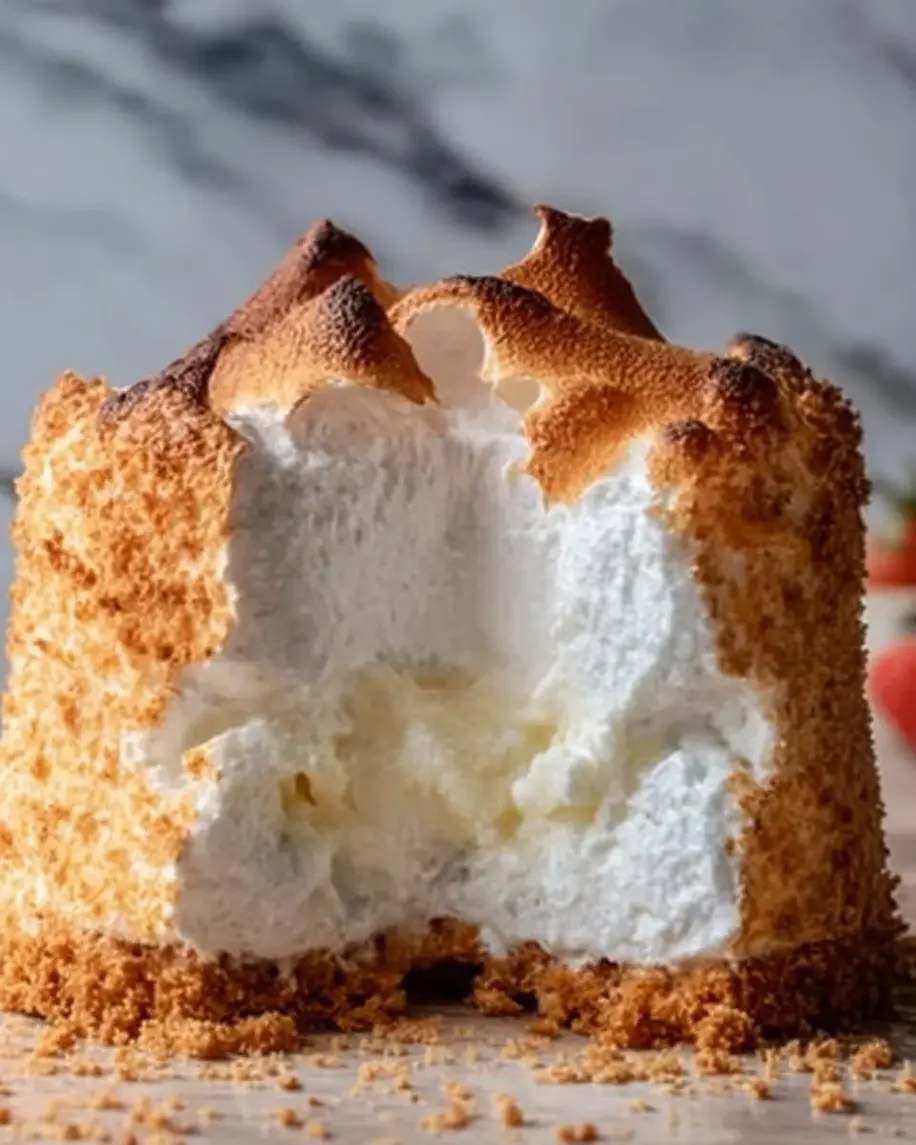
Table of Contents
Angel Food Cake Recipe
Introduction
Did you know that a perfectly made Angel Food Cake can contain over 70% air by volume? This fascinating fact highlights the incredible science behind this beloved dessert. If you’ve ever wondered how to achieve that signature cloud-like texture and delicate sweetness that defines a classic Angel Food Cake, you’re in the right place. This recipe is your foolproof guide to creating a light, airy, and ethereally fluffy masterpiece. Unlike denser butter cakes, this cake relies on the magical power of whipped egg whites, resulting in a dessert that’s surprisingly low in fat but high in impressive stature. Perfect for birthdays, summer gatherings, or a simple Sunday treat, this Angel Food Cake recipe promises elegance without excessive effort. Let’s dive into the art of baking this heavenly confection.
Ingredients List
Gathering the right ingredients is the first critical step to Angel Food Cake success. Precision is key—this is a cake where the chemistry truly matters.
- 1 cup (120g) cake flour, sifted – The fine, low-protein texture of cake flour is non-negotiable for a tender crumb. All-purpose flour will make the cake denser. For a gluten-free version, substitute with a finely milled gluten-free flour blend (like Bob’s Red Mill 1-to-1) plus ¼ teaspoon xanthan gum.
- 1 ½ cups (300g) granulated sugar, divided – Superfine sugar is ideal as it dissolves faster into the egg whites. If you only have regular granulated, pulse it in a food processor for 30 seconds. Do not use coarse sugar.
- 12 large egg whites (about 1 ½ cups), at room temperature – Room temperature egg whites whip to a much greater volume. Ensure not a single speck of yolk is present. For a convenient swap, you can use 1 ½ cups of pasteurized liquid egg whites.
- 1 ½ teaspoons cream of tartar – This acidic powder stabilizes the egg white foam, ensuring it doesn’t collapse. If you don’t have it, you can substitute with ½ teaspoon of white vinegar or lemon juice, though the stabilization may be slightly less effective.
- ¼ teaspoon fine sea salt – Enhances all the flavors and balances the sweetness.
- 1 ½ teaspoons pure vanilla extract – The classic flavor. Use the real thing for the best aroma.
- ½ teaspoon pure almond extract (optional but recommended) – Adds a beautiful, nuanced depth that makes the cake taste more complex. Omit if you have a nut allergy.
Timing
While the active prep time for this Angel Food Cake is relatively short (about 25 minutes), patience during the cooling process is what sets a great cake apart from a good one. Many recipes rush this, but allowing a full 2+ hours for the cake to cool upside down in the pan is crucial for setting its lofty structure. Compared to the average recipe that might skimp on cooling, this extended time guarantees your cake won’t shrink or collapse, preserving every precious air bubble you worked so hard to create.
A perfectly baked Angel Food Cake should have a golden-brown crust and a springy, uniform texture.
Step-by-Step Instructions
Step 1: Prepare Your Tools and Ingredients
Success starts with a clean slate. Ensure your mixing bowl and beaters (or whisk attachment) are impeccably clean, dry, and free of any grease. Even a tiny amount of fat can prevent the egg whites from whipping properly. Sift your cake flour and ¾ cup (150g) of the sugar together onto a piece of parchment paper. Do this three times. This aerates the flour and ensures the two are perfectly combined, which is vital for easy folding later. Separate your eggs carefully—it’s easiest to do this when they are cold, but then let the whites sit out for 30 minutes to come to room temperature. Do NOT grease your 10-inch tube pan. The cake needs to cling to the sides to rise properly.
Step 2: Whip the Egg Whites to Perfection
In your spotless mixing bowl, combine the room-temperature egg whites, cream of tartar, and salt. Using a stand mixer or hand mixer fitted with the whisk attachment, start beating on medium-low speed until the mixture becomes frothy and tiny bubbles cover the surface. This takes about 1-2 minutes. Now, with the mixer running, begin adding the remaining ¾ cup (150g) of sugar, one tablespoon at a time. This slow incorporation is key for building a stable, glossy meringue. Once all the sugar is added, increase the speed to medium-high and whip until you reach stiff, glossy peaks. This means when you lift the whisk, the peak stands straight up and doesn’t curl over. Halfway through whipping, add the vanilla and almond extracts. The meringue should look smooth and satiny, not grainy or clumpy.
Step 3: Fold in the Dry Ingredients
Now for the most delicate part: incorporating the flour without deflating the meringue. Sprinkle about one-quarter of the sifted flour-sugar mixture over the surface of the meringue. Using a large, flexible rubber spatula, gently fold it in with a motion that goes down the center, across the bottom, and up the side of the bowl, rotating the bowl as you go. Be patient and gentle. Repeat with the remaining flour in three more additions, folding just until no white streaks remain. Overmixing is the enemy here. The batter will still be light and fluffy.
Step 4: Bake and Cool Properly
Gently spoon the batter into your ungreased tube pan. Use a spatula to smooth the top, but do not tap or bang the pan on the counter. Immediately place it in the center of a preheated 350°F (175°C) oven. Bake for 35-40 minutes. The cake is done when the top is golden brown, feels dry and springy to the touch, and a long skewer inserted comes out clean. Here’s the critical step: As soon as the cake comes out of the oven, invert the pan. If your pan has little “feet,” rest it on those. If not, carefully hang the center tube over the neck of a glass bottle or a funnel. Let the cake cool completely upside down for a minimum of 2 hours. This allows gravity to work for you, stretching the cake’s structure as it sets and preventing collapse.
Nutritional Information
The following estimates are for 1 of 12 slices. Actual values may vary based on specific ingredients and serving size.
Healthier Alternatives
While already a lower-fat option, you can tweak this Angel Food Cake recipe for specific dietary needs without sacrificing its soul.
- Reduced Sugar: You can cautiously reduce the total sugar to 1 ¼ cups (250g). The cake will be slightly less tender and the meringue slightly less stable, but it will still work. Do not substitute with liquid sweeteners like honey, as they will weigh down the batter.
- Whole-Grain Option: For added fiber, substitute up to half of the cake flour with finely ground whole wheat pastry flour. The texture will be slightly more substantial but still pleasant.
- Flavor Infusions: Boost flavor without calories by adding 1 teaspoon of grated citrus zest (lemon or orange) or 2 teaspoons of instant espresso powder sifted with the flour for a mocha hint.
- Serving Swap: Instead of whipped cream, top with a vibrant, unsweetened berry compote or a dollop of thick Greek yogurt sweetened with a touch of vanilla.
Serving Suggestions
The beauty of Angel Food Cake is its versatility. Its mild sweetness is the perfect canvas for a variety of toppings and presentations.
- Classic Elegance: Serve a simple slice with a cloud of freshly whipped cream and a pile of mixed berries (strawberries, raspberries, blueberries). A light dusting of powdered sugar adds a snowy finish.
- Summer Splendor: Pair with macerated peaches or nectarines and a scoop of vanilla bean ice cream for a stunning shortcake-style dessert.
- Chocolate Indulgence: Drizzle slices with a warm chocolate ganache or a rich berry sauce for a more decadent feel.
- Breakfast or Brunch: Toast a slice lightly and serve with fresh fruit and a drizzle of honey for a surprisingly delightful morning treat.
Common Mistakes
- Greasing the Pan: This is the #1 error. The cake needs to climb the sides of the pan. Grease will cause it to slide down and result in a dense, short cake.
- Under-whipped or Over-whipped Meringue: Soft peaks won’t provide enough structure; over-whipped, grainy meringue will be impossible to fold smoothly. Aim for stiff, glossy peaks.
- Using Cold Egg Whites: They simply will not achieve the same volume as room temperature ones.
- Not Cooling Upside Down: Skipping this step or cutting the cake out while warm guarantees a collapsed, gummy interior.
- Vigorous Mixing/Folding: Treat the batter with a gentle hand. Stirring or beating deflates the air bubbles.
Storing Tips
Proper storage keeps your Angel Food Cake tasting fresh and light.
- Room Temperature: Once completely cooled, store the whole cake (or slices) in an airtight cake carrier or wrapped tightly in plastic wrap at room temperature for up to 2 days.
- Refrigeration: For longer storage (up to 5 days), refrigerate in an airtight container. Let slices come to room temperature for 30 minutes before serving for the best texture.
- Freezing: Angel Food Cake freezes beautifully. Wrap the whole cake or individual slices tightly in plastic wrap, then in aluminum foil or a freezer bag. Freeze for up to 2 months. Thaw, still wrapped, at room temperature for a few hours.
- Pro Tip: Never store the cake with a moist topping (like berries or cream) if you plan to keep it for more than a few hours, as it will make the cake soggy. Add toppings just before serving.