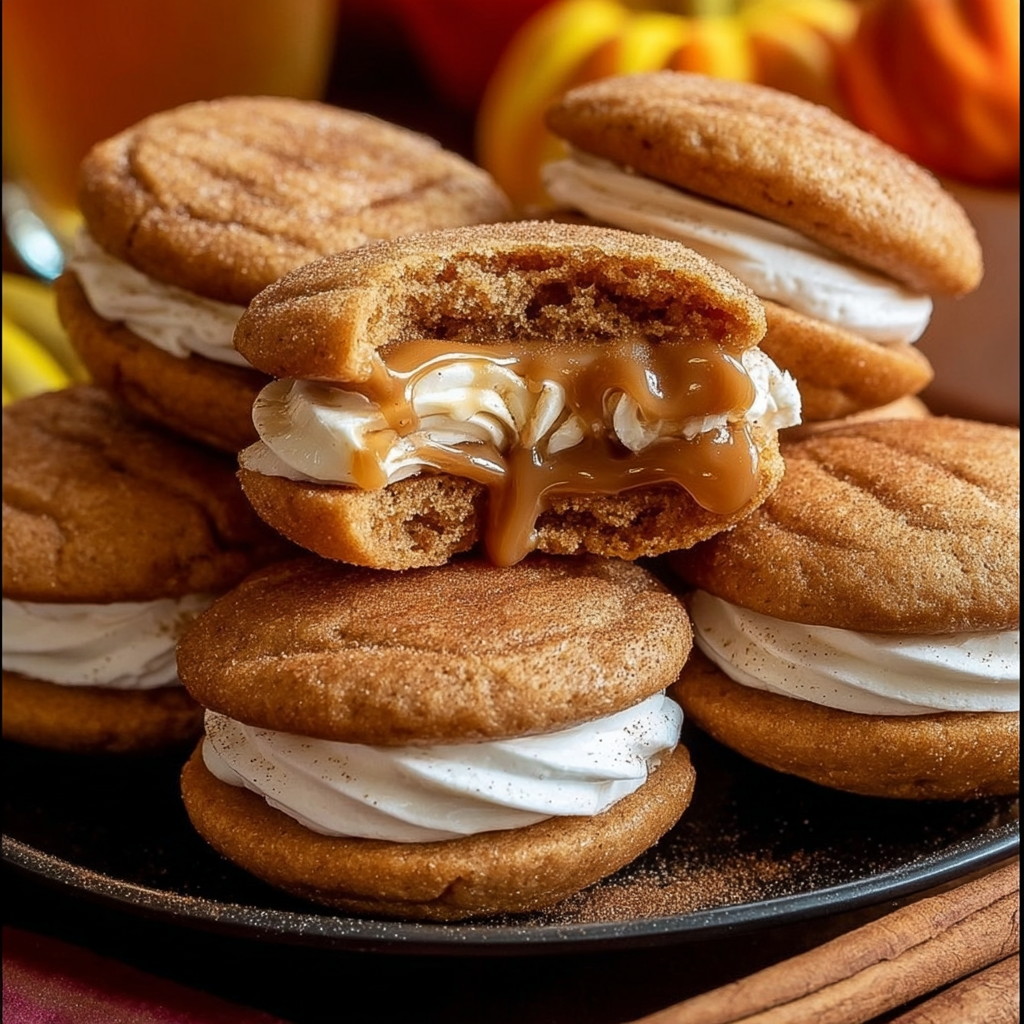
Soft Spiced Apple Cider Whoopie Pies
Apple Cider Whoopie Pies Recipe: Soft Spiced Cookies with Creamy Filling
Are you tired of the same old desserts during fall? Imagine biting into a soft, spiced cookie that’s bursting with apple cider flavor, perfectly complemented by a creamy filling that melts in your mouth. These apple cider whoopie pies are the ultimate fall treat, blending warm spices like cinnamon and nutmeg with the tangy sweetness of apple cider. At Emma’s Cake Studio, we’ve perfected this whoopie pies recipe to bring you not just a dessert, but a cozy reminder of autumn gatherings. Whether you’re hosting friends or enjoying a quiet evening, this fall dessert recipe delivers comfort and indulgence. The unique angle here is their creamy cream cheese filling, which contrasts beautifully with the spiced cookies, making them irresistibly moist and full of flavor.
Visually, picture golden-brown cookies that have a slight crunch on the edges but remain soft and pillowy inside, infused with the subtle tartness of reduced apple cider. The aroma of baking spices – cinnamon, nutmeg, and a hint of cloves – fills your kitchen, evoking crisp autumn leaves and apple orchards. When you take a bite, the creamy filling oozes out, offering a smooth, tangy contrast to the spiced cookie’s warmth. It’s not just a dessert; it’s a sensory experience, with each whoopie pie layer revealing hints of vanilla and buttery sweetness. Fall flavors come alive here, where the apple cider adds a natural juiciness without overpowering the balance of spiced cookies.
What sets our version apart is the deeply infused apple cider reduction, which concentrates the cider into a pudding-like batter for ultimate tenderness. Backed by Chef Sally’s expertise, this whoopie pies recipe has been tested for reliability, ensuring every batch is successful even for novice bakers. In this post, you’ll learn step-by-step techniques to avoid common pitfalls like dry cookies or runny batter. Plus, we’ll explore substitutions, storage tips, and ways to elevate these spiced cookies into show-stoppers. Get ready to master this caramel-filled (or should we say creamy-filled?) treat that outshines basic fall desserts – because whoopie pies don’t have to be ordinary.
Why This Apple Cider Whoopie Pies Recipe is the Best
Our whoopie pies recipe stands out with its creamy cream cheese filling, made extra luxurious by beating in vanilla and powdered sugar until silky smooth. This unique angle prevents the filling from being too dense, creating a melt-in-your-mouth sensation that pairs perfectly with the cookies.
The secret to the perfected texture lies in the apple cider infusion, where the cider is incorporated slowly to keep the dough moist without excess liquid. We use a mix of baking soda and powder for lightness, ensuring each spiced cookie bakes to a soft, cake-like interior with lightly golden edges.
What makes this method foolproof is the clear instructions, from prepping dry ingredients to alternating additions of cider. Even beginners can succeed, as we’ve simplified the process to avoid overmixing, guaranteeing consistent results every time.
Ingredient Spotlight: Key to Creamy, Spiced Perfection
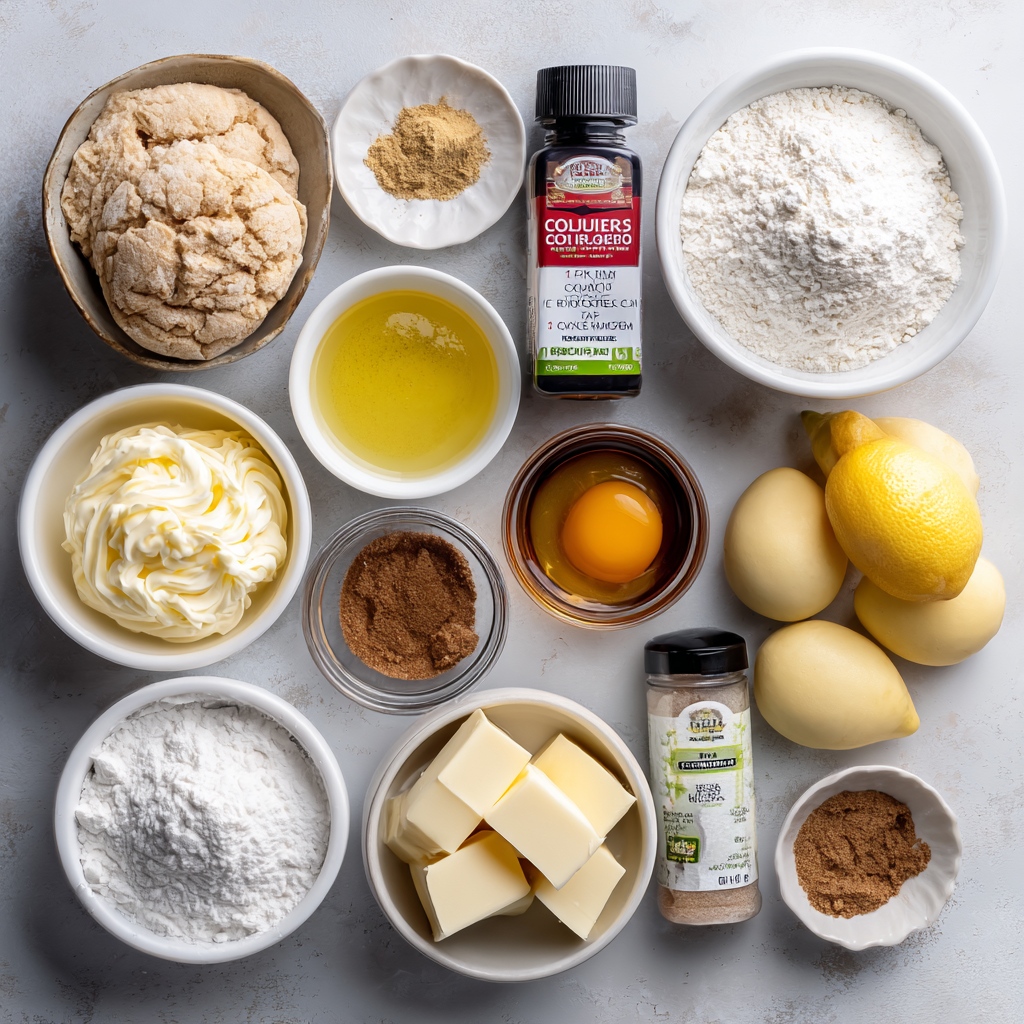
All-purpose flour provides the base structure for these cookies, ensuring they hold shape during baking. Opt for unbleached flour for a richer flavor, and substitute with whole wheat flour if you prefer a nuttier twist, though it may make the spiced cookies denser.
Baking soda and baking powder create the airy lift, reacting with the apple cider to produce soft whoopie pies. Ensure they’re fresh to avoid flat cookies; double-check expiration dates.
Ground cinnamon, nutmeg, cloves, and salt are the spiced heart of this recipe, infusing each bite with fall warmth. Use freshly ground spices for maximum aroma, or experiment by adding allspice as a substitution for a deeper spice profile.
Unsalted butter, softened, brings richness and creamed texture to the dough. Always use butter at room temperature to avoid lumps; margarine can work in a pinch but may alter the fall dessert’s authenticity.
Granulated sugar sweetens the cookies, caramelizing slightly in the oven for a hint of toasty flavor. For a less sweet option, substitute half with brown sugar to enhance the spiced cookies’ molasses notes.
A large egg binds everything together, adding moisture and binding power. Choose organic eggs for the best results; for a vegan twist, use flax eggs.
Vanilla extract enhances the apple cider’s flavor, bridging the cookies and filling. Use pure extract over imitation for superior taste – it’s worth the extra cost.
Apple cider is the star, reducing acidity and adding natural sweetness to create moist fall dessert recipes. Select fresh, unfiltered cider for the purest taste; apple juice can substitute if cider is unavailable.
For the filling, cream cheese offers tanginess and creaminess, making it smoother than buttercream alone. Soft it fully to prevent lumps; Greek yogurt can replace some for a lighter version.
Powdered sugar dissolves easily in the filling, resulting in a luscious, pipeable consistency. Sift it to avoid grit; substitute with a powdered sugar alternative for dietary needs.
Step-by-Step Instructions for Apple Cider Whoopie Pies (with Pro Tips)
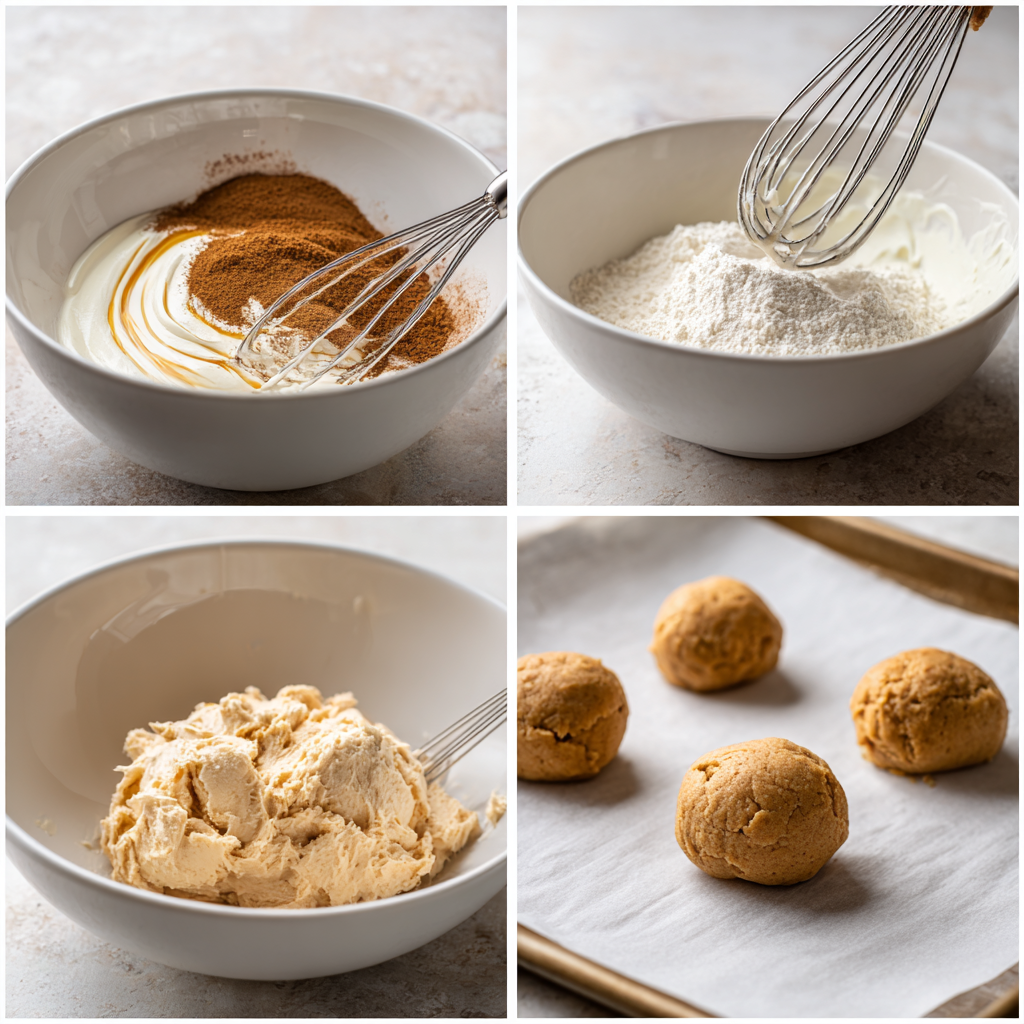
Step 1: Preparing the Spiced Dry Ingredients
Preheat oven to 350°F (175°C) and line baking sheets with parchment paper. In a medium bowl, whisk together flour, baking soda, baking powder, cinnamon, nutmeg, cloves, and salt.
Pro Tip: Whisk vigorously for 30 seconds to evenly distribute the baking agents, ensuring your spiced cookies rise uniformly.
Step 2: Creaming the Butter and Sugar
In a large bowl, beat butter and sugar until light and fluffy. Add the egg and vanilla, beating well to incorporate.
Common Mistake to Avoid: Don’t rush the creaming process – under-beaten butter can lead to dense whoopie pies; aim for pale and airy.
Step 3: Alternating Wet and Dry Ingredients
Reduce speed to low and add dry ingredients alternately with apple cider, starting and ending with dry ingredients. Mix until just combined.
Pro Tip: Alternate in three additions to prevent curdling and maintain the dough’s integrity for moist spiced cookies.
Step 4: Scooping the Dough
Drop rounded tablespoons of dough onto prepared baking sheets, spacing 2 inches apart.
Common Mistake to Avoid: Overcrowding leads to uneven baking; space evenly to allow air circulation.
Step 5: Baking the Cookies
Bake for 10-12 minutes or until edges are lightly golden. Cool on baking sheet for 5 minutes before transferring to a wire rack to cool completely.
Pro Tip: A toothpick inserted should come out with a few moist crumbs for the soft texture in fall dessert recipes.
Step 6: Mixing the Creamy Filling
For the filling, beat cream cheese and butter until smooth. Gradually add powdered sugar and vanilla, beating until creamy.
Pro Tip: Beat on high speed for 2-3 minutes to incorporate air, making the filling fluffy and easier to pipe.
Step 7: Assembling the Whoopie Pies
Spread or pipe filling onto the flat side of one cookie, then top with another to form sandwiches.
Common Mistake to Avoid: Don’t overfill, as it can make the apple cider whoopie pies messy; aim for 1-2 tablespoons per sandwich.
Step 8: Storing for Later
Store in an airtight container in the refrigerator for up to 3 days.
Pro Tip: Bring to room temperature before serving to enhance the creamy filling’s texture.
Serving & Presentation Guide
Serve these apple cider whoopie pies at room temperature for the best flavor and texture, where the spiced cookies soften slightly and the filling remains velvety. Plate them on a rustic wooden board to evoke fall vibes, perhaps dusted with cinnamon sugar for an extra touch of warmth. For presentation, top each with a drizzle of caramel sauce to nod to “caramel filled whoopie pies” inspiration, or sprinkle chopped pecans for added crunch. Pair with warm apple cider or pumpkin spice coffee to amplify the autumn theme – the tart-sweet components harmonize beautifully with these fall dessert recipes. As a dessert course, they complement pumpkin pie or candied yams for holiday spreads.
Make-Ahead & Storage
Make-Ahead Strategy: Prepare the dough up to 24 hours ahead and refrigerate; bake fresh for optimal softness. The filling can be made a day early and chilled, then whipped again before assembly.
Storing Leftovers: Refrigerate in an airtight container for up to 3 days, or freeze assembled whoopie pies for up to 2 months. Thaw overnight in the fridge and let sit at room temp for 30 minutes to restore texture.
Frequently Asked Questions (FAQ)
How do you make whoopie pies from scratch? To make whoopie pies from scratch, follow this apple cider whoopie pies recipe by prepping dry ingredients, creaming butter and sugar, alternating in apple cider, scooping dough, baking, and assembling with a creamy filling.
What are good fillings for whoopie pies? Beyond cream cheese, try buttercream, whipped cream, or even peanut butter for variety in your spiced cookies.
How long do whoopie pies last? These apple cider whoopie pies last up to 3 days refrigerated or 2 months frozen, making them perfect for fall dessert recipes.
What spices go in whoopie pies? Typical spices include cinnamon, nutmeg, and cloves as in this recipe, but you can add ginger or allspice for extra fall flair.
Can whoopie pies be made gluten-free? Yes, substitute all-purpose flour with a 1:1 gluten-free blend to adapt these whoopie pies recipe for dietary needs.
We Want Your Feedback!
Did you make this recipe? I’d love to see it! Share a photo on Pinterest and tag me at @sallysbakerecipes so I can see your creation. If you have tips or variations, please leave a comment below!
Do not forget to Leave a Comment!
PrintApple Cider Whoopie Pies – Soft Spiced Cookies With Creamy Filling For Fall

Indulge in the cozy flavors of fall with these soft, spiced Apple Cider Whoopie Pies. Featuring tender cookies infused with apple cider and warm spices, sandwiched with a creamy filling, perfect for autumn gatherings at Emma’s Cake Studio.
- Prep Time: 20 minutes
- Cook Time: 12 minutes
- Total Time: 32 minutes
- Yield: 18-20 pies 1x
- Method: Dessert
- Cuisine: American
Ingredients
- For the Cookies:
- 2 1/2 cups all-purpose flour
- 1 teaspoon baking soda
- 1/2 teaspoon baking powder
- 1 teaspoon ground cinnamon
- 1/2 teaspoon ground nutmeg
- 1/4 teaspoon ground cloves
- 1/4 teaspoon salt
- 1/2 cup unsalted butter, softened
- 1 cup granulated sugar
- 1 large egg
- 1 teaspoon vanilla extract
- 1 cup apple cider
- For the Filling:
- 8 oz cream cheese, softened
- 1/4 cup unsalted butter, softened
- 2 cups powdered sugar
- 1 teaspoon vanilla extract
Instructions
- Preheat oven to 350°F (175°C). Line baking sheets with parchment paper.
- In a medium bowl, whisk together flour, baking soda, baking powder, cinnamon, nutmeg, cloves, and salt.
- In a large bowl, beat butter and sugar until light and fluffy. Add egg and vanilla, beating well.
- Reduce speed to low and add dry ingredients alternately with apple cider, starting and ending with dry ingredients. Mix until just combined.
- Drop rounded tablespoons of dough onto prepared baking sheets, spacing 2 inches apart.
- Bake for 10-12 minutes or until edges are lightly golden. Cool on baking sheet for 5 minutes before transferring to a wire rack to cool completely.
- For the filling, beat cream cheese and butter until smooth. Gradually add powdered sugar and vanilla, beating until creamy.
- Spread or pipe filling onto the flat side of one cookie, then top with another cookie to form sandwiches.
- Store in an airtight container in the refrigerator.
Notes
These whoopie pies can be made ahead and stored in the fridge for up to 3 days. For extra flavor, reduce the apple cider to 3/4 cup if desired. Yield: About 18-20 whoopie pies.
Nutrition
- Calories: 250 kcal
- Sugar: 20g
- Fat: 12g
- Carbohydrates: 35g
- Protein: 3g