Bunny Pizza Recipe
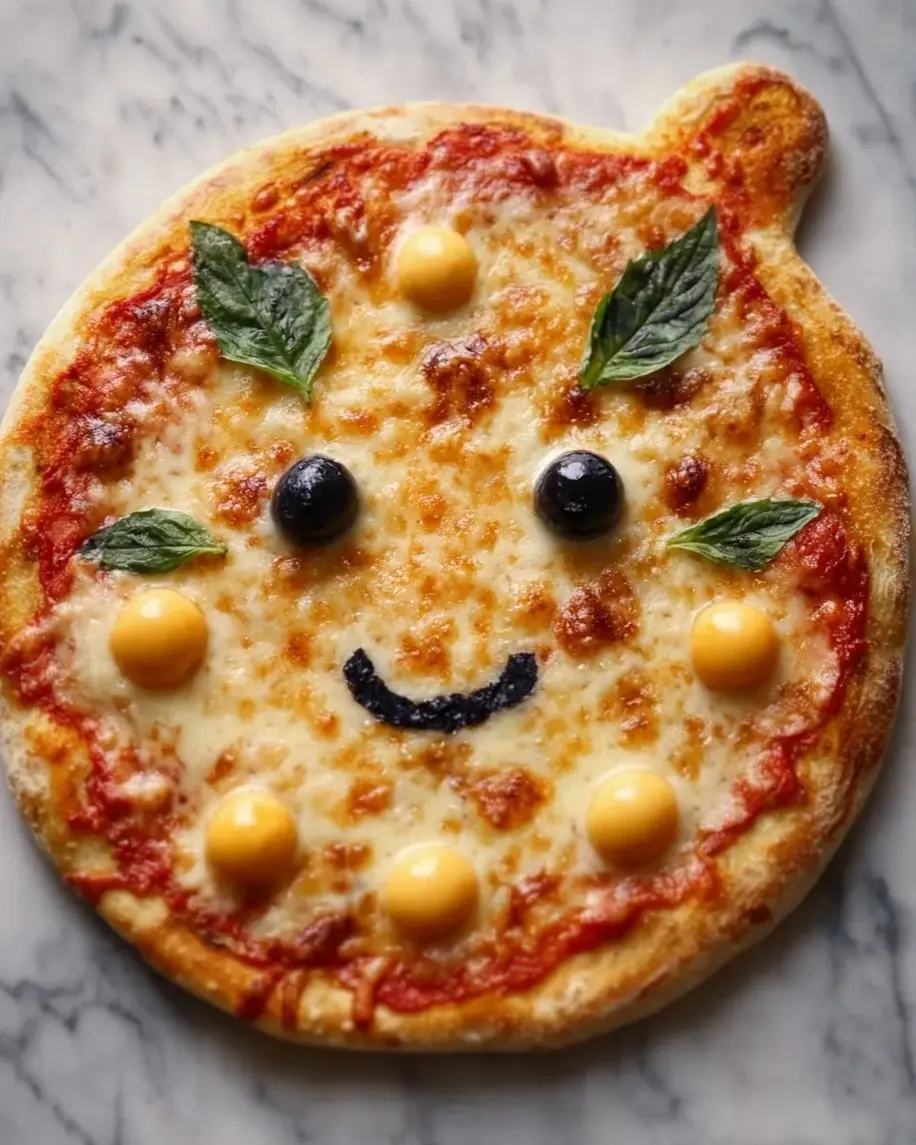
Table of Contents
Bunny Pizza Recipe
Introduction
Did you know that over 70% of parents report their kids are more likely to eat vegetables when they’re presented in a fun, creative way? This delightful Bunny Pizza recipe is the perfect solution for a playful meal that bridges the gap between whimsy and nutrition. More than just food, this adorable pizza is an edible craft project, featuring a bunny-shaped dough base topped with classic pizza sauce, gooey melted mozzarella, and a colorful vegetable mosaic that forms the bunny’s cheerful face. Ready in just 30 minutes, this recipe is a guaranteed crowd-pleaser for family dinners, kids’ parties, or even a lighthearted Easter celebration. It transforms the simple act of eating into a memorable experience, proving that healthy ingredients can be incredibly fun.
Ingredients List
Gather these simple ingredients to create your edible masterpiece. Each component plays a role in flavor, texture, and the final adorable presentation.
- For the Pizza Base:
- 1 lb pre-made pizza dough (store-bought or homemade) – Look for a soft, pliable dough that’s easy to shape. The slightly sweet, yeasty aroma is key.
- 1 tbsp olive oil – For a golden, crisp crust with a subtle fruity note.
- All-purpose flour for dusting – Prevents sticking and makes handling a breeze.
- For the Toppings:
- 1/2 cup classic pizza sauce – A vibrant, tangy base with hints of oregano and garlic.
- 1 1/2 cups shredded mozzarella cheese – For that iconic, creamy, stretchy melt. (Substitute with a blend of provolone and cheddar for a sharper flavor).
- 2-3 black olives – Sliced for the bunny’s eyes and nose, offering a briny, savory pop.
- 1 small red bell pepper – Thinly sliced into strips for the mouth and inner ears, adding a sweet crunch.
- 2-3 cherry tomatoes – Halved for the rosy cheeks, bursting with juicy, sweet-tart flavor.
- 2-3 chives or green onion stalks – For the delicate whiskers, providing a mild oniony freshness.
- Optional for Ears: Extra dough scraps or thin strips of mozzarella cheese for the inner ear details.
Timing
15 minutes
12-15 minutes
30 minutes
At just 30 minutes from start to finish, this Bunny Pizza is significantly faster than the average homemade pizza recipe, which often requires over an hour for dough rising alone. By using a quality pre-made dough, we eliminate the longest step, making this a perfect weeknight-friendly or last-minute fun meal. The active hands-on time is mostly creative decoration, which can be a joyful activity shared with little helpers.
Our adorable Bunny Pizza, ready to hop onto your dinner table!
Step-by-Step Instructions
Step 1: Prepare the Dough and Shape
Preheat your oven to 475°F (245°C). This high heat is crucial for a perfectly crisp crust. On a lightly floured surface, roll or stretch your pizza dough into a large oval shape, about 12-14 inches long. This will be the bunny’s face. Now, using kitchen scissors or a sharp knife, carefully cut two long, tapered ears from the top third of the oval. You can reattach these ear pieces slightly above the head with a dab of water to make them stand up, or simply leave them as part of the main dough shape. Transfer your bunny-shaped dough onto a parchment-lined baking sheet. Brush the entire surface lightly with olive oil. This simple step creates a barrier that keeps the crust from getting soggy and promotes a beautiful golden-brown color.
Step 2: Add Sauce and Cheese
Using the back of a spoon, spread the pizza sauce evenly over the dough, leaving a small border around the edges for the crust. Be generous but not excessive; you want a flavorful base without making the dough soggy. Next, sprinkle the shredded mozzarella cheese evenly over the sauce, covering the entire bunny shape. The cheese acts as the “canvas” for the bunny’s face, so try to create an even layer for consistent melting. If you’re using cheese strips for the inner ears, place them now.
Step 3: Create the Bunny Face
This is where the magic happens! Let’s decorate:
- Eyes & Nose: Place two small, round slices of black olive for the eyes. Add a tiny triangle or heart-shaped olive piece just below and between the eyes for the nose.
- Mouth: Use thin strips of red bell pepper to create a gentle, smiling mouth.
- Whiskers: Carefully place three chive or green onion pieces on each side of the nose, fanning them out.
- Cheeks: Press two halved cherry tomatoes, cut-side down, onto the cheeks for a rosy, plump effect.
- Inner Ears: If you haven’t used cheese, fill the ear shapes with thin strips of red bell pepper.
Take a step back and admire your edible artwork before it goes into the oven!
Step 4: Bake to Perfection
Carefully place the baking sheet in the preheated oven. Bake for 12-15 minutes, or until the crust is puffed and golden brown, and the cheese is completely melted, bubbly, and has a few golden spots. Keep a close eye during the last few minutes to prevent burning. The high heat will cook the pizza quickly, ensuring the vegetables stay vibrant and slightly crisp-tender. Once baked, remove from the oven and let it cool on the pan for 2-3 minutes. This allows the cheese to set slightly, making slicing easier.
Nutritional Information
The following estimates are for one serving (1/4 of the entire pizza), using standard ingredients.
- Calories: ~320 kcal
- Total Fat: 12g
- Saturated Fat: 5g
- Carbohydrates: 38g
- Fiber: 3g
- Sugars: 4g
- Protein: 14g
- Sodium: ~680mg
Healthier Alternatives
You can easily adapt this recipe to fit various dietary needs without sacrificing fun or flavor:
- Whole-Wheat or Cauliflower Crust: Swap the standard dough for a whole-wheat or pre-made cauliflower crust to significantly increase fiber and reduce refined carbs.
- Low-Fat Cheese or Vegan Cheese: Use part-skim mozzarella or a plant-based alternative to lower saturated fat content.
- No-Salt-Added Sauce: Opt for a pizza sauce labeled “no salt added” to better control sodium levels.
- Veggie Power-Up: Add more nutrients by scattering finely chopped spinach, broccoli florets, or mushrooms under the cheese layer before decorating the face.
- Lean Protein Boost: Add a sprinkle of cooked, diced chicken breast or turkey pepperoni for extra protein.
Serving Suggestions
This Bunny Pizza is a complete meal on its own, but it pairs wonderfully with a few simple sides to create a festive spread:
- “Carrot Patch” Salad: Serve with a fresh green salad topped with shredded carrots and a light lemon vinaigrette.
- Veggie Sticks with “Rabbit Dip”: Offer a platter of cucumber, celery, and bell pepper sticks with a side of ranch or hummus for dipping.
- Fruit “Bunny Tails”: For dessert, serve small bowls of fluffy cottage cheese or yogurt with a side of fresh blueberries or grapes.
- Cut the pizza with a sharp pizza cutter or kitchen shears. For maximum effect, present the whole bunny on a large board or platter before slicing into wedges.
Common Mistakes
- Soggy Crust: This happens from too much sauce or wet toppings. Always brush the dough with oil first and spread sauce thinly.
- Burnt Vegetables: Delicate veggies like chives or cherry tomatoes can burn. Ensure they are placed on top of the cheese, not embedded, and monitor baking time closely.
- Dough Tearing: If the dough is too cold, it will resist stretching. Let it sit at room temperature for 20-30 minutes before shaping.
- Overcomplicated Decorations: Keep the facial features simple and chunky. Tiny, intricate pieces are harder to place and may disappear during baking.
- Not Preheating the Oven: A fully preheated, very hot oven is non-negotiable for the perfect pizza texture. Don’t skip this step.
Storing Tips
This pizza is best enjoyed fresh, but leftovers can be saved:
- Refrigeration: Cool completely, then store in an airtight container in the refrigerator for up to 3 days.
- Freezing: Freeze fully baked and cooled slices on a parchment-lined tray before transferring to a freezer bag. Reheat directly from frozen for best texture.
- Reheating: To revive the crisp crust, reheat slices in a toaster oven, air fryer, or conventional oven at 375°F for 5-8 minutes. Avoid the microwave, as it will make the crust rubbery.
Conclusion
This Bunny Pizza recipe is more than just a meal; it’s a joyful kitchen adventure that combines creativity with delicious, approachable ingredients. In just 30 minutes, you can create a whimsical centerpiece that encourages everyone, especially kids, to enjoy their veggies and have fun with food. The process is simple, the results are adorable, and the taste is classic pizza perfection. We hope this recipe brings a smile to your table and becomes a new family favorite.
Did you make this adorable Bunny Pizza