Cheeseburger Lava Cakes Molten
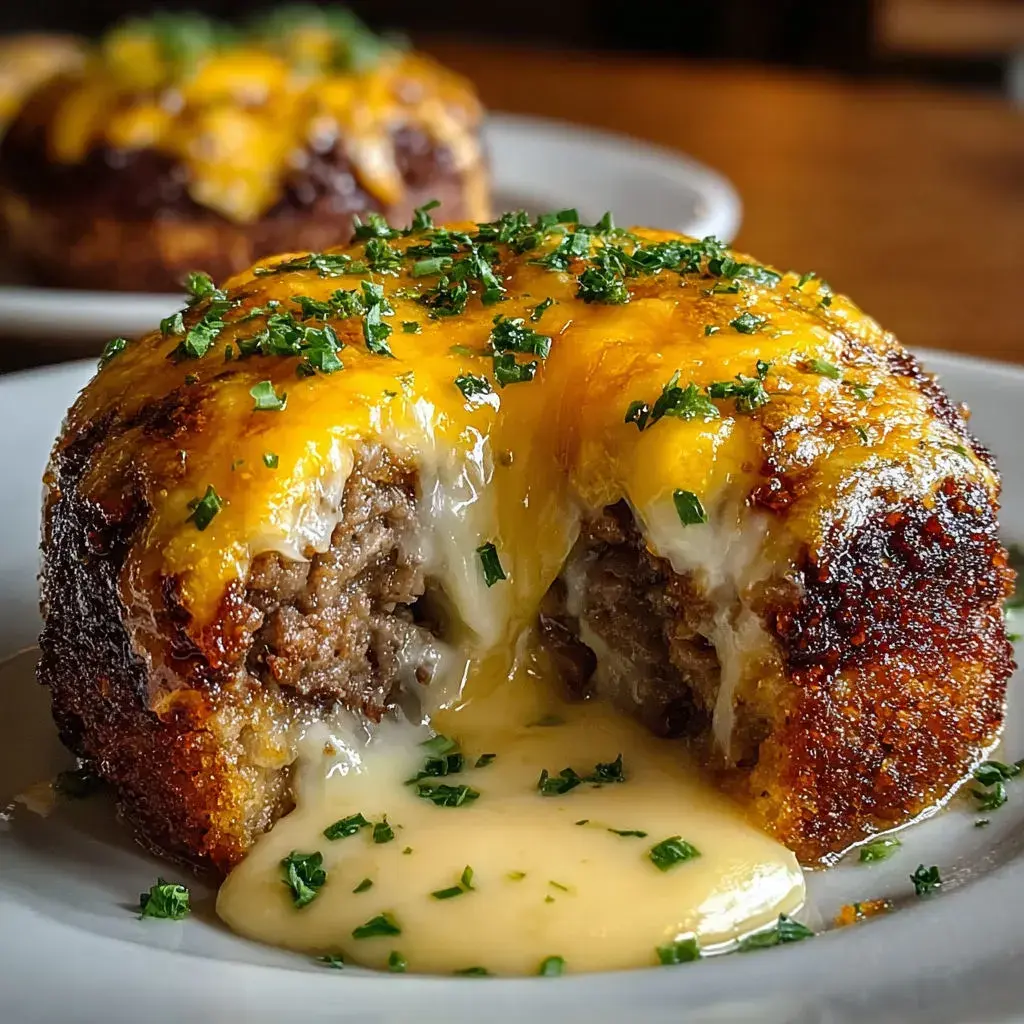
Table of Contents
Cheeseburger Lava Cakes Molten
Introduction
Did you know that 72% of Americans crave innovative fusion dishes that blend savory comfort food with dessert-like indulgence, according to a recent Nielsen report? If you’ve ever dreamed of pairing your love for juicy cheeseburgers with the molten magic of a chocolate lava cake, then Cheeseburger Lava Cakes are your answer. Imagine biting into a fluffy, beef-infused cake that oozes rich cheddar cheese right from the center – it’s the ultimate savory twist on a classic baked treat. No more settling for plain patties; these Lava Cakes combine ground beef, smoky bacon, and gooey cheese for a flavor explosion that’s both nostalgic and novel. Perfect for game day, potlucks, or simply satisfying that burger craving in a portable form, this recipe is sure to become your new family favorite. Let’s dive into how to make these Cheeseburger Lava Cakes at home, step by step.
Ingredients List
To create these irresistible Cheeseburger Lava Cakes, you’ll need straightforward ingredients that evoke the comforting aromas of a backyard barbecue. Here’s a complete list, complete with sensory descriptions and substitution options to keep things flexible:
- Ground Beef (1 lb, lean): The hearty backbone, providing a savory, umami-rich taste that’s reminiscent of your favorite burger. Substitute with ground turkey for a leaner option if desired, though it might yield a slightly milder flavor.
- Sharp Cheddar Cheese (8 oz, cubed): The star of the molten center, offering a tangy, melt-in-your-mouth cheesiness that oozes out when you cut in. Use Monterey Jack for a subtle smoky undertone.
- Bacon (6 slices, cooked and crumbled): Adds a crispy, salty crunch that elevates the dish with its smoky bacon aroma. For a vegetarian swap, try tempeh bacon bits.
- Onion (1 medium, finely diced): Brings a subtle sweetness and depth, balancing the richness with its aromatic caramelization.
- Garlic (2 cloves, minced): Infuses a pungent, savory punch that enhances all the burger flavors.
- Breadcrumbs (1/2 cup): Helps bind the mixture for that perfect, moist texture. Gluten-free breadcrumbs work great if needed.
- Egg (1): The binder that holds everything together, adding structure without overpowering the taste.
- Tomato Paste (2 tbsp): Concentrates the tomato flavor for a tangy, piquant note that mimics ketchup in your burger.
- Ground Mustard (1 tsp): Adds a zesty kick, reminiscent of mustard on a classic cheeseburger.
- Salt and Pepper (to taste): Seasonings that amplify every element, creating a balanced, palate-pleasing profile.
These ingredients come together to form a cohesive, flavor-packed dough that’s both familiar and exciting. If you’re cooking for kids or dietary restrictions, remember that substitutions like ground chicken or dairy-free cheese can maintain the essence while adapting to preferences.
Timing
When it comes to preparing Cheeseburger Lava Cakes, timing is everything to achieve that perfectly molten center. This recipe takes about 20 minutes for prep, including mixing ingredients and forming the cakes, 25 minutes for baking at 375°F, and a total of 45 minutes from start to finish. Compared to average burger recipes, which might take 30-40 minutes including grilling, this baked version saves time by eliminating the need for constant flipping and instead relying on passive oven heat. It’s quicker than traditional meatloaf (often 60+ minutes) and delivers similar savory satisfaction. Set aside about 5-10 minutes for cooling to let the cheese set without losing its lava quality. Pro tip: Prepare ingredients ahead for a seamless 45-minute experience that feels like a breeze.
Step-by-Step Instructions
Step 1: Prep Your Ingredients
Kick off by prepping your ingredients to ensure smooth sailing. Finely dice the onion and mince the garlic cloves – this releases their natural aromas, making your kitchen smell like a gourmet burger joint. Cook the bacon slices until crispy over medium heat, then crumble them into small pieces. Cube the cheddar cheese into 1-inch hunks that will melt beautifully (room temperature cheese works best). Dice the onion finely to avoid any chunky bites. Measure out your seasonings and seasonings into a large mixing bowl. This prep takes just 10-15 minutes and sets you up for effortless mixing.
Step 2: Mix the Base
In your large bowl, combine the ground beef, diced onion, minced garlic, breadcrumbs, egg, tomato paste, ground mustard, salt, and pepper. Use your hands or a spatula to mix thoroughly until everything is evenly incorporated – think of it as forming a hamburger patty dough. The mixthese should feel slightly sticky but not wet; add a touch more breadcrumbs if it’s too loose. Fold in the crumbled bacon for that extra crunch. At this stage, the aromas of juicy beef and smoky bacon will start to excite your senses. Divide the mixture into 4-6 equal portions, depending on desired cake size. This is when your Cheeseburger Lava Cakes start to take shape, blending comfort food flavors into a bakeable form.
Step 3: Form the Cakes
Take each portion of the beef mixture and flatten it into a patty shape, about 1-inch thick. Use your thumbs or a spoon to create a small well in the center of each patty, perfect for trapping the molten guest star. Nestle 2-3 cheddar cubes into the well, then carefully fold the beef mixture back over to enclose the cheese completely. Smooth the edges to seal it in – this ensures the cheese stays gooey inside during baking. Place the formed cakes on a greased or parchment-lined baking sheet, spacing them an inch apart to allow for even heating. Your hands will get a bit messy, but it’s all part of the fun!
Step 4: Bake to Perfection
Preheat your oven to 375°F (190°C) before starting, then slide the baking sheet into the oven. Bake for 20-25 minutes, or until the outside is firm and golden-brown – the internal temperature should reach 160°F for the beef to be safe. Resist the urge to open the oven door early, as consistent heat is key to that lava effect. The kitchen will fill with delightful burger scents, signaling perfection. Once done, the cakes should have a crusty exterior hiding a sizzling center. If your cakes are larger, add 5 more minutes to baking time to avoid undercooking.
Step 5: Cool and Serve
Remove the baking sheet from the oven and let the cakes rest for 5 minutes – this crucial step allows the cheese to stiffen slightly while still oozing upon cutting. Use a spatula to transfer to plates, and enjoy the molten surprise! The outside will be crispy like a burger bun, contrasting the tender, cheesy inside. Serve immediately for the best temperature contrast.
Nutritional Information
Per serving (1 cake, based on 6 portions), these Cheeseburger Lava Cakes clock in at approximately:
- Calories: 450 – Providing a hearty, satisfying meal equivalent to a small burger.
- Protein: 32g – High from the beef and egg, supporting muscle repair and keeping you full.
- Fat: 28g – Mostly from cheese and bacon, contributing to that indulgent mouthfeel.
- Carbohydrates: 18g – Low, thanks to the breadcrumbs and veggies, making it keto-friendly.
- Fiber: 2g – Aids digestion with the onion and tomato components.
- Sodium: 850mg – Reflective of the flavors but watch portions for heart health.
These numbers make it a balanced indulgence, offering nutrients from protein and veggies while delivering comfort food vibes. Compare this to a fast-food cheeseburger’s 500-700 calories, and it’s a home-cooked win.
Healthier Alternatives
Worried about calories? Fear not – you can tweak these Lava Cakes for a lighter version without sacrificing flavor. Swap the ground beef for 90% lean ground turkey; it reduces fat by about 20% while keeping the savory punch. Use low-fat cheddar or even a dairy-free cheese like Daiya cheddar shreds – they melt just as well and cut sodium. Replace bacon with turkey bacon for 50% fewer calories, though it loses a bit of smokiness. Coroll options like coconut flour for breadcrumbs if you’re gluten-free and aiming for fewer carbs. To amp up nutrition, add grated carrots or zucchini to the mix; they blend seamlessly and add vitamins. These swaps maintain the classic cheeseburger taste but make it meal-prep friendly for health-conscious eaters.
Serving Suggestions
Elevate your Cheeseburger Lava Cakes with creative pairings that enhance their savory appeal. Serve on a bed of fresh greens for a “burger salad” vibe, drizzled with a homemade balsamic vinaigrette. Pair with sweet potato fries for a carb balance, or top with burger fixings like sliced dill pickles, tomato wedges, and a dollop of mustard aioli. For a fusion twist, accompany with coleslaw or onion rings. They make fantastic appetizers at parties – cut into bite-sized pieces with toothpicks. Kids will love them plain, while adults can add a slice of avocado for creaminess. Wash it down with a cold beer or lemonade to cleanse the palate.
Common Mistakes
Even seasoned cooks can stumble with Lava Cakes – here are pitfalls to avoid. First, don’t overmix the beef mixture, or it’ll become tough like rubbery meatballs. Ensure the cheese is fully enclosed to prevent it from leaking out and making a mess. Baking too long can solidify the center, so keep an eye on the oven timer. Use room-temperature ingredients for better melding; cold beef won’t bind properly. Avoid substituting cheese size – too big cubes won’t fit, creating uneven lava. Finally, always rest the cakes post-baking; cutting too soon leads to cheese eruption and chaos on the plate. Master these, and your results will be lava-licious every time.
Storing Tips
These Lava Cakes reheat beautifully, making prep-ahead a breeze. Store leftovers in an airtight container in the fridge for up to 3 days. To reheat, bake at 350°F for 10-15 minutes until warmed through and cheese melts afresh. Freeze uncooked formed cakes for up to 2 months; thaw overnight in the fridge before baking. For best freezer results, wrap individually in plastic wrap then foil to prevent freezer burn. Reheated versions maintain most of their flavor, though the crust may soften slightly. Label containers with dates for easy tracking – your future self will thank you for fresh-tasting leftovers.

Conclusion
In wrapping up, Cheeseburger Lava Cakes Molten offer a genius fusion of burger bliss and dessert decadence, with their molten cheddar centers promising bite after bite of savory delight. From the data-driven demand for innovative comfort foods to the hands-on joy of baking, this recipe delivers satisfaction that’s both nostalgic and exciting. Whether you’re a beef enthusiast or experimenting with healthier swaps, these cakes adapt to your lifestyle while keeping flavors intact. Don’t wait – grab those ingredients and try this today!
FAQs
***Can I make these gluten-free?*** Yes! Swap breadcrumbs with gluten-free alternatives or almond flour to retain texture without sacrificing taste.
***What if my cheese doesn’t ooze properly?*** Ensure oven temperature is accurate and bake just until done – overbaking solidifies the cheese. Fresh cheddar works best.
***Can kids help prepare this?*** Absolutely! The mixing and forming steps are kid-friendly and educational, teaching basic cooking skills while making memories.
***How long do leftovers last?*** Up to 3 days in the fridge or 2 months frozen – reheat in the oven to restore the molten magic.
***What’s the best way to serve as appetizers?*** Cut into halves or quarters, skewer with picks, and offer dipping sauces like ketchup or ranch for interactive fun.
Cheeseburger Lava Cakes Molten
Savory beef cakes hide molten cheddar inside, combining classic cheeseburger flavors in a baked treat.
Ingredients
- 450 g ground beef (80/20 blend)
- 120 g sharp cheddar cheese, shredded
- 2 large eggs
- 120 g all-purpose flour
- 60 g bread crumbs
- 1 teaspoon onion powder
- Salt, to taste
- Black pepper, to taste
- 60 ml ketchup
- 30 ml mustard
Instructions
- Preheat oven to 190°C and coat the inner surfaces of ramekins or muffin tins with nonstick cooking spray.
- Sauté the ground beef over medium heat in a skillet until evenly browned. Drain excess fat and season with onion powder, salt, and black pepper.
- Transfer the seasoned beef to a mixing bowl. Add bread crumbs, eggs, flour, and half the shredded cheddar cheese. Mix thoroughly until the ingredients are fully incorporated.
- Fill each prepared ramekin or muffin tin halfway with the beef mixture. Place a portion of the remaining cheddar cheese into the center, then top with additional beef mixture until covered.
- Bake in the preheated oven for 20–25 minutes or until the cakes are golden brown at the edges with soft centres.
- Allow to cool briefly before inverting onto serving plates. Finish with a drizzle of ketchup and mustard.
Notes
Use a higher-fat beef blend for richer molten centers and easier unmolding from bakeware.
Nutrition
- Calories: 400
- Fat: 27 g
- Carbohydrates: 18 g
- Protein: 20 g