Chicken Bacon Ranch Sliders A Must-Try Recipe
“`html
Table of Contents
Chicken Bacon Ranch Sliders: A Must-Try Recipe
Are You Craving an Irresistible Flavor Bomb?
If you’re anything like us, the thought of juicy chicken, crispy bacon, and creamy ranch all nestled within a soft slider bun probably makes your taste buds tingle. But what if you could achieve that perfect harmony of flavors and textures in under an hour, making them ideal for any occasion, from game nights to impromptu lunches? That’s where these Chicken Bacon Ranch Sliders come in. They are a culinary masterpiece that’s surprisingly easy to whip up, proving that gourmet-level taste doesn’t always require hours in the kitchen. Imagine the savory, salty crunch of bacon meeting tender, seasoned chicken, all brought together by the tangy, herbaceous goodness of ranch dressing – all miniaturized into perfect, bite-sized delights. This recipe is designed to be your new go-to, a crowd-pleaser that delivers maximum flavor with minimal fuss, ensuring you spend less time cooking and more time enjoying with your loved ones. Discover the ultimate recipe for Chicken Bacon Ranch Sliders. Packed with flavor, these sliders are perfect for parties, lunches, or quick dinners.
The Dream Team: Ingredients for Your Chicken Bacon Ranch Sliders
The magic of these sliders lies in the quality and interplay of a few key ingredients that create a symphony of taste and texture. We’ve organized them to make your shopping and prep a breeze!
For the Chicken & Ranch Filling:
- 1.5 lbs Boneless, Skinless Chicken Breasts or Thighs: The star of our show. Chicken thighs offer a richer, more forgiving flavor due to their higher fat content, while breasts are leaner. Whichever you choose, ensure they are cooked and shredded or diced into small, manageable pieces. The aroma of freshly cooked chicken is a promise of the deliciousness to come.
- 8-10 strips Thick-Cut Bacon: The salty, smoky crunch that elevates any dish. Cooked until perfectly crisp and then crumbled or chopped. The sizzle of bacon is an undeniable culinary anthem.
- 1 cup Ranch Dressing: The creamy, tangy binder that ties all the flavors together. Use your favorite store-bought or homemade ranch for that signature zesty kick. The cool, herbaceous scent is a refreshing contrast.
- Substitution: If ranch isn’t your favorite, try a creamy blue cheese dressing for a bolder flavor, or a Caesar dressing for an Italian twist. For a lighter option, mix Greek yogurt with herbs and a touch of lemon juice.
- 1/2 cup Shredded Cheddar Cheese (or a blend like Monterey Jack/Cheddar): Melty, gooey goodness that adds a sharp, savory note. The golden hue promises a delightful richness.
- Substitution: Pepper Jack for a spicy kick, or a mild Provolone for a slightly different creamy profile.
- 1/4 cup Finely Diced Red Onion: Adds a subtle bite and a pop of color. The sharp, crisp texture is a welcome contrast.
- Substitution: Green onions or chives for a milder onion flavor.
- 1 tablespoon Fresh Parsley, chopped (optional): For a burst of fresh, herbaceous flavor and a touch of green. The vibrant scent brightens the mix.
For the Slider Buns:
- 12-24 Slider Buns (Hawaiian Sweet Rolls are ideal): The soft, slightly sweet vessel for our incredible filling. Their pillowy texture is essential.
- Note: The number of buns depends on the size of your rolls and how generously you fill them.
- 1/4 cup Butter, melted: For brushing the tops of the buns and achieving that irresistible golden-brown crispness. The comforting aroma of melted butter is a culinary hug.
- 1 teaspoon Garlic Powder: To infuse the butter with savory notes, creating a garlic bread aroma.
- Pinch of Paprika (optional): For a hint of smoky sweetness and color on top.
Timing is Everything: Prep, Cook, and Enjoy!
We know your time is valuable. This recipe is designed to be efficient, bringing maximum flavor to your table with a reasonable time commitment. Let’s break it down:
20 minutes
25-30 minutes
45-50 minutes
12-24 sliders
Compared to the average recipe that might require longer marinating or cooking times, these Chicken Bacon Ranch Sliders are a weeknight warrior and a party-perfect appetizer. You can even prep some components ahead of time to speed things up even further!
Step-by-Step: Crafting Your Perfect Sliders
Let’s get cooking! Follow these simple steps to create sliders that will disappear in minutes.
Step 1: Preheat and Prep
Begin by preheating your oven to 375°F (190°C). While the oven heats up, prepare your ingredients. If you haven’t already, cook your bacon until it’s wonderfully crisp. Let it cool slightly on a paper towel-lined plate, then crumble or chop it into bite-sized pieces. Prepare your chicken: ensure it’s cooked (rotisserie chicken is a great shortcut!) and then shredded or diced into small, manageable pieces. This sets the stage for a seamless assembly.
Step 2: Cook the Bacon
Cook the bacon in a skillet over medium heat until it reaches your desired crispness. The aroma filling your kitchen at this stage is pure bliss! Once cooked, transfer the bacon to a paper towel-lined plate to absorb excess grease. When it’s cool enough to handle, crumble or chop it into small pieces. Save a little bacon grease in the pan if you plan on cooking the chicken in it for extra flavor (optional).
Step 3: Prepare the Chicken
If using raw chicken, season it generously with salt, pepper, and any other desired spices (garlic powder, onion powder work well). Cook the chicken in a skillet with a little oil or the reserved bacon grease until fully cooked through. Alternatively, you can bake or grill the chicken. Once cooked, allow it to cool slightly before shredding it with two forks or dicing it into very small pieces. If using pre-cooked chicken like rotisserie, simply shred or dice it.
Step 4: Assemble the Sliders
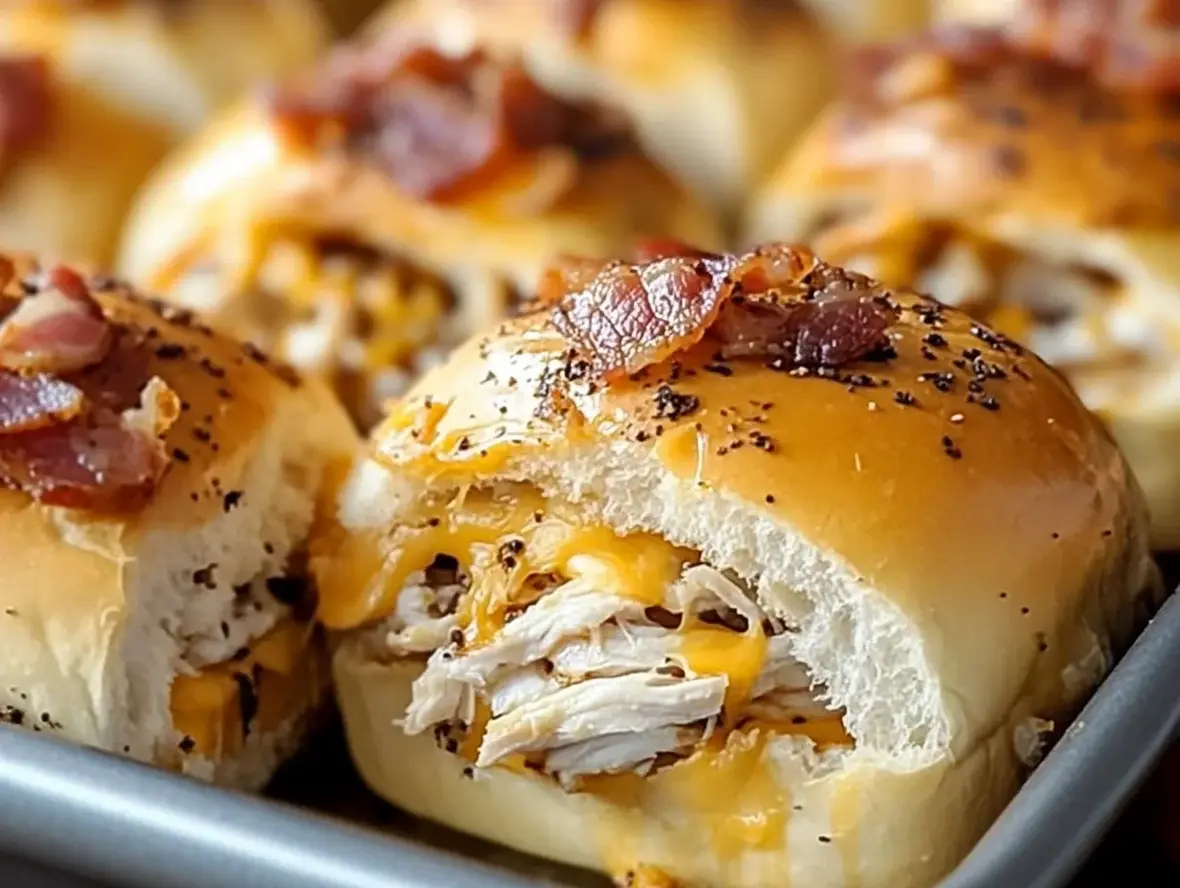
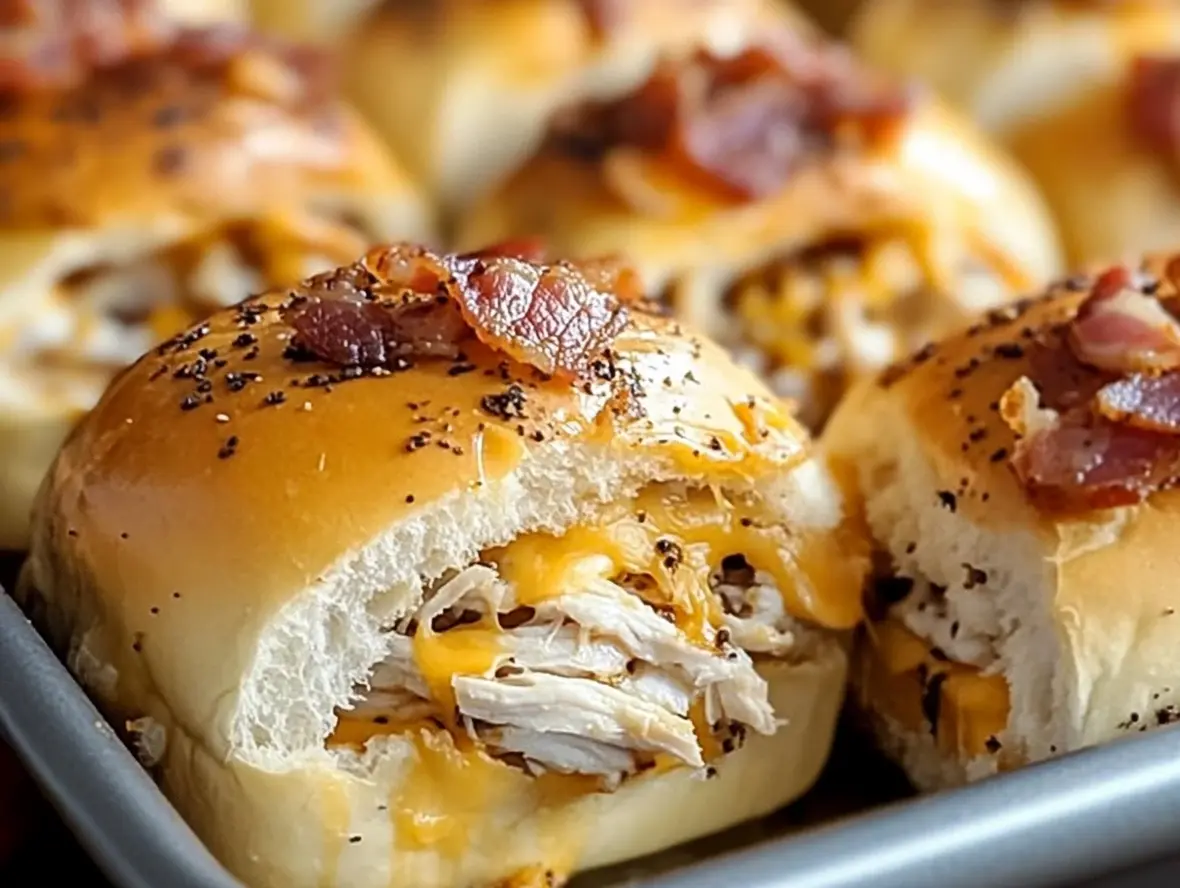
Now for the most exciting part! Take your slider buns and slice them horizontally, keeping the tops and bottoms together in their rows. Place the bottom halves of the buns onto a parchment-lined baking sheet. In a medium bowl, combine the shredded chicken, crumbled bacon, ranch dressing, shredded cheese, diced red onion, and chopped parsley (if using). Mix everything gently until well combined and the chicken and bacon are thoroughly coated in the ranch and cheese. Spoon this glorious mixture evenly over the bottom halves of the slider buns.
Step 5: Bake to Perfection
In a small bowl, whisk together the melted butter, garlic powder, and paprika (if using). Brush this mixture evenly over the top halves of the slider buns. Place the top buns over the filling. Cover the baking sheet loosely with aluminum foil (tenting it so it doesn’t stick to the buns). Bake in the preheated oven for 15-20 minutes, or until the buns are golden brown and the cheese inside is delightfully melted and gooey. Remove the foil for the last 5 minutes of baking if you want extra crispiness on top.
Step 6: Serve and Enjoy
Once baked to golden perfection, carefully remove the sliders from the oven. Let them cool for just a few minutes – they will be hot! Slice the entire sheet of sliders into individual portions using a sharp knife. Serve immediately and watch them disappear! The warm, melted cheese and savory filling encased in soft, buttery buns are a truly irresistible combination.
Nutritional Snapshot (Approximate per Slider)
While individual results may vary based on specific ingredients and portion sizes, here’s a general idea of what you can expect:
- Calories: 250-350 kcal
- Protein: 15-20g
- Fat: 15-25g
- Carbohydrates: 15-25g
Please note: This is an estimate. For precise nutritional information, it’s recommended to calculate using your specific ingredients.
Healthier Twists Without Sacrificing Flavor
Looking to make these sliders a little lighter? You don’t have to miss out on the deliciousness!
- Leaner Protein: Opt for chicken breast and consider baking or grilling it instead of pan-frying.
- Lighter Ranch: Use a Greek yogurt-based ranch dressing, or a lighter store-bought version. You can also make your own by mixing low-fat Greek yogurt with herbs, garlic powder, and a splash of milk or lemon juice.
- Whole Wheat Buns: Swap traditional slider buns for whole wheat varieties to increase fiber content.
- Reduced Fat Cheese: Use a sharp reduced-fat cheddar or Monterey Jack cheese. The sharpness means you can often use less while still getting plenty of flavor.
- Veggie Boost: Add finely chopped celery or bell peppers to the filling for added nutrients and crunch.
Serving Suggestions: Elevate Your Slider Experience
These sliders are fantastic on their own, but here are a few ways to make them even more of a meal or appetizer:
- Classic Pairings: Serve with a side of crispy sweet potato fries, a light green salad with a vinaigrette, or some crunchy coleslaw.
- Soup Companion: They make a perfect accompaniment to a hearty bowl of tomato soup or a creamy broccoli cheddar soup.
- Dipping Delights: Offer extra ranch dressing or a spicy sriracha aioli for dipping.
- Party Platter: Arrange them beautifully on a platter with some pickles and a variety of dips for a show-stopping appetizer spread.
Common Mistakes to Avoid
To ensure your sliders are absolutely perfect, steer clear of these common pitfalls:
- Over-mixing the Filling: This can make the chicken mushy. Gently combine ingredients until just incorporated.
- Soggy Buns: Don’t skip brushing the tops with butter and garlic; this creates a protective crust. Also, ensure your filling isn’t too wet.
- Under-baked Cheese: Make sure the cheese is melted and bubbly. You might need to remove the foil for the last few minutes of baking to achieve this.
- Boring Bacon: Don’t undercook your bacon! The crispiness is key to the slider’s texture and flavor profile.
- Cutting Too Soon: Let the sliders rest for a few minutes after baking before slicing. This helps them hold their shape.
Storing Your Delicious Sliders
While these sliders are best enjoyed fresh, it’s good to know how to store them:
- Refrigeration: Store any leftovers in an airtight container in the refrigerator for up to 2-3 days.
- Reheating: Reheat gently in a moderate oven (around 300°F/150°C) or in a toaster oven until warmed through. Microwaving can make them a bit soft, so oven reheating is preferred for preserving texture.
The Verdict: A Flavor Revolution in Every Bite!
There you have it – the ultimate recipe for Chicken Bacon Ranch Sliders that are guaranteed to impress. They strike a perfect balance between savory, creamy, and crunchy, making them incredibly versatile and addictively delicious. Whether you’re hosting a party, packing lunches, or just looking for a satisfying meal, these sliders deliver big on flavor and fun. Don’t just take our word for it; try them out and experience the magic yourself! Whip up a batch this week and get ready for the rave reviews!
Frequently Asked Questions
***What is the best type of bun to use for these sliders?***
Hawaiian sweet rolls are a popular choice because their slight sweetness perfectly complements the savory filling. However, regular slider buns or even brioche rolls work wonderfully too.
***Can I make the filling ahead of time?***
Yes, you can prepare the chicken, bacon, and mix it with the ranch and cheese up to a day in advance. Store it in an airtight container in the refrigerator. You might want to add fresh parsley just before assembling and baking.
***How do I ensure the chicken is moist?***
Using chicken thighs will generally result in moister filling due to their higher fat content. If using chicken breasts, be careful not to overcook them. Rotisserie chicken is also a fantastic, foolproof option for moist shredded chicken.
***Can I add other vegetables to the filling?***
Absolutely! Finely diced celery, bell peppers, or even some corn can add extra texture and flavor to the filling. Just ensure they are chopped small enough to be easily incorporated into the slider.
***What if I don’t have a baking sheet that fits all the buns?***
You can bake the sliders in batches. Alternatively, use a casserole dish or a 9×13 inch baking pan if the buns fit snugly. Ensure you cover it appropriately for baking.
Chicken Bacon Ranch Sliders

TheseChicken Bacon Ranch Slidersare the perfect blend of savory and cheesy goodness. Made with shredded chicken, creamy Ranch dressing, turkey bacon, and melted cheddar, they’re a crowd-pleasing appetizer or quick dinner option.
Ingredients
- 4 cupscooked chicken, shredded1 cupRanch dressing1/2 cupturkey bacon, cooked and crumbled3 tbspParmesan cheese15Hawaiian sweet rolls, sliced in half2 cupsshredded cheddar cheese1/4 cupbutter, melted1 tspgarlic powder
- 1 cupRanch dressing1/2 cupturkey bacon, cooked and crumbled3 tbspParmesan cheese15Hawaiian sweet rolls, sliced in half2 cupsshredded cheddar cheese1/4 cupbutter, melted1 tspgarlic powder
- 1/2 cupturkey bacon, cooked and crumbled3 tbspParmesan cheese15Hawaiian sweet rolls, sliced in half2 cupsshredded cheddar cheese1/4 cupbutter, melted1 tspgarlic powder
- 3 tbspParmesan cheese15Hawaiian sweet rolls, sliced in half2 cupsshredded cheddar cheese1/4 cupbutter, melted1 tspgarlic powder
- 15Hawaiian sweet rolls, sliced in half2 cupsshredded cheddar cheese1/4 cupbutter, melted1 tspgarlic powder
- 2 cupsshredded cheddar cheese1/4 cupbutter, melted1 tspgarlic powder
- 1/4 cupbutter, melted1 tspgarlic powder
- 1 tspgarlic powder
Instructions
- 1️⃣Preheat Oven:Preheat your oven to 350°F (175°C). Lightly grease a 9×13-inch baking pan.2️⃣Prepare the Rolls:Place the bottom halves of the sliced Hawaiian rolls in the prepared baking pan.3️⃣Make the Chicken Mixture:In a mixing bowl, combine the shredded chicken, Ranch dressing, crumbled turkey bacon, and Parmesan cheese. Mix until evenly coated.4️⃣Assemble the Sliders:Spread the chicken mixture evenly over the bottom halves of the rolls.Sprinkle the shredded cheddar cheese evenly over the chicken mixture.Place the top halves of the rolls on top to form sandwiches.5️⃣Prepare Garlic Butter:In a small bowl, mix the melted butter with garlic powder.Brush the garlic butter generously over the tops of the rolls.6️⃣Bake the Sliders:Cover the baking pan with aluminum foil and bake in the preheated oven for 15 minutes, or until the cheese is melted and the sliders are heated through.Remove the foil and bake for an additional 2-3 minutes to lightly brown the tops.7️⃣Serve:Remove from the oven and let cool slightly before serving. Serve warm and enjoy!
- 2️⃣Prepare the Rolls:
- Place the bottom halves of the sliced Hawaiian rolls in the prepared baking pan.3️⃣Make the Chicken Mixture:In a mixing bowl, combine the shredded chicken, Ranch dressing, crumbled turkey bacon, and Parmesan cheese. Mix until evenly coated.4️⃣Assemble the Sliders:Spread the chicken mixture evenly over the bottom halves of the rolls.Sprinkle the shredded cheddar cheese evenly over the chicken mixture.Place the top halves of the rolls on top to form sandwiches.5️⃣Prepare Garlic Butter:In a small bowl, mix the melted butter with garlic powder.Brush the garlic butter generously over the tops of the rolls.6️⃣Bake the Sliders:Cover the baking pan with aluminum foil and bake in the preheated oven for 15 minutes, or until the cheese is melted and the sliders are heated through.Remove the foil and bake for an additional 2-3 minutes to lightly brown the tops.7️⃣Serve:Remove from the oven and let cool slightly before serving. Serve warm and enjoy!
- 3️⃣Make the Chicken Mixture:In a mixing bowl, combine the shredded chicken, Ranch dressing, crumbled turkey bacon, and Parmesan cheese. Mix until evenly coated.4️⃣Assemble the Sliders:Spread the chicken mixture evenly over the bottom halves of the rolls.Sprinkle the shredded cheddar cheese evenly over the chicken mixture.Place the top halves of the rolls on top to form sandwiches.5️⃣Prepare Garlic Butter:In a small bowl, mix the melted butter with garlic powder.Brush the garlic butter generously over the tops of the rolls.6️⃣Bake the Sliders:Cover the baking pan with aluminum foil and bake in the preheated oven for 15 minutes, or until the cheese is melted and the sliders are heated through.Remove the foil and bake for an additional 2-3 minutes to lightly brown the tops.7️⃣Serve:Remove from the oven and let cool slightly before serving. Serve warm and enjoy!
- In a mixing bowl, combine the shredded chicken, Ranch dressing, crumbled turkey bacon, and Parmesan cheese. Mix until evenly coated.
- 4️⃣Assemble the Sliders:Spread the chicken mixture evenly over the bottom halves of the rolls.Sprinkle the shredded cheddar cheese evenly over the chicken mixture.Place the top halves of the rolls on top to form sandwiches.5️⃣Prepare Garlic Butter:In a small bowl, mix the melted butter with garlic powder.Brush the garlic butter generously over the tops of the rolls.6️⃣Bake the Sliders:Cover the baking pan with aluminum foil and bake in the preheated oven for 15 minutes, or until the cheese is melted and the sliders are heated through.Remove the foil and bake for an additional 2-3 minutes to lightly brown the tops.7️⃣Serve:Remove from the oven and let cool slightly before serving. Serve warm and enjoy!
- Spread the chicken mixture evenly over the bottom halves of the rolls.Sprinkle the shredded cheddar cheese evenly over the chicken mixture.Place the top halves of the rolls on top to form sandwiches.5️⃣Prepare Garlic Butter:In a small bowl, mix the melted butter with garlic powder.Brush the garlic butter generously over the tops of the rolls.6️⃣Bake the Sliders:Cover the baking pan with aluminum foil and bake in the preheated oven for 15 minutes, or until the cheese is melted and the sliders are heated through.Remove the foil and bake for an additional 2-3 minutes to lightly brown the tops.7️⃣Serve:Remove from the oven and let cool slightly before serving. Serve warm and enjoy!
- Sprinkle the shredded cheddar cheese evenly over the chicken mixture.
- Place the top halves of the rolls on top to form sandwiches.5️⃣Prepare Garlic Butter:In a small bowl, mix the melted butter with garlic powder.Brush the garlic butter generously over the tops of the rolls.6️⃣Bake the Sliders:Cover the baking pan with aluminum foil and bake in the preheated oven for 15 minutes, or until the cheese is melted and the sliders are heated through.Remove the foil and bake for an additional 2-3 minutes to lightly brown the tops.7️⃣Serve:Remove from the oven and let cool slightly before serving. Serve warm and enjoy!
- 5️⃣Prepare Garlic Butter:In a small bowl, mix the melted butter with garlic powder.Brush the garlic butter generously over the tops of the rolls.6️⃣Bake the Sliders:Cover the baking pan with aluminum foil and bake in the preheated oven for 15 minutes, or until the cheese is melted and the sliders are heated through.Remove the foil and bake for an additional 2-3 minutes to lightly brown the tops.7️⃣Serve:Remove from the oven and let cool slightly before serving. Serve warm and enjoy!
- In a small bowl, mix the melted butter with garlic powder.
- Brush the garlic butter generously over the tops of the rolls.6️⃣Bake the Sliders:Cover the baking pan with aluminum foil and bake in the preheated oven for 15 minutes, or until the cheese is melted and the sliders are heated through.Remove the foil and bake for an additional 2-3 minutes to lightly brown the tops.7️⃣Serve:Remove from the oven and let cool slightly before serving. Serve warm and enjoy!
- 6️⃣Bake the Sliders:Cover the baking pan with aluminum foil and bake in the preheated oven for 15 minutes, or until the cheese is melted and the sliders are heated through.Remove the foil and bake for an additional 2-3 minutes to lightly brown the tops.7️⃣Serve:Remove from the oven and let cool slightly before serving. Serve warm and enjoy!
- Cover the baking pan with aluminum foil and bake in the preheated oven for 15 minutes, or until the cheese is melted and the sliders are heated through.
- Remove the foil and bake for an additional 2-3 minutes to lightly brown the tops.7️⃣Serve:Remove from the oven and let cool slightly before serving. Serve warm and enjoy!
- 7️⃣Serve:Remove from the oven and let cool slightly before serving. Serve warm and enjoy!
- Remove from the oven and let cool slightly before serving. Serve warm and enjoy!
Notes
Make-Ahead Option:Assemble the sliders up to step 5, cover tightly, and refrigerate for up to 12 hours. Bake as directed when ready to serve.Serving Suggestions:Serve with a side of celery sticks, a salad, or chips for a complete meal or party snack.Turkey Bacon Tip:Cook the turkey bacon until crispy for the best texture and flavor in the sliders.Storage:Store leftovers in an airtight container in the refrigerator for up to 2 days. Reheat in the oven at 300°F until warmed through.
Serving Suggestions:Serve with a side of celery sticks, a salad, or chips for a complete meal or party snack.Turkey Bacon Tip:Cook the turkey bacon until crispy for the best texture and flavor in the sliders.Storage:Store leftovers in an airtight container in the refrigerator for up to 2 days. Reheat in the oven at 300°F until warmed through.
Turkey Bacon Tip:Cook the turkey bacon until crispy for the best texture and flavor in the sliders.Storage:Store leftovers in an airtight container in the refrigerator for up to 2 days. Reheat in the oven at 300°F until warmed through.
Storage:Store leftovers in an airtight container in the refrigerator for up to 2 days. Reheat in the oven at 300°F until warmed through.
“`