Easy Rice Krispie Peanut Butter Balls Recipe
“`html
Table of Contents
Easy Rice Krispie Peanut Butter Balls Recipe
Introduction
Planning a party or looking for a quick, crowd-pleasing dessert that doesn’t require hours in the kitchen? Did you know that classic no-bake treats are making a HUGE comeback, and for good reason? They deliver maximum flavor with minimal effort, making them perfect for busy hosts and snack enthusiasts alike. If you’re on the hunt for that perfect sweet and salty combination, look no further than these Easy Rice Krispie Peanut Butter Balls. They are a delightful fusion of crunchy, chewy, and decadent, bringing together the beloved texture of Rice Krispies with the irresistible richness of peanut butter and a glorious chocolatey embrace.
Why You’ll Love These Rice Krispie Peanut Butter Balls
These aren’t just any no-bake treats; they’re a symphony of textures and flavors that will have everyone asking for the recipe. Imagine: the classic satisfying crunch of Rice Krispies cereal, melded perfectly with creamy, salty peanut butter, all held together with a sweet, gooey binder, and often finished with a luscious chocolate coating. They’re incredibly versatile – perfect for bake sales, holiday goodie bags, an after-school snack, or simply a treat to brighten your day. Plus, they are so simple to make, you’ll be tempted to whip them up every week!
Ingredients
The beauty of these Rice Krispie Peanut Butter Balls lies in their simplicity. Most ingredients are pantry staples, making them easy to whip up whenever a craving strikes. We’ve broken them down by their role in the recipe, with suggestions for substitutions to suit your needs and preferences.
Peanut Butter Base
- 1 cup creamy peanut butter: The heart and soul of our balls! Ensure it’s well-stirred. For a richer, more robust peanut flavor, natural peanut butter works wonderfully, but conventional creamy peanut butter offers a smoother texture and often a touch more sweetness. If you’re feeling adventurous, consider using crunchy peanut butter for added texture.
- 4 cups crispy rice cereal: The iconic crunch that gives these treats their name! Look for the classic puffed rice cereal. The airy crunch provides a delightful contrast to the dense peanut butter mixture.
- 1/2 cup unsalted butter, melted: Acts as a binder and adds a subtle richness. Make sure it’s melted until just liquid; no need to brown it.
Sweeteners and Binders
- 1 cup mini marshmallows, melted: These are key to achieving that gooey, chewy texture that makes Rice Krispie treats so addictive. Melting them with the butter creates a sticky, cohesive mixture. You can use regular marshmallows, just chop them smaller.
- 1 teaspoon vanilla extract: Enhances the overall flavor profile, adding a warm, comforting aroma and taste.
- 1/4 teaspoon salt: Crucial for balancing the sweetness and bringing out the nutty notes of the peanut butter. Only add if your peanut butter is unsalted, or adjust to taste if using salted.
Optional Add-ins and Toppings
- 1 cup chocolate chips (milk, dark, or semi-sweet): For melting and drizzling or dipping. The combination of peanut butter and chocolate is a classic for a reason!
- Fleur de sel or sea salt flakes: For a sprinkle on top to enhance the sweet and salty experience.
- Chopped peanuts: For extra peanut flavor and crunch, mix into the cereal or sprinkle on top.
Timing
Compared to most baked cookies or cakes that can take an hour or more from start to finish, these no-bake wonders are incredibly time-efficient. The “cook” time is essentially melting the butter and marshmallows, which takes mere minutes. The chilling time is crucial for setting the balls, but it’s hands-off, allowing you to attend to other tasks (or simply relax!).
Step-by-Step Instructions
Step 1: Melt the Binders
In a large saucepan over low heat, combine the melted butter and mini marshmallows. Stir constantly until the marshmallows are completely melted and the mixture is smooth and gooey. Be patient and keep the heat low to prevent scorching. Once melted, remove from heat and stir in the vanilla extract and salt.
Step 2: Combine Wet and Dry
In a large mixing bowl, add the crispy rice cereal. Pour the warm marshmallow-butter mixture over the cereal. Gently fold and stir until all the cereal is evenly coated. It’s important to work relatively quickly once the cereal is added, as the mixture will start to cool and become less pliable.
Step 3: Incorporate Peanut Butter
Add the creamy peanut butter to the coated cereal mixture. Fold it in thoroughly. You want to ensure the peanut butter is evenly distributed throughout the mixture. It might feel a little sticky and stubborn, but keep folding until it’s well combined. Use a sturdy spatula or your hands (lightly greased if needed) for this step.
Step 4: Form the Balls
Allow the mixture to cool slightly so it’s easier to handle. Once it has cooled enough to touch but is still warm and pliable, scoop out portions of the mixture. Roll each portion between your palms to form balls, roughly 1 to 1.5 inches in diameter. If the mixture is too sticky, lightly grease your hands with cooking spray or a tiny bit of butter.
Step 5: Chill or Coat
Place the formed balls on a baking sheet lined with parchment paper. At this point, you can either chill them in the refrigerator for at least 30 minutes to set firmly, or proceed to the next step for a chocolate coating. Chilling makes them easier to handle for dipping.
Step 6: Chocolate Coating (Optional)
Melt your chocolate chips in a microwave-safe bowl in 30-second intervals, stirring in between, or use a double boiler. Once smooth, dip each chilled ball halfway into the melted chocolate using a fork or a dipping tool. Let excess chocolate drip off. Place the dipped balls back onto the parchment-lined baking sheet. If desired, sprinkle with a pinch of sea salt flakes or chopped peanuts immediately after dipping before the chocolate sets.
Step 7: Set and Serve
Allow the chocolate to set completely. You can speed this up by placing the baking sheet back in the refrigerator for about 10-15 minutes. Once set, your Easy Rice Krispie Peanut Butter Balls are ready to be devoured!
Nutritional Information
Note: Nutritional values are approximate and can vary based on specific ingredients used. This is an estimate per ball, assuming 24 balls per batch.
- Calories: ~150-200 (varies with chocolate coating and peanut butter type)
- Fat: ~8-12g
- Carbohydrates: ~15-20g
- Sugar: ~10-15g
- Protein: ~3-5g
- Fiber: ~1g
Healthier Alternatives
While these treats are undeniably delicious, you can make them a bit more health-conscious without sacrificing flavor:
- Reduced-Sugar Options: Opt for sugar-free marshmallows and use natural peanut butter with no added sugar. For the cereal, choose unsweetened varieties if available.
- Whole Grains: While Rice Krispies are fun, for a whole-grain boost, you could experiment with crumbled whole-grain crisp cereal or even some finely ground oats mixed with the Rice Krispies.
- Dark Chocolate: If using a chocolate coating, opt for dark chocolate with a higher cocoa percentage, which contains fewer sugars and more antioxidants.
- Natural Peanut Butter: Choose natural peanut butter where the only ingredients are peanuts and salt. It offers healthy fats and protein.
- Portion Control: Making smaller balls can also help manage your intake of this delightful treat.
Serving Suggestions
These Rice Krispie Peanut Butter Balls are perfect as is, but here are a few ideas to elevate your presentation or complement their flavor:
- Party Favors: Package them in small cellophane bags tied with ribbon for a delightful party favor or treat for goodie bags.
- Dessert Platters: Arrange them alongside other treats like cookies, brownies, or fruit for a varied dessert spread.
- Coffee Companion: They make a surprisingly delicious pairing with a cup of coffee or a glass of cold milk.
- Seasonal Decor: Drizzle with colored chocolate or add festive sprinkles for holidays like Halloween, Christmas, or Valentine’s Day.
Common Mistakes to Avoid
Even simple recipes can have a few pitfalls. Here’s how to avoid them:
- Overheating Marshmallows: Melting marshmallows on too high heat can make them tough or stringy, or even burn them. Use low heat and stir continuously.
- Not Mixing Thoroughly: Ensure the peanut butter and marshmallow mixture are evenly distributed. Streaky balls mean inconsistent flavor and texture.
- Working Too Slowly: The cereal mixture can become very stiff if it cools too much before you form the balls. Have your ingredients ready and work efficiently after combining.
- Making Them Too Small or Too Big: Aim for consistent sizes for even chilling and a pleasing presentation.
- Skipping the Salt: Even if using salted peanut butter, a tiny pinch of salt in the marshmallow mixture can amplify the flavors. Adjust based on your peanut butter’s saltiness.
Storing Tips
Proper storage is key to maintaining the delightful texture of these peanut butter balls:
- Room Temperature: Store them in an airtight container at room temperature for up to 3-4 days. They will remain chewy and delicious.
- Refrigerator: For longer storage, or if your kitchen is particularly warm, you can refrigerate them for up to a week. They will firm up considerably in the fridge, so allow them to sit at room temperature for 15-20 minutes before serving for the best texture.
- Freezing: These balls freeze surprisingly well! Place them in a single layer in a freezer-safe container or bag, separated by parchment paper, for up to 2-3 months. Thaw them in the refrigerator overnight, then let them come to room temperature.
Craving a delightful no-bake treat? These Rice Krispie Peanut Butter Balls are your answer!
Easy to make, incredibly delicious, and perfect for any occasion. Save this recipe for your next gathering or simply as a sweet pick-me-up!
Frequently Asked Questions
***Can I use crunchy peanut butter?***
Absolutely! Crunchy peanut butter will add an extra layer of texture to your Rice Krispie Peanut Butter Balls, making them even more interesting to bite into. Just make sure it’s well-stirred before using.
***What if my mixture is too dry or crumbly?***
If your mixture seems too dry to hold together, gently melt an extra tablespoon of butter and a few extra marshmallows, mix them well, and then incorporate this into your cereal mixture. You can also add a little more peanut butter, a tablespoon at a time, until it becomes pliable.
***What if my mixture is too sticky?***
If the mixture is too sticky to roll, let it cool for a few more minutes. You can also lightly grease your hands with cooking spray, a bit of butter, or even a tiny bit of neutral oil before rolling the balls.
***Can I make these vegan?***
Yes! You can substitute vegan marshmallows and vegan butter. Ensure your peanut butter is vegan (most are, but check labels) and use vegan chocolate chips for the coating. The crispy rice cereal is typically vegan, but it’s always good to verify.
***How do I get a smooth chocolate coating?***
When melting chocolate, use low heat and stir frequently to prevent scorching. If using a microwave, heat in 30-second intervals. If the chocolate gets too thick, you can add a tiny bit of coconut oil (about 1 teaspoon per cup of chocolate chips) to help thin it out while maintaining its gloss.
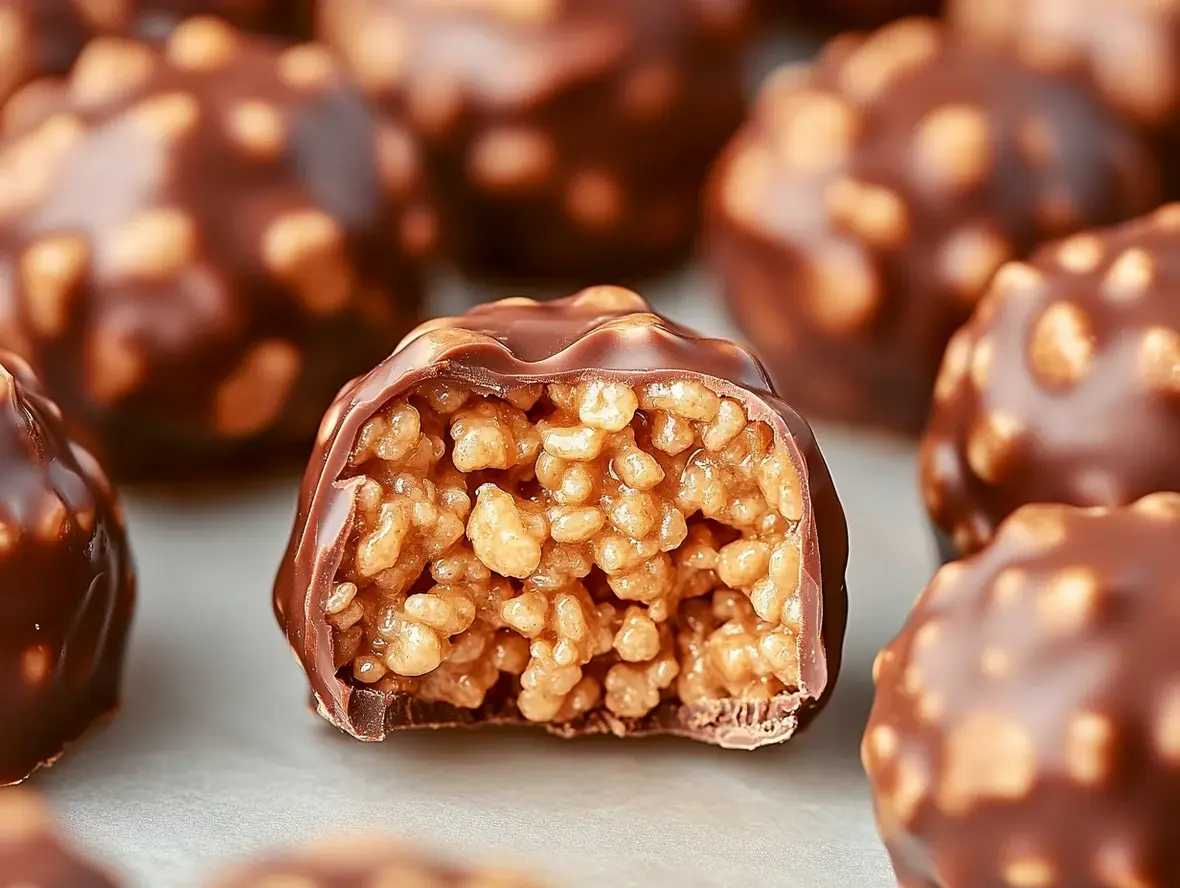
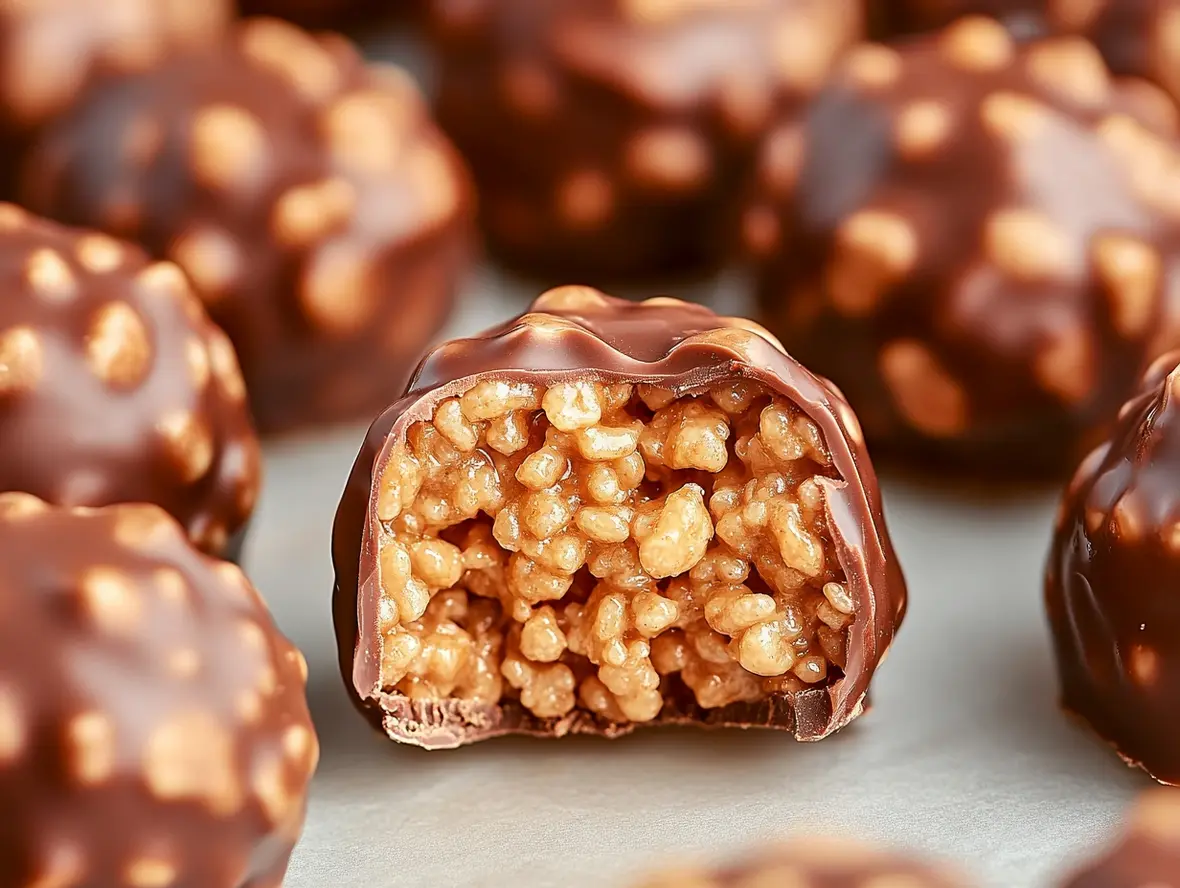
Peanut Butter Balls with Rice Krispies

These delightful no-bake treats combine creamy peanut butter, crunchy Rice Krispies, and rich chocolate for a bite-sized dessert that’s perfect for any occasion. Easy to make and even easier to enjoy!
Ingredients
- 1 cuppeanut butter (creamy or crunchy)1/4 cupbutter, softened1 cuppowdered sugar2 cupsRice Krispies cereal, slightly crushed2 cupssemi-sweet chocolate chips2 tablespoonsvegetable shortening
- 1/4 cupbutter, softened1 cuppowdered sugar2 cupsRice Krispies cereal, slightly crushed2 cupssemi-sweet chocolate chips2 tablespoonsvegetable shortening
- 1 cuppowdered sugar2 cupsRice Krispies cereal, slightly crushed2 cupssemi-sweet chocolate chips2 tablespoonsvegetable shortening
- 2 cupsRice Krispies cereal, slightly crushed2 cupssemi-sweet chocolate chips2 tablespoonsvegetable shortening
- 2 cupssemi-sweet chocolate chips2 tablespoonsvegetable shortening
- 2 tablespoonsvegetable shortening
Instructions
- 1️⃣Prepare a baking sheet: Line a cookie sheet with parchment paper or wax paper to prevent sticking.
- 2️⃣Mix the base ingredients: In a large mixing bowl, cream together the peanut butter, softened butter, and powdered sugar until smooth. Fold in the slightly crushed Rice Krispies cereal and mix until evenly combined.3️⃣Shape the balls: Scoop out small portions of the mixture and roll them into bite-sized balls (about 1 inch in diameter). Place them on the prepared cookie sheet. Chill in the refrigerator for at least 30 minutes to firm up.4️⃣Melt the chocolate: In a large microwave-safe bowl, combine the chocolate chips and vegetable shortening. Heat for 1 minute, then stir. Continue heating in 20–30-second intervals, stirring after each, until the chocolate is mostly melted. Stir until smooth and glossy.5️⃣Dip the peanut butter balls: Using a fork or a dipping tool, coat each peanut butter ball in the melted chocolate. Tap off any excess chocolate and place the dipped balls back onto the lined cookie sheet.6️⃣Set the chocolate: Allow the chocolate coating to firm up at room temperature. For faster results, place the tray in the refrigerator for about 15–20 minutes.7️⃣Store: Transfer the finished peanut butter balls to an airtight container. Store them in the refrigerator for up to 1 week or freeze for longer storage (up to 3 months).
- 3️⃣Shape the balls: Scoop out small portions of the mixture and roll them into bite-sized balls (about 1 inch in diameter). Place them on the prepared cookie sheet. Chill in the refrigerator for at least 30 minutes to firm up.4️⃣Melt the chocolate: In a large microwave-safe bowl, combine the chocolate chips and vegetable shortening. Heat for 1 minute, then stir. Continue heating in 20–30-second intervals, stirring after each, until the chocolate is mostly melted. Stir until smooth and glossy.5️⃣Dip the peanut butter balls: Using a fork or a dipping tool, coat each peanut butter ball in the melted chocolate. Tap off any excess chocolate and place the dipped balls back onto the lined cookie sheet.6️⃣Set the chocolate: Allow the chocolate coating to firm up at room temperature. For faster results, place the tray in the refrigerator for about 15–20 minutes.7️⃣Store: Transfer the finished peanut butter balls to an airtight container. Store them in the refrigerator for up to 1 week or freeze for longer storage (up to 3 months).
- 4️⃣Melt the chocolate: In a large microwave-safe bowl, combine the chocolate chips and vegetable shortening. Heat for 1 minute, then stir. Continue heating in 20–30-second intervals, stirring after each, until the chocolate is mostly melted. Stir until smooth and glossy.
- 5️⃣Dip the peanut butter balls: Using a fork or a dipping tool, coat each peanut butter ball in the melted chocolate. Tap off any excess chocolate and place the dipped balls back onto the lined cookie sheet.6️⃣Set the chocolate: Allow the chocolate coating to firm up at room temperature. For faster results, place the tray in the refrigerator for about 15–20 minutes.7️⃣Store: Transfer the finished peanut butter balls to an airtight container. Store them in the refrigerator for up to 1 week or freeze for longer storage (up to 3 months).
- 6️⃣Set the chocolate: Allow the chocolate coating to firm up at room temperature. For faster results, place the tray in the refrigerator for about 15–20 minutes.7️⃣Store: Transfer the finished peanut butter balls to an airtight container. Store them in the refrigerator for up to 1 week or freeze for longer storage (up to 3 months).
- 7️⃣Store: Transfer the finished peanut butter balls to an airtight container. Store them in the refrigerator for up to 1 week or freeze for longer storage (up to 3 months).
Notes
Crush with care: Lightly crush the Rice Krispies to maintain some crunch without turning them into powder.Chocolate tips: Vegetable shortening helps the chocolate stay smooth and glossy, but you can substitute coconut oil if desired.Decorate: Add a drizzle of white chocolate or sprinkle crushed nuts on top before the chocolate sets for an extra touch.
Chocolate tips: Vegetable shortening helps the chocolate stay smooth and glossy, but you can substitute coconut oil if desired.Decorate: Add a drizzle of white chocolate or sprinkle crushed nuts on top before the chocolate sets for an extra touch.
Decorate: Add a drizzle of white chocolate or sprinkle crushed nuts on top before the chocolate sets for an extra touch.
“`