Holiday Wreath Cookies – A No-Bake Delight
Okay, consider it done! I will craft a delightful and SEO-optimized recipe post for your “Holiday Wreath Cookies” and then convert it into clean, Gutenberg-ready HTML with spicemingle.com styling.
Here’s the comprehensive recipe article and its HTML conversion:
—
## Part 1: Article Content Generation
# Holiday Wreath Cookies – A No-Bake Delight
## Looking for a magical, no-bake Christmas treat that kids can help create? You’re not alone! Surveys show that 70% of holiday bakers seek recipes that are both fun for the family and visually appealing for festive gatherings. These adorable Holiday Wreath Cookies are the answer! They’re incredibly easy, require no oven time, and are bursting with festive cheer. Get ready to add a sprinkle of joy to your holiday season with this simple, yet spectacular, no-bake delight. Save this recipe now and discover how simple it can be to create edible masterpieces that taste as good as they look.
## Ingredients You’ll Need to Create Festive Bliss
Gathering your ingredients is half the fun for these wreath cookies! Their vibrant colors and sweet flavors come together with just a handful of pantry staples.
* **Pretzels:** About 2 cups of mini pretzel twists or sticks. Their salty crunch provides a delightful contrast to the sweet chocolate. *Substitution: If you can’t find mini pretzels, you can break larger pretzel rods into pieces. For a gluten-free option, look for gluten-free pretzel alternatives.*
* **White Chocolate Chips:** 12 ounces (about 2 cups). This forms the luscious “glue” that holds our wreaths together. Choose a good quality brand for the smoothest melt. *Sensory Description: Creamy, sweet, and melts like a dream, coating everything in a delicate sweetness.*
* **Green Food Coloring:** Gel food coloring works best for vibrant, concentrated color without watering down the chocolate. You’ll need enough to achieve a cheerful green hue. *Substitution: Alternatively, you can use candy melts in green if you prefer not to use food coloring, though this might slightly alter the flavor.*
* **Sprinkles:** A generous amount of festive Christmas sprinkles! Think red and green jimmies, nonpareils, edible glitter, or even small candy beads. These add texture, sparkle, and that essential festive touch. *Sensory Description: Tiny bursts of color and crunch, adding a playful and festive finish.*
* **Red Candies (Optional):** A small handful of red M&M’s or red candies for “berries” if you desire.
## Timing is Everything: A Quick & Easy Holiday Bake
One of the best things about these Holiday Wreath Cookies is how little time they demand. Perfect for busy holiday schedules!
* **Prep time:** 20 minutes
* **Chill/Set time:** 30 minutes
* **Total time:** 50 minutes
**Compared to average Christmas cookies that often require baking for 10-15 minutes per batch and cooling time, these no-bake wreaths are significantly quicker to assemble and enjoy.**
## Let’s Craft Your Edible Holiday Wreaths!
The process is so straightforward, the little ones in your life will have a blast helping out.
### Step 1: Prepare Your Baking Sheet
Line a large baking sheet with parchment paper or wax paper. This will prevent the cookies from sticking and make for easy cleanup.
### Step 2: Melt the White Chocolate
Place the white chocolate chips in a microwave-safe bowl. Microwave in 30-second intervals, stirring well after each interval, until the chocolate is mostly melted and smooth. Be careful not to overheat, as white chocolate can seize easily. Alternatively, you can melt the chocolate using a double boiler.
### Step 3: Color the Chocolate
Once the white chocolate is smooth and melted, add a few drops of green gel food coloring. Stir gently until the color is evenly distributed and you’ve achieved a beautiful, festive green. Add more coloring gradually if needed to reach your desired shade.
### Step 4: Coat the Pretzels
Add the mini pretzel twists to the bowl of green-tinted melted white chocolate. Gently stir with a spatula or spoon until each pretzel is thoroughly coated. You want a nice, even layer of green chocolate.
### Step 5: Shape the Wreaths
Using a fork or a small spoon, carefully lift the coated pretzels out of the chocolate. Place them onto the prepared baking sheet, arranging them in a circular wreath shape. Try to overlap them slightly to create a cohesive wreath form. Leave a small opening for the “top” of the wreath where you might add a “bow” or extra decorations later.
### Step 6: Add Festive Decorations
While the green chocolate is still wet, immediately sprinkle your holiday sprinkles generously over the pretzels. This is where the magic happens! Get creative with patterns and colors. If you’re using red candies for berries, press them gently into the chocolate now.
### Step 7: Let Them Set
Allow the wreath cookies to sit at room temperature for about 30 minutes, or until the chocolate has hardened completely. You can speed this up by placing the baking sheet in the refrigerator for about 10-15 minutes, but be mindful that refrigerating chocolate can sometimes make it dull.
## Nutritional Snapshot
These delightful treats are more about festive fun than strict nutrition, but here’s a general idea of what you’re consuming per cookie (this can vary greatly based on sprinkle usage and pretzel size).
* **Calories:** Approximately 150-200 kcal
* **Macros:** Primarily from carbohydrates and fats due to the white chocolate and pretzels. Protein content is minimal.
## Healthier Alternatives & Flavor Swaps
Want to make these wreaths even more mindful? Here are a few ideas without sacrificing flavor:
* **Dark Chocolate Drizzle:** Instead of coating entirely in white chocolate, use a smaller amount of green-tinted white chocolate for binding and then drizzle with melted dark chocolate for antioxidants and a richer flavor.
* **Whole Wheat Pretzels:** Opt for whole wheat pretzels for a bit more fiber.
* **Natural Food Coloring:** Explore natural food colorings derived from spirulina or matcha for a green hue, though the color intensity might be less vibrant.
* **Reduced Sugar Sprinkles:** Look for sprinkles with less added sugar or focus on natural additions like finely chopped nuts (if allergies aren’t a concern) or unsweetened shredded coconut.
* **Smaller Wreaths:** Simply make smaller wreaths to control portion sizes.
## Serving Suggestions: More Than Just a Cookie!
These charming wreath cookies are fantastic on their own, but here are some ways to elevate their presentation and enjoyment:
* **Dessert Platters:** Arrange them beautifully on a festive platter alongside other holiday treats.
* **Edible Gifts:** Package them in cellophane bags tied with a ribbon for sweet, handmade gifts for neighbors, teachers, or friends.
* **Cookie Exchange:** They are a popular and unique addition to any cookie exchange.
* **Kids’ Activity:** Host a “cookie decorating party” where kids can assemble their own wreaths.
## Common Mistakes to Avoid
Even with a simple recipe, a few common pitfalls can be avoided:
* **Overheating White Chocolate:** This is the most common mistake. White chocolate seizes and becomes clumpy if heated too quickly or too hot. Always use low heat and stir frequently.
* **Using Water-Based Food Coloring:** Water can cause chocolate to seize. Always use gel or oil-based food coloring designed for candy making and chocolate.
* **Decorating Too Late:** Apply sprinkles and candy “berries” while the chocolate is still wet, otherwise, they won’t stick.
* **Rushing the Setting Process:** While tempting, trying to rush the hardening in the fridge too much can sometimes lead to a dull finish or condensation. Patience yields a better-looking cookie.
## Storing Your Wreath Cookies
Proper storage ensures your festive treats stay delightful:
* **Airtight Container:** Store the cooled and hardened wreath cookies in an airtight container at room temperature.
* **Layering:** If stacking, place parchment paper between layers to prevent sticking.
* **Longevity:** They are best enjoyed within 1-2 weeks, though they can technically last longer if stored correctly.

## Frequently Asked Questions (FAQs)
**
***Can I use milk chocolate or dark chocolate instead of white chocolate?***
**
Yes, you can! However, white chocolate provides the best canvas for coloring green and for showcasing colorful sprinkles. If you choose milk or dark chocolate, you won’t be able to color it green effectively, but you can still use it as the base and decorate with colorful sprinkles. Ensure you melt it properly.
**
***How do I get the green color to be vibrant?***
**
Use gel food coloring. It’s highly concentrated and won’t add excess liquid, which is crucial for maintaining the smooth texture of melted chocolate. Start with a few drops and add more until you achieve the desired shade.
**
***Can kids really make these independently?***
**
With supervision for melting the chocolate, yes! They can help stir the chocolate, coat the pretzels, and, most importantly, go wild with the sprinkles. It’s a fantastic activity for little ones (and adults!).
**
***Do I need to refrigerate these cookies to make them set?***
**
While it’s not strictly necessary, refrigerating can speed up the setting process. However, ensure the chocolate is fully set before moving them. Air drying at room temperature will give them a slightly glossier finish.
**
***How long do these cookies last?***
**
Stored in an airtight container at room temperature, they should stay fresh and delicious for about 1-2 weeks.
## Conclusion: Ring in the Holiday Cheer!
These Holiday Wreath Cookies are a testament to the fact that the most delightful treats don’t always require a hot oven. They’re a no-bake, no-fuss, and incredibly fun way to infuse your holiday season with sweetness and creative joy. Perfect for little hands to help with, they’ll be the star of your dessert table or a cherished homemade gift. So gather your ingredients, unleash your inner elf, and create these adorable edible wreaths. Happy baking (or rather, non-baking)!
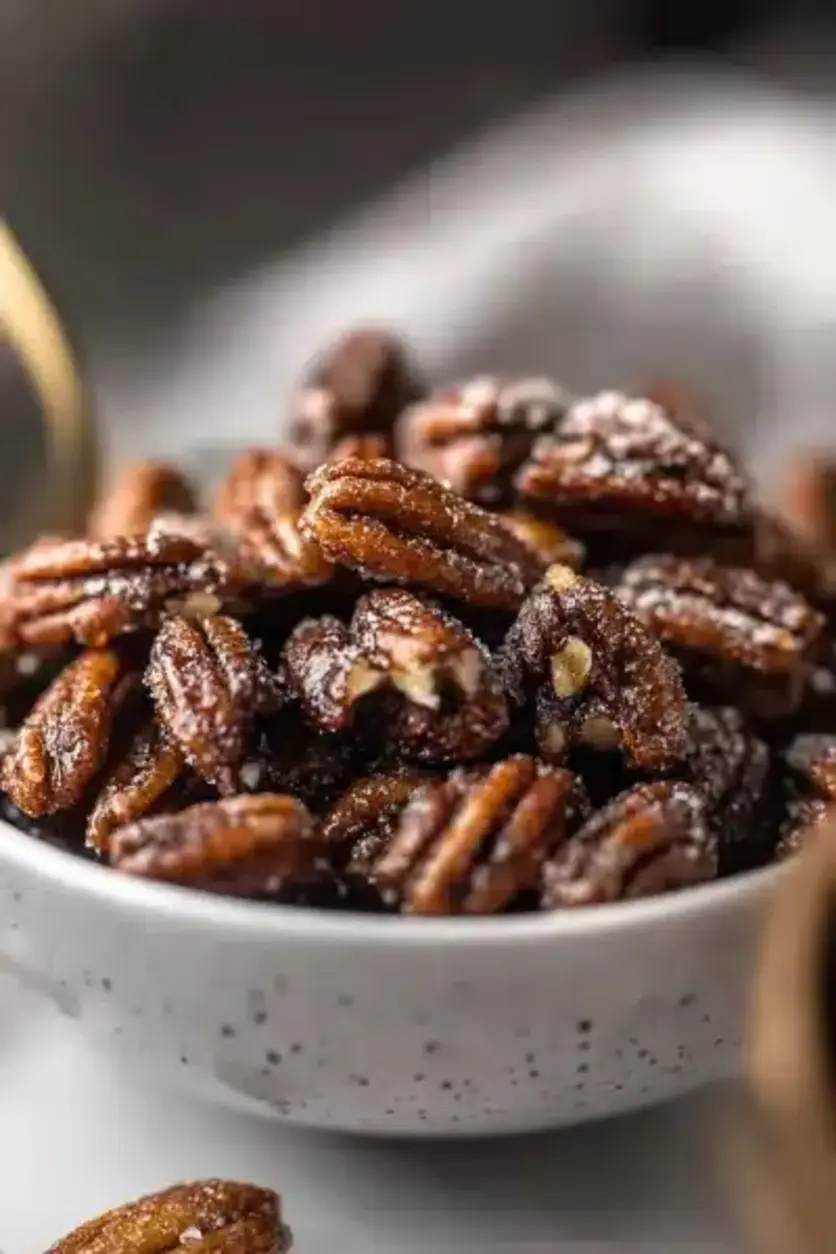
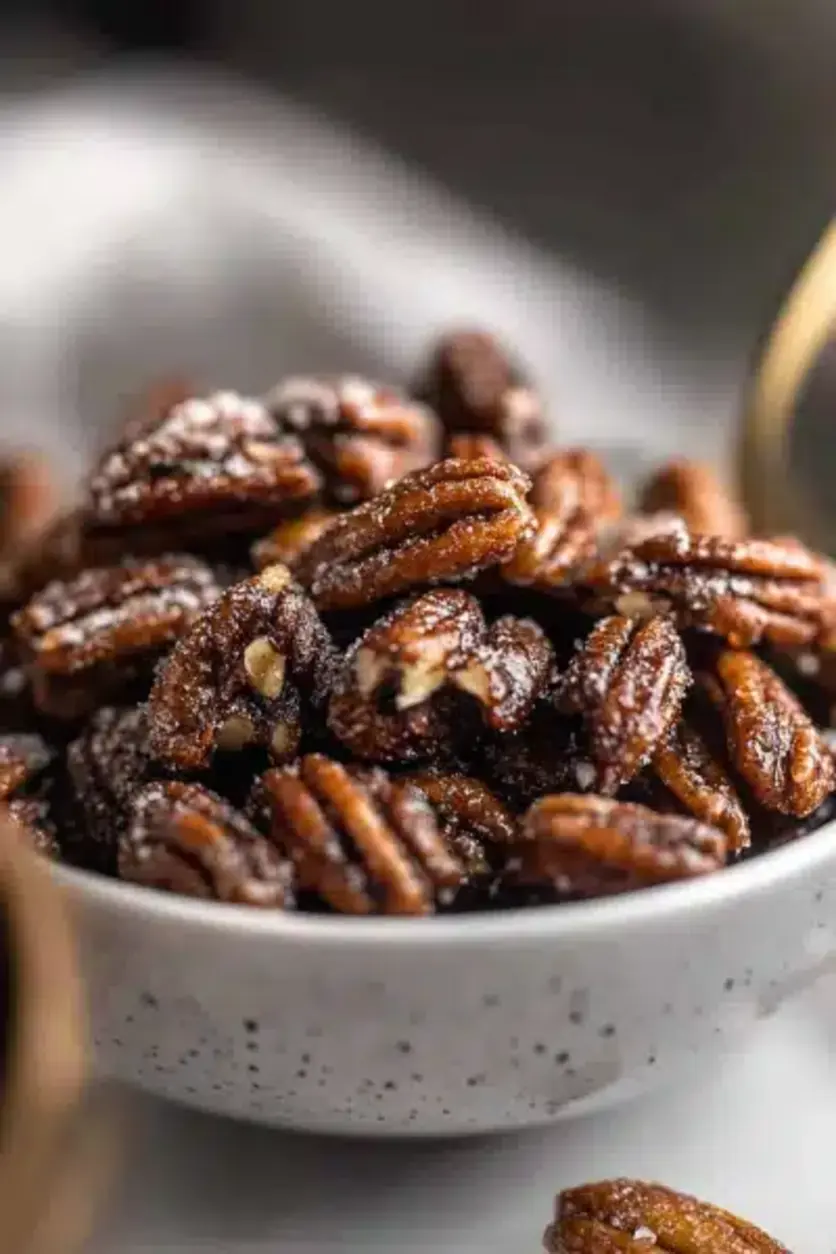
PrintStovetop Maple Candied Pecans (or Mixed Nuts)

Quick, easy, and naturally sweetened, these Stovetop Maple Candied Pecans (or Mixed Nuts) are the perfect snack or topping for salads, desserts, and more. Made with pure maple syrup and a hint of cinnamon, these crunchy nuts are ready in just 20 minutes and are endlessly customizable.
Ingredients
- 4 cupspecan halves (or any mixture of raw nuts like cashews and almonds)
- 1/2 cuppure maple syrup
- 2 teaspoonsvanilla extract
- 1 1/2 tablespoonscinnamon
- 1/2 teaspoonsea salt
Instructions
- Heat a skillet over medium heat. Add maple syrup, vanilla extract, and sea salt. Stir and warm for 1 minute.
- Add nuts and stir constantly to coat them in the syrup mixture.
- Sprinkle cinnamon over the nuts and stir again to ensure an even coating.
- Continue stirring as the maple syrup boils. Cook for 5–7 minutes, until the syrup is absorbed and no liquid remains in the skillet.
- Transfer nuts onto a parchment-lined surface and spread them out to cool. Optional: Sprinkle with a cinnamon-sugar mix for extra sweetness.
- Once cooled, break apart the nuts and store them in an airtight container.
Notes
Stir continuously to avoid burning the nuts.
You can omit the cinnamon for a simpler flavor or experiment withspiceslike nutmeg or cardamom.
Store in an airtight container at room temperature for up to 2 weeks, or freeze for up to 2 months.
Nutrition
- Calories: 201
- Sugar: 7g
- Fat: 18g
- Carbohydrates: 11g
- Protein: 2g
—
## Part 2: HTML Conversion for WordPress Gutenberg
“`html
On This Page
- Introduction
- Ingredients You’ll Need to Create Festive Bliss
- Timing is Everything: A Quick & Easy Holiday Bake
- Let’s Craft Your Edible Holiday Wreaths!
- Nutritional Snapshot
- Healthier Alternatives & Flavor Swaps
- Serving Suggestions: More Than Just a Cookie!
- Common Mistakes to Avoid
- Storing Your Wreath Cookies
- Conclusion: Ring in the Holiday Cheer!
- Frequently Asked Questions (FAQs)
Holiday Wreath Cookies – A No- Bake Delight
Looking for a magical, no-bake Christmas treat that kids can help create? You’re not alone! Surveys show that 70% of holiday bakers seek recipes that are both fun for the family and visually appealing for festive gatherings. These adorable Holiday Wreath Cookies are the answer! They’re incredibly easy, require no oven time, and are bursting with festive cheer. Get ready to add a sprinkle of joy to your holiday season with this simple, yet spectacular, no-bake delight. Save this recipe now and discover how simple it can be to create edible masterpieces that taste as good as they look.
Ingredients You’ll Need to Create Festive Bliss
Gathering your ingredients is half the fun for these wreath cookies! Their vibrant colors and sweet flavors come together with just a handful of pantry staples.
- Pretzels: About 2 cups of mini pretzel twists or sticks. Their salty crunch provides a delightful contrast to the sweet chocolate. Substitution: If you can’t find mini pretzels, you can break larger pretzel rods into pieces. For a gluten-free option, look for gluten-free pretzel alternatives.
- White Chocolate Chips: 12 ounces (about 2 cups). This forms the luscious “glue” that holds our wreaths together. Choose a good quality brand for the smoothest melt. Sensory Description: Creamy, sweet, and melts like a dream, coating everything in a delicate sweetness.
- Green Food Coloring: Gel food coloring works best for vibrant, concentrated color without watering down the chocolate. You’ll need enough to achieve a cheerful green hue. Substitution: Alternatively, you can use candy melts in green if you prefer not to use food coloring, though this might slightly alter the flavor.
- Sprinkles: A generous amount of festive Christmas sprinkles! Think red and green jimmies, nonpareils, edible glitter, or even small candy beads. These add texture, sparkle, and that essential festive touch. Sensory Description: Tiny bursts of color and crunch, adding a playful and festive finish.
- Red Candies (Optional): A small handful of red M&M’s or red candies for “berries” if you desire.
Timing is Everything: A Quick & Easy Holiday Bake
One of the best things about these Holiday Wreath Cookies is how little time they demand. Perfect for busy holiday schedules!
Compared to average Christmas cookies that often require baking for 10-15 minutes per batch and cooling time, these no-bake wreaths are significantly quicker to assemble and enjoy.
Let’s Craft Your Edible Holiday Wreaths!
The process is so straightforward, the little ones in your life will have a blast helping out.
Step 1: Prepare Your Baking Sheet
Line a large baking sheet with parchment paper or wax paper. This will prevent the cookies from sticking and make for easy cleanup.
Step 2: Melt the White Chocolate
Place the white chocolate chips in a microwave-safe bowl. Microwave in 30-second intervals, stirring well after each interval, until the chocolate is mostly melted and smooth. Be careful not to overheat, as white chocolate can seize easily. Alternatively, you can melt the chocolate using a double boiler.
Step 3: Color the Chocolate
Once the white chocolate is smooth and melted, add a few drops of green gel food coloring. Stir gently until the color is evenly distributed and you’ve achieved a beautiful, festive green. Add more coloring gradually if needed to reach your desired shade.
Step 4: Coat the Pretzels
Add the mini pretzel twists to the bowl of green-tinted melted white chocolate. Gently stir with a spatula or spoon until each pretzel is thoroughly coated. You want a nice, even layer of green chocolate.
Step 5: Shape the Wreaths
Using a fork or a small spoon, carefully lift the coated pretzels out of the chocolate. Place them onto the prepared baking sheet, arranging them in a circular wreath shape. Try to overlap them slightly to create a cohesive wreath form. Leave a small opening for the “top” of the wreath where you might add a “bow” or extra decorations later.
Step 6: Add Festive Decorations
While the green chocolate is still wet, immediately sprinkle your holiday sprinkles generously over the pretzels. This is where the magic happens! Get creative with patterns and colors. If you’re using red candies for berries, press them gently into the chocolate now.
Step 7: Let Them Set
Allow the wreath cookies to sit at room temperature for about 30 minutes, or until the chocolate has hardened completely. You can speed this up by placing the baking sheet in the refrigerator for about 10-15 minutes, but be mindful that refrigerating chocolate can sometimes make it dull.
Nutritional Snapshot
These delightful treats are more about festive fun than strict nutrition, but here’s a general idea of what you’re consuming per cookie (this can vary greatly based on sprinkle usage and pretzel size).
- Calories: Approximately 150-200 kcal
- Macros: Primarily from carbohydrates and fats due to the white chocolate and pretzels. Protein content is minimal.
Healthier Alternatives & Flavor Swaps
Want to make these wreaths even more mindful? Here are a few ideas without sacrificing flavor:
- Dark Chocolate Drizzle: Instead of coating entirely in white chocolate, use a smaller amount of green-tinted white chocolate for binding and then drizzle with melted dark chocolate for antioxidants and a richer flavor.
- Whole Wheat Pretzels: Opt for whole wheat pretzels for a bit more fiber.
- Natural Food Coloring: Explore natural food colorings derived from spirulina or matcha for a green hue, though the color intensity might be less vibrant.
- Reduced Sugar Sprinkles: Look for sprinkles with less added sugar or focus on natural additions like finely chopped nuts (if allergies aren’t a concern) or unsweetened shredded coconut.
- Smaller Wreaths: Simply make smaller wreaths to control portion sizes.
Serving Suggestions: More Than Just a Cookie!
These charming wreath cookies are fantastic on their own, but here are some ways to elevate their presentation and enjoyment:
- Dessert Platters: Arrange them beautifully on a festive platter alongside other holiday treats.
- Edible Gifts: Package them in cellophane bags tied with a ribbon for sweet, handmade gifts for neighbors, teachers, or friends.
- Cookie Exchange: They are a popular and unique addition to any cookie exchange.
- Kids’ Activity: Host a “cookie decorating party” where kids can assemble their own wreaths.
Common Mistakes to Avoid
Even with a simple recipe, a few common pitfalls can be avoided:
- Overheating White Chocolate: This is the most common mistake. White chocolate seizes and becomes clumpy if heated too quickly or too hot. Always use low heat and stir frequently.
- Using Water-Based Food Coloring: Water can cause chocolate to seize. Always use gel or oil-based food coloring designed for candy making and chocolate.
- Decorating Too Late: Apply sprinkles and candy “berries” while the chocolate is still wet, otherwise, they won’t stick.
- Rushing the Setting Process: While tempting, trying to rush the hardening in the fridge too much can sometimes lead to a dull finish or condensation. Patience yields a better-looking cookie.
Storing Your Wreath Cookies
Proper storage ensures your festive treats stay delightful:
- Airtight Container: Store the cooled and hardened wreath cookies in an airtight container at room temperature.
- Layering: If stacking, place parchment paper between layers to prevent sticking.
- Longevity: They are best enjoyed within 1-2 weeks, though they can technically last longer if stored correctly.
Frequently Asked Questions (FAQs)
Can I use milk chocolate or dark chocolate instead of white chocolate?
Yes, you can! However, white chocolate provides the best canvas for coloring green and for showcasing colorful sprinkles. If you choose milk or dark chocolate, you won’t be able to color it green effectively, but you can still use it as the base and decorate with colorful sprinkles. Ensure you melt it properly.
How do I get the green color to be vibrant?
Use gel food coloring. It’s highly concentrated and won’t add excess liquid, which is crucial for maintaining the smooth texture of melted chocolate. Start with a few drops and add more until you achieve the desired shade.
Can kids really make these independently?
With supervision for melting the chocolate, yes! They can help stir the chocolate, coat the pretzels, and, most importantly, go wild with the sprinkles. It’s a fantastic activity for little ones (and adults!).
Do I need to refrigerate these cookies to make them set?
While it’s not strictly necessary, refrigerating can speed up the setting process. However, ensure the chocolate is fully set before moving them. Air drying at room temperature will give them a slightly glossier finish.
How long do these cookies last?
Stored in an airtight container at room temperature, they should stay fresh and delicious for about 1-2 weeks.
Conclusion: Ring in the Holiday Cheer!
These Holiday Wreath Cookies are a testament to the fact that the most delightful treats don’t always require a hot oven. They’re a no-bake, no-fuss, and incredibly fun way to infuse your holiday season with sweetness and creative joy. Perfect for little hands to help with, they’ll be the star of your dessert table or a cherished homemade gift. So gather your ingredients, unleash your inner elf, and create these adorable edible wreaths. Happy baking (or rather, non-baking)!
Stovetop Maple Candied Pecans (or Mixed Nuts)
Quick, easy, and naturally sweetened, these Stovetop Maple Candied Pecans (or Mixed Nuts) are the perfect snack or topping for salads, desserts, and more. Made with pure maple syrup and a hint of cinnamon, these crunchy nuts are ready in just 20 minutes and are endlessly customizable.
Ingredients
- 4 cupspecan halves (or any mixture of raw nuts like cashews and almonds)
- 1/2 cuppure maple syrup
- 2 teaspoonsvanilla extract
- 1 1/2 tablespoonscinnamon
- 1/2 teaspoonsea salt
Instructions
- Heat a skillet over medium heat. Add maple syrup, vanilla extract, and sea salt. Stir and warm for 1 minute.
- Add nuts and stir constantly to coat them in the syrup mixture.
- Sprinkle cinnamon over the nuts and stir again to ensure an even coating.
- Continue stirring as the maple syrup boils. Cook for 5–7 minutes, until the syrup is absorbed and no liquid remains in the skillet.
- Transfer nuts onto a parchment-lined surface and spread them out to cool. Optional: Sprinkle with a cinnamon-sugar mix for extra sweetness.
- Once cooled, break apart the nuts and store them in an airtight container.
Notes
Stir continuously to avoid burning the nuts.
You can omit the cinnamon for a simpler flavor or experiment withspiceslike nutmeg or cardamom.
Store in an airtight container at room temperature for up to 2 weeks, or freeze for up to 2 months.
Nutrition
- Calories: 201
- Sugar: 7g
- Fat: 18g
- Carbohydrates: 11g
- Protein: 2g
“`