Chocolate Peanut Butter Pie Recipe | Easy Dessert

“`html
Table of Contents
- Indulge in the Delectable Chocolate Peanut Butter Temptation Pie
- Ingredients for Chocolate Peanut Butter Temptation Pie
- Pie Perfection: Timing Your Chocolate Peanut Butter Dream
- Crafting Your Chocolate Peanut Butter Masterpiece
- Nutritional Snapshot: A Guilt-Free (Almost!) Indulgence
- Flavorful Swaps: Healthier Twists on Chocolate Peanut Butter Pie
- Serving Suggestions: Elevate Your Dessert Experience
- Avoiding Pitfalls: Common Mistakes to Steer Clear Of
- Storing Your Masterpiece: Keeping the Magic Alive
- Frequently Asked Questions About Chocolate Peanut Butter Pie
Chocolate Peanut Butter Pie Recipe | Easy Dessert
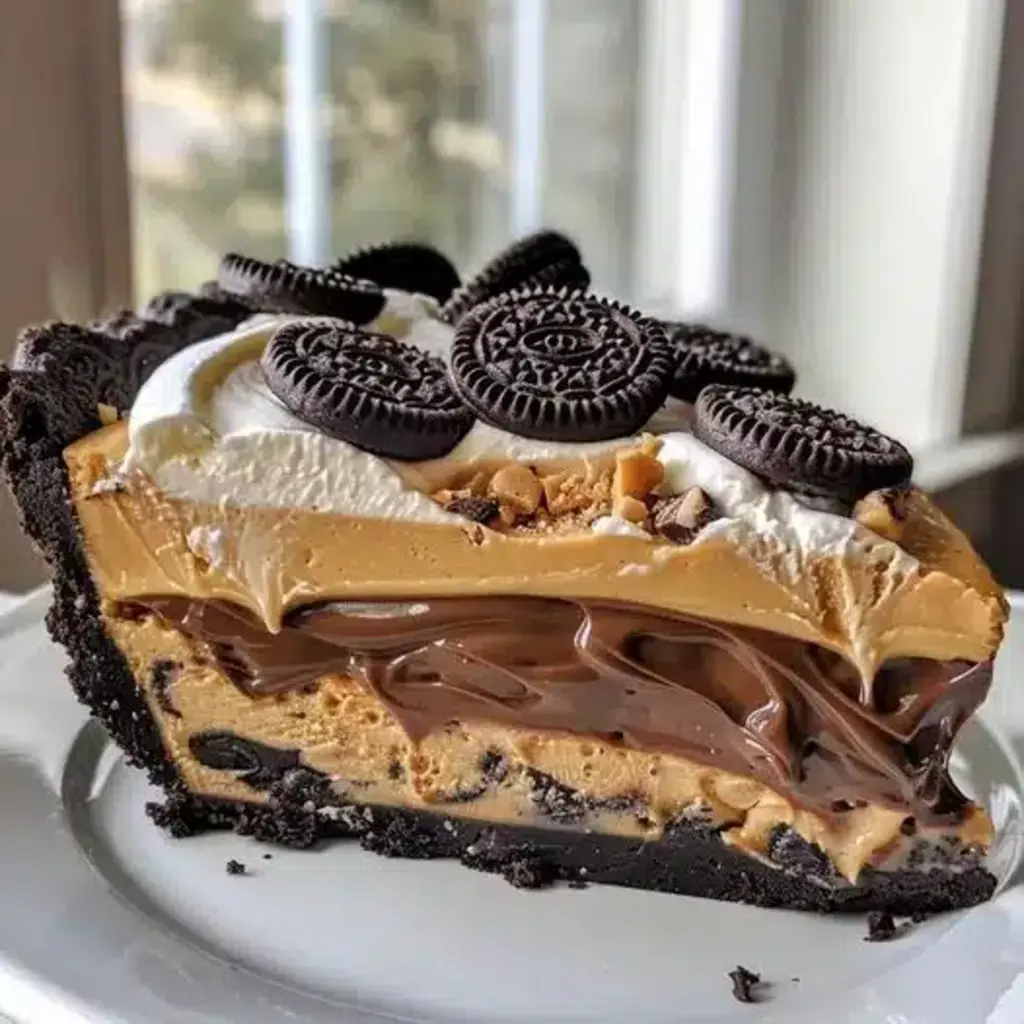
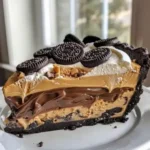
Are you searching for a dessert that consistently receives rave reviews and elicits gasps of delight? In a world overflowing with sweet treats, what makes a chocolate peanut butter pie stand head and shoulders above the rest? It’s all about the perfect symphony of textures and flavors, and our Chocolate Peanut Butter Temptation Pie is precisely that: a masterpiece. Imagine the satisfying crunch of an Oreo cookie crust, the velvety embrace of a rich peanut butter filling, and the decadent, luscious cascade of a dark chocolate ganache. This isn’t just a pie; it’s an experience, a celebration designed to impress even the most discerning palate. Whether you’re hosting a special occasion, looking for a show-stopping potluck contribution, or simply craving an extraordinary indulgence, this recipe promises to satisfy your deepest sweet cravings and become a cherished favorite.
Ingredients for Chocolate Peanut Butter Temptation Pie
For the Oreo Crust
- 2 cups finely crushed Oreo cookies (about 20-24 cookies): The base of our pie, providing a delightful chocolatey crunch and a familiar, comforting flavor. These cookies create a sturdy yet tender crust that perfectly complements the creamy filling.
- 6 tablespoons unsalted butter, melted: Binds the cookie crumbs together, creating a cohesive crust that holds its shape. The richness of butter enhances the overall flavor profile.
For the Creamy Peanut Butter Filling
- 1 (8 ounce) package cream cheese, softened: The powerhouse of our creamy filling, it adds a tangy richness and a smooth, luxurious texture that is essential for a no-bake pie.
- 1 cup creamy peanut butter: The star of the show! Use your favorite brand of creamy peanut butter – natural or conventional. Its nutty, slightly sweet flavor is what makes this pie unforgettable.
- 1 cup powdered sugar: Sweetens the filling to perfection without adding a gritty texture, ensuring a silky-smooth consistency.
- 1 teaspoon vanilla extract: Enhances the overall flavor, rounding out the sweetness and peanut butter notes with its aromatic warmth.
- 1 ½ cups heavy whipping cream, cold: Whipped to soft peaks, this ingredient lightens the filling, making it airy and wonderfully decadent. It also helps the filling set beautifully.
For the Rich Chocolate Ganache
- 1 cup semi-sweet chocolate chips: The foundation of our luscious ganache. Semi-sweet offers a balanced chocolate flavor that isn’t too bitter or too sweet.
- ½ cup heavy whipping cream: When heated and combined with chocolate, this creates a smooth, glossy ganache that drapes beautifully over the pie.
Pie Perfection: Timing Your Chocolate Peanut Butter Dream
This recipe is designed for maximum flavor with minimal fuss, making it perfect for busy bakers. You can create this stunning pie with:
Compared to traditional baked pies, this no-bake wonder significantly cuts down on active time, shifting the focus to the crucial chilling period that allows the flavors to meld and the textures to set perfectly. Most baked pies require at least an hour of baking, plus cooling time, making this a fantastic time-saver for achieving a gourmet dessert.
Crafting Your Chocolate Peanut Butter Masterpiece
Step 1: Laying the Foundation – The Oreo Crust
Begin by preparing your crust. In a medium bowl, combine the finely crushed Oreo cookies with the melted unsalted butter. Stir until the crumbs are evenly moistened, resembling wet sand. This mixture is the unsung hero, providing structural integrity and a delightful chocolatey base. Press this mixture firmly and evenly into the bottom and up the sides of a 9-inch pie plate. Use the bottom of a glass or a measuring cup to ensure a compact and smooth surface. This firm foundation is crucial for a slice that holds its shape.
Step 2: The Creamy Core – Peanut Butter Filling
In a large bowl, beat the softened cream cheese with an electric mixer until completely smooth and free of lumps. This step is vital for a velvety texture. Add the creamy peanut butter and beat until well combined and smooth. Gradually beat in the powdered sugar and vanilla extract until the mixture is light and fluffy. In a separate, clean bowl, whip the cold heavy whipping cream until medium peaks form. Gently fold about one-third of the whipped cream into the peanut butter mixture to lighten it, then carefully fold in the remaining whipped cream until just combined. Be careful not to overmix, as this can deflate the whipped cream and result in a denser filling. You want it light and airy!
Step 3: The Glossy Crown – Chocolate Ganache
For the decadent chocolate ganache, place the semi-sweet chocolate chips in a heatproof bowl. In a small saucepan, heat the heavy whipping cream over medium heat until it just begins to simmer around the edges. Do not let it boil. Pour the hot cream over the chocolate chips. Let it sit undisturbed for 5 minutes to allow the chocolate to melt. Then, whisk gently until the ganache is smooth, glossy, and completely combined. The aroma alone is intoxicating! Let the ganache cool slightly to room temperature, which will take about 15-20 minutes. It should be pourable but not too hot.
Step 4: Bringing It All Together – Assembly
Gently pour the creamy peanut butter filling into the prepared Oreo crust. Spread it evenly with a spatula to create a smooth, even layer. Once the filling is spread, carefully pour the slightly cooled chocolate ganache over the peanut butter filling. Use an offset spatula or the back of a spoon to spread the ganache evenly, creating a beautiful, glossy topping. Aim for an even coating that goes all the way to the edges of the crust.
Step 5: The Crucial Chill – Patience is a Virtue
This is perhaps the most important step for optimal results. Cover the pie loosely with plastic wrap (try not to let it touch the ganache) and refrigerate for at least 4-6 hours, or preferably overnight. This chilling time allows the filling to set firmly, the flavors to meld together, and the ganache to achieve its perfect, luscious consistency. For the cleanest slices, you can briefly dip your knife in hot water and wipe it dry between each cut. This is the key to a professional-looking dessert!
Nutritional Snapshot: A Guilt-Free (Almost!) Indulgence
While this pie is pure indulgence, understanding its nutritional profile can help you savor it mindfully:
- Calories: Approximately 450-550 per serving (varies based on ingredients and serving size)
- Fat: Rich in healthy fats from peanut butter and cream, but also contains saturated fats from butter and chocolate.
- Carbohydrates: Primarily from sugar and Oreo crumbs.
- Protein: Contributes some protein from the peanut butter and cream cheese.
Note: This is an approximation. Actual nutritional values can vary based on specific ingredients used.
Flavorful Swaps: Healthier Twists on Chocolate Peanut Butter Pie
You can still enjoy the irresistible combination of chocolate and peanut butter with a few smart substitutions:
- Crust: Swap Oreo crumbs for crushed graham crackers or whole wheat digestive biscuits, and reduce the butter slightly. A nut-based crust (almonds, walnuts) with a touch of dates can also be a great alternative.
- Filling Sweetener: Reduce powdered sugar or experiment with natural sweeteners like maple syrup or honey, keeping in mind they can affect texture. For a sugar-free option, consider erythritol or stevia blends, adjusting amounts to taste.
- Cream Cheese: Use a light or Neufchâtel cream cheese for a slightly lower fat content. Greek yogurt can also be incorporated for tang and creaminess, though it might change the texture slightly.
- Chocolate Ganache: Opt for dark chocolate (70% cacao or higher) which contains less sugar and more beneficial antioxidants. You can also use dairy-free milk and dark chocolate for a vegan version.
Serving Suggestions: Elevate Your Dessert Experience
This pie is sensational on its own, but here are a few ways to make it even more memorable:
- Whipped Cream Dollops: A generous swirl of freshly whipped cream is a classic and elegant topping.
- Chocolate Shavings: Grate some high-quality dark or milk chocolate over the ganache for added visual appeal and texture.
- Peanut Butter Drizzle: Warm a small amount of peanut butter slightly and drizzle it over the top in a decorative pattern.
- Chopped Peanuts or Pretzels: A sprinkle of chopped roasted peanuts or crushed pretzels adds another layer of crunch and salty contrast.
- Fresh Berries: A few fresh raspberries or strawberries can provide a burst of freshness and color to cut through the richness.
Avoiding Pitfalls: Common Mistakes to Steer Clear Of
Ensure foolproof success by sidestepping these common blunders:
- Not Softening Cream Cheese Enough: Lumpy filling is often the result of not allowing the cream cheese to come to room temperature properly.
- Overmixing the Filling: Overbeating can destabilize the whipped cream and lead to a less airy, denser texture.
- Ganache Too Hot or Too Cold: Pouring hot ganache can melt the filling, while cold ganache won’t spread smoothly. Let it cool to a pourable, warm consistency.
- Insufficient Chilling Time: Impatience is the enemy of a well-set no-bake pie. Rushing the chilling process will result in a pie that’s too soft to slice cleanly.
- Pressing the Crust Too Thinly: A flimsy crust can lead to a pie that falls apart when served. Ensure it’s pressed firmly and evenly.
Storing Your Masterpiece: Keeping the Magic Alive
To maintain its pristine condition, store your Chocolate Peanut Butter Temptation Pie properly:
- Refrigeration is Key: Always store the pie, covered loosely with plastic wrap or in an airtight container, in the refrigerator.
- Shelf Life: The pie will keep well in the refrigerator for up to 3-4 days. The flavors often deepen and improve on the second day!
- Freezing: While not ideal for texture, you can freeze individual slices wrapped tightly in plastic wrap and then in foil for up to 1 month. Thaw overnight in the refrigerator before serving.

Frequently Asked Questions About Chocolate Peanut Butter Pie
***Can I use crunchy peanut butter instead of creamy?***
Yes, you absolutely can! Using crunchy peanut butter will add an extra layer of texture to the filling, making it even more interesting. Just be aware that the texture will be slightly different.
***My ganache seems too thick. What should I do?***
If your ganache is too thick, you can gently warm it up by placing the bowl over a warm water bath (a bain-marie) and whisking until it reaches a pourable consistency. Be careful not to overheat it.
***Can I make this pie ahead of time?***
Yes! This is an excellent make-ahead dessert. In fact, it’s best when chilled for at least 4-6 hours, or overnight, allowing the flavors to fully meld and the texture to set properly.
***What kind of chocolate is best for the ganache?***
Semi-sweet chocolate chips are a classic choice and provide a balanced flavor. However, you can also use dark chocolate (60-70% cacao) for a richer, less sweet ganache, or even milk chocolate for a sweeter profile. Just ensure it’s good quality for the best results.
***How do I get clean slices of no-bake pie?***
The secret to clean slices is a sharp knife that is hot and dry. Dip your knife in hot water, wipe it dry with a clean towel, and then make your cut. Repeat this for each slice.
Ready to bake up a storm? Bookmark this recipe and share your creations with us! Your feedback is what makes our culinary journey so sweet!
Chocolate Peanut Butter Pie Recipe | Easy Dessert
Indulge in the delectable Chocolate Peanut Butter Temptation Pie—a masterpiece of textures and flavors that promises a perfect dessert experience. Combining the crunchiness of Oreo cookies, the creamy richness of peanut butter, and the lusciousness of chocolate ganache, this pie is not just a treat but a celebration of flavors. Perfect for any occasion, it’s designed to impress and satisfy your sweet cravings.
Ingredients
- 24Oreo cookies, finely crushed
- 1/4 cupunsalted butter, melted
- 1 cupcreamy peanut butter
- 1package (8 ounces) cream cheese, softened
- 1/2 cupconfectioners’ sugar
- 1/2 cupmilk
- 1 cupsemisweet chocolate chips
- 1/2 cupheavy cream
- 1 cupheavy whipping cream
- 2 tablespoonsconfectioners’ sugar
- Mini Oreo cookies
- Additional peanut butter, melted for drizzle
Instructions
- Crust: Mix Oreo crumbs with melted butter and press into the bottom of a pie dish. Chill for 30 minutes.
- Peanut Butter Layer: Beat peanut butter, cream cheese, and confectioners’ sugar until smooth. Gradually add milk until blended. Spread half over the crust. Chill for 10 minutes.
- Chocolate Ganache: Melt chocolate chips with heavy cream over low heat until smooth. Pour over the peanut butter layer. Chill until set.
- Second Peanut Butter Layer: Spread the remaining peanut butter mixture over the chocolate layer.
- Whipped Cream Topping: Whip the cream with confectioners’ sugar until stiff peaks form. Spread over the final peanut butter layer.
- Garnish: Garnish with mini Oreo cookies and drizzle with melted peanut butter.
Notes
Storage: Keep refrigerated and consume within 3 days for best taste and texture.
Serving Suggestions: Serve chilled. Pair with a hot cup of coffee or tea to balance the sweetness.
Variations: Consider adding a layer of sliced bananas between the peanut butter and chocolate layers for a fruity twist.
“`