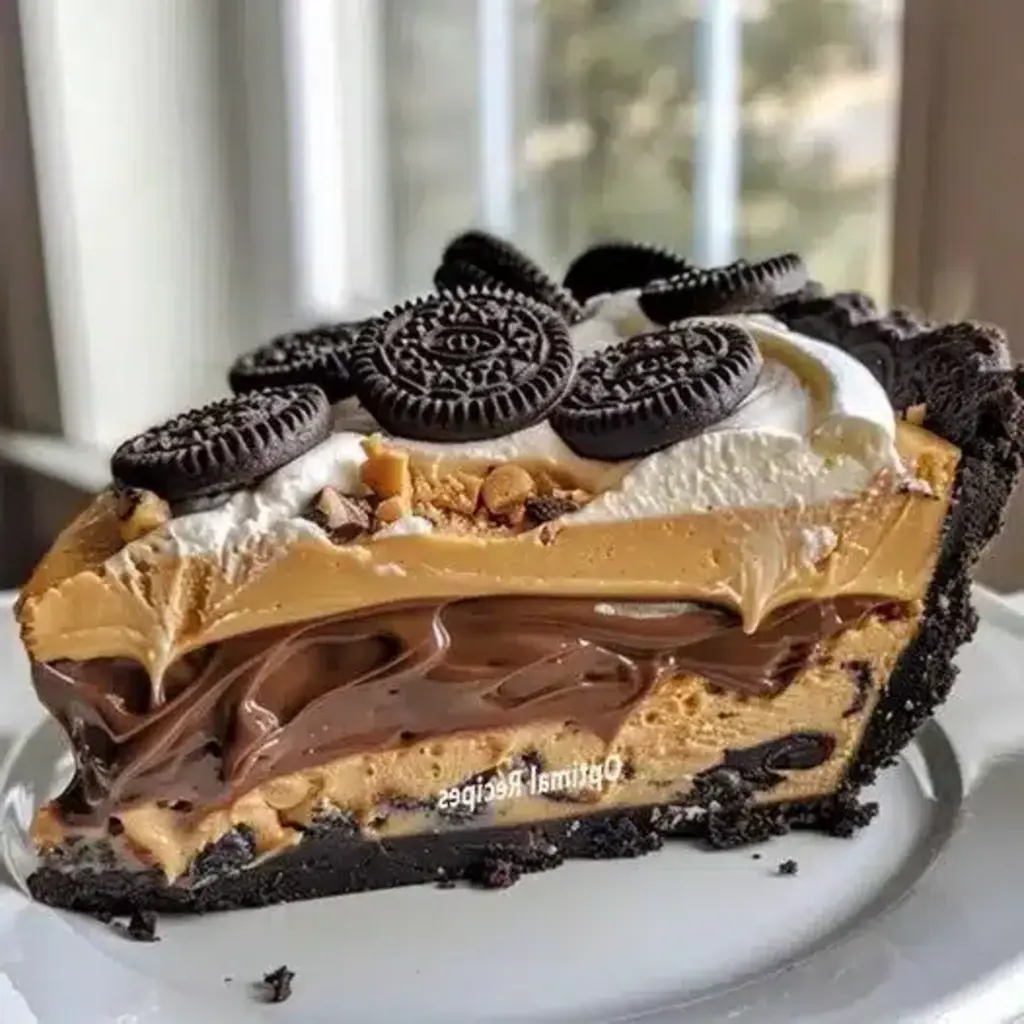
Chocolate Peanut Butter Temptation Pie Recipe
“`html
Table of Contents
Chocolate Peanut Butter Temptation Pie Recipe
Craving the Ultimate Dessert? Unlock the Magic of Chocolate Peanut Butter Temptation Pie!
Are you searching for a dessert that perfectly balances the rich allure of chocolate with the comforting embrace of peanut butter? If statistics hold true and a significant majority of dessert lovers reach for chocolate and peanut butter combinations, then this Chocolate Peanut Butter Temptation Pie recipe is designed for you! It’s more than just a pie; it’s an experience, a symphony of textures and flavors that will leave you and your guests utterly delighted. Imagine a crisp, chocolatey crust, a creamy, dreamy peanut butter filling, a silken chocolate ganache, and a cloud of whipped cream – all coming together in a single, glorious bite. This recipe is your ticket to dessert heaven, and we’re about to guide you through every decadent step.
Irresistible Ingredients for Your Chocolate Peanut Butter Temptation Pie
The magic of this pie lies in its simple yet powerful combination of ingredients. We’ve focused on readily available items that deliver maximum flavor and a luxurious texture. Let’s break down what you’ll need:
For the Oreo Crust:
- 24 Oreo cookies, finely crushed: The backbone of our sweet foundation. The dark chocolate cookie and creamy filling meld beautifully when baked. You can crush them in a food processor for an even texture or place them in a zip-top bag and use a rolling pin for a more rustic crumble.
- 1/4 cup unsalted butter, melted: This acts as the binder, holding those glorious cookie crumbs together. Ensure it’s fully melted but not hot.
For the Peanut Butter Layer:
- 1 cup creamy peanut butter: The star of the show! Use your favorite creamy peanut butter. Natural peanut butter can sometimes separate, so a commercial creamy version tends to yield a smoother, more stable filling. For an extra nutty punch, consider using a blend of creamy and crunchy.
- 1 package (8 ounces) cream cheese, softened: Crucial for that velvety, rich texture and tangy counterpoint to the sweet peanut butter. Make sure it’s truly softened to room temperature to avoid lumps.
- 1/2 cup confectioners’ sugar: Provides sweetness and helps achieve that signature smooth, creamy consistency. Sift it if you notice any lumps.
- 1/2 cup milk: Helps to create the perfect creamy, spreadable consistency for the filling. Whole milk will yield the richest texture, but any milk will work.
For the Chocolate Ganache:
- 1 cup semisweet chocolate chips: The deep, decadent chocolate layer. Feel free to use chopped chocolate bars for a smoother melt. The quality of your chocolate will significantly impact the flavor here.
- 1/2 cup heavy cream: This, combined with the chocolate, creates a luscious, glossy ganache that pours beautifully.
For the Whipped Cream Topping:
- 1 cup heavy whipping cream: For a light and airy crown. It must be very cold to whip properly.
- 2 tablespoons confectioners’ sugar: To sweeten the whipped cream just right.
For the Garnish:
- Mini Oreo cookies: For that classic, irresistible look.
- Additional peanut butter, melted for drizzle: An extra touch of flavor and visual appeal.
The Sweet Timeline: How Long Does This Masterpiece Take?
Let’s talk about time. This “temptation” pie requires a bit of patience, especially with chilling times, but the active preparation is quite manageable. Compared to the average homemade pie that might involve complex baking or lengthy dough resting, this no-bake wonder is relatively efficient.
Step-by-Step Instructions: Crafting Your Chocolate Peanut Butter Dream
Follow these steps to create a pie that’s as beautiful as it is delicious. Precision and a little love will ensure a perfect outcome!
Step 1: Prepare the Oreo Crust
First things first, let’s build a sturdy and delicious foundation. Take your 24 Oreo cookies and crush them into fine crumbs. A food processor makes quick work of this, but you can also place them in a sturdy zip-top bag and go at them with a rolling pin! In a medium bowl, combine the Oreo crumbs with the 1/4 cup of melted unsalted butter. Stir until all the crumbs are moistened and the mixture resembles wet sand. Press this crumbly mixture firmly and evenly into the bottom and up the sides of a 9-inch pie plate. A flat-bottomed glass or your hands works best for this. Pop this crust into the freezer for about 10-15 minutes while you prepare the filling. This helps it set up beautifully.
Step 2: Mix the Peanut Butter Filling
Now for the creamy heart of our pie! In a large bowl, beat together the 1 cup of creamy peanut butter and the 8 ounces of softened cream cheese until smooth and well combined. This is where you’ll want to ensure your cream cheese is at room temperature to avoid any lumpy surprises. Gradually beat in the 1/2 cup of confectioners’ sugar until fully incorporated, making sure to scrape down the sides of the bowl. Finally, slowly drizzle in the 1/2 cup of milk, mixing until the filling is smooth, creamy, and has a lusciously thick but spreadable consistency.
Step 3: Assemble and Chill the Crust
Retrieve your chilled Oreo crust from the freezer. Spoon the creamy peanut butter filling into the prepared crust and spread it evenly. Use a spatula to create a smooth, beautiful layer. Once the filling is perfectly smooth, cover the pie loosely with plastic wrap and refrigerate for at least 2 hours, or until the filling is firm to the touch. This chilling step is crucial for allowing the pie to set properly so it holds its shape when sliced.
Step 4: Prepare the Chocolate Ganache
For this step, you have two easy methods. Method 1 (Microwave): Place the 1 cup of semisweet chocolate chips in a microwave-safe bowl. Heat on 50% power for 30-second intervals, stirring in between, until the chocolate is almost completely melted. Stir until smooth. In a separate small saucepan, heat 1/2 cup of heavy cream just until it begins to simmer around the edges – do not boil. Pour the hot cream over the melted chocolate and let it sit for 5 minutes. Gently whisk until the ganache is smooth, glossy, and luxurious. Method 2 (Stovetop): Place the chocolate chips in a heatproof bowl. Heat the heavy cream in a small saucepan over medium heat until it just begins to simmer. Pour the hot cream over the chocolate chips. Let it sit for 5 minutes, then whisk until smooth and glossy. Allow the ganache to cool slightly at room temperature until it’s still pourable but not hot.
Step 5: Prepare the Whipped Cream Topping
Just before serving, or when the pie is fully chilled and ready for its crowning glory, let’s whip up some cream. In a chilled bowl (a metal or glass bowl works best), combine 1 cup of very cold heavy whipping cream and 2 tablespoons of confectioners’ sugar. Using an electric mixer or a whisk, beat the cream until stiff peaks form. Be careful not to over-whip, or you’ll end up with butter! The cream should hold its shape when you lift the beaters.
Step 6: Decorate and Serve
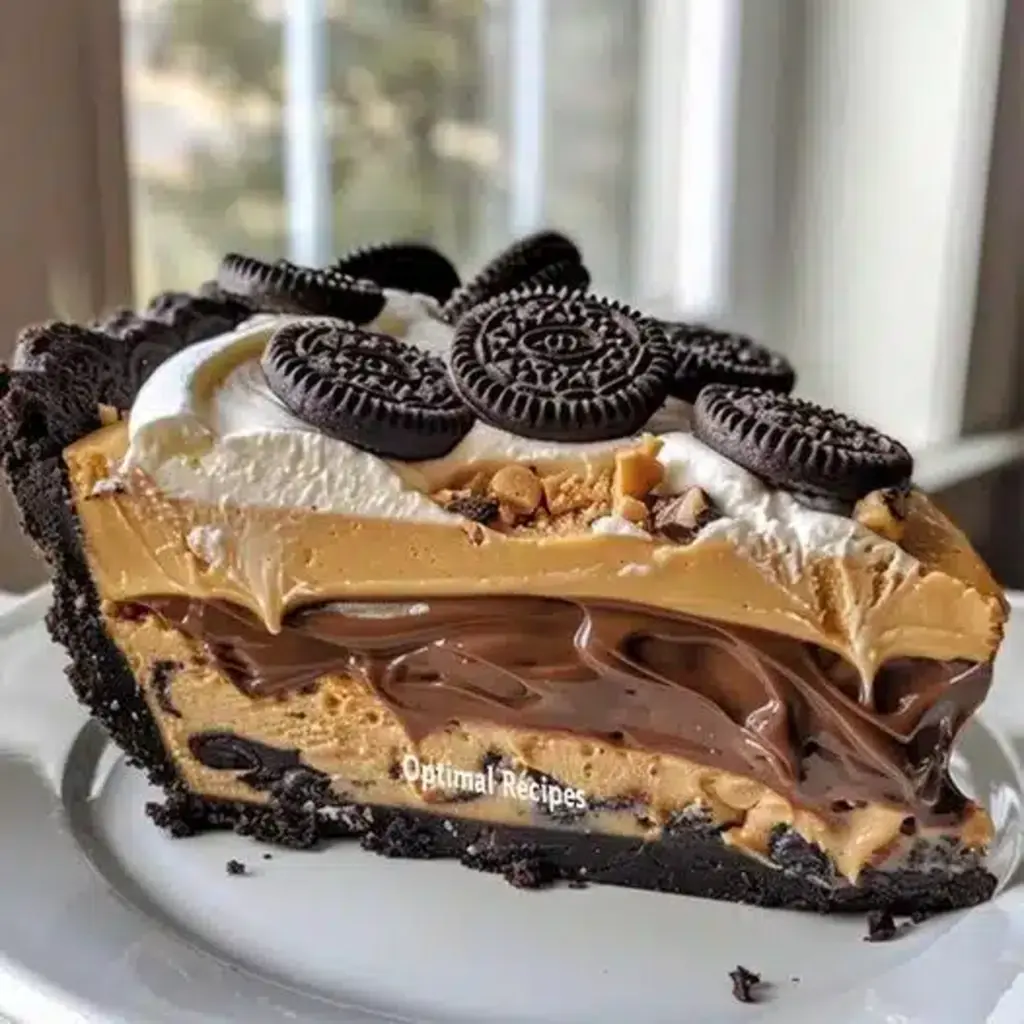
Now for the grand finale! Once the peanut butter layer is firm, gently pour or spread the slightly cooled chocolate ganache over the peanut butter filling, creating an even, shimmering layer. Return the pie to the refrigerator for at least another 2 hours, or until the ganache is set. Just before serving, top the pie with the freshly whipped cream. Dollop it on generously or use a piping bag for an extra fancy touch. Finally, adorn your masterpiece with mini Oreo cookies and a drizzle of melted peanut butter for that ultimate eye-catching appeal. Slice with a sharp knife (wiping it clean between slices for neat cuts) and serve immediately!
Nutritional Information (Approximate Per Serving of 8 Slices)
- Calories: 550-650 kcal (this can vary based on exact ingredients and portion size)
- Fat: 35-45g
- Carbohydrates: 45-55g
- Protein: 10-15g
- Sugar: 30-40g
Please note: Nutritional values are estimates and can vary significantly based on specific ingredient brands and portion sizes.
Making it a Little Lighter (Without Sacrificing Flavor!)
While this pie is a celebration of indulgence, we can make a few smart swaps to lighten it up:
- Crust: Opt for a graham cracker crust or a reduced-sugar cookie crust. You can also reduce the butter slightly, as it still holds reasonably well.
- Peanut Butter Layer: Use a natural peanut butter (stirred well!) and consider reducing the confectioners’ sugar by a tablespoon or two. You can also swap some of the cream cheese with Greek yogurt for a tangy protein boost, though this will alter the texture slightly.
- Chocolate Ganache: Use dark chocolate with a higher cocoa percentage (70% or more) as it contains less sugar. You can also use a lighter hand with its application.
- Whipped Cream: Lighten whip or a coconut cream topping can be used, though the flavor profile will change.
Serving Suggestions: Elevate Your Pie Experience
This Chocolate Peanut Butter Temptation Pie is a star on its own, but here are a few ways to make it even more special:
- Serve chilled with a tall glass of cold milk or a hot cup of coffee.
- A small scoop of vanilla bean or coffee ice cream makes for a delightful pairing.
- For an extra rich dessert, serve with a dollop of raspberry coulis to cut through the sweetness.
- A sprinkle of sea salt flakes over the ganache just before serving can add a sophisticated salty-sweet dimension.
Common Mistakes to Avoid (So Your Pie is Perfect!)
Even simple recipes can have pitfalls. Here are a few common mistakes to steer clear of:
- Not Softening Cream Cheese: Lumps in your filling are a texture disaster. Ensure cream cheese is truly at room temperature.
- Not Chilling Enough: Impatience can lead to a messy slice. The chilling times are essential for the pie to set firm.
- Oreo Crumbs Too Coarse: Very large chunks can lead to a crumbly crust that doesn’t hold together.
- Over-Whipping Cream: Turn your whipped cream into butter by whipping for too long. Watch for stiff peaks.
Storing Your Temptation
Because of the cream cheese and whipped cream, this pie needs to be stored in the refrigerator. Cover it tightly with plastic wrap or transfer slices to an airtight container. It’s best enjoyed within 3-4 days of making.
Frequently Asked Questions (FAQs)
Is it okay to use crunchy peanut butter?
Yes, you can! Crunchy peanut butter will add a delightful textural element to the filling. Just ensure it’s well-mixed for an overall smooth filling.
Can I make this pie ahead of time?
Absolutely! The pie can be assembled and chilled a day in advance. Add the whipped cream topping just before serving for the freshest taste and texture.
What is the best way to cut this pie cleanly?
For the cleanest slices, use a large, sharp knife. Dip the knife in hot water and wipe it dry between each cut. This helps the knife glide through the layers smoothly.
Can I freeze this pie?
It’s not ideal to freeze the entire pie, especially with the whipped cream topping, as it can affect the texture. Slices, tightly wrapped, might freeze for a short period, but the dairy components are best fresh.
What if I don’t have Oreos for the crust?
Don’t worry! Any chocolate cookie or even graham crackers will work as a substitute for the crust. Just follow the same ratio of cookie crumbs to melted butter.
There you have it – a step-by-step guide to creating the decadent Chocolate Peanut Butter Temptation Pie. We promise, every spoonful is worth the effort. If you make this pie, be sure to share your creations and tag us! Happy baking (and eating)!
Chocolate Peanut Butter Temptation Pie Recipe

For the Oreo Crust:24 Oreo cookies, finely crushed1/4 cup unsalted butter, meltedFor the Peanut Butter Layer:1 cup creamy peanut butter1 package (8 ounces) cream cheese, softened1/2 cup confectioners’ sugar1/2 cup milkFor the Chocolate Ganache:1 cup semisweet chocolate chips1/2 cup heavy creamFor the Whipped Cream Topping:1 cup heavy whipping cream2 tablespoons confectioners’ sugarFor the Garnish:Mini Oreo cookiesAdditional peanut butter, melted for drizzle
Instructions
Notes
For an extra touch of flair, consider using a decorative pie dish or garnishing with chocolate curls. Serving this pie slightly chilled maximizes the flavors and textures of each layer. It’s an excellent choice for making ahead, as it keeps well in the refrigerator for several days.
“`