Chocolate Whipped Cream Recipe
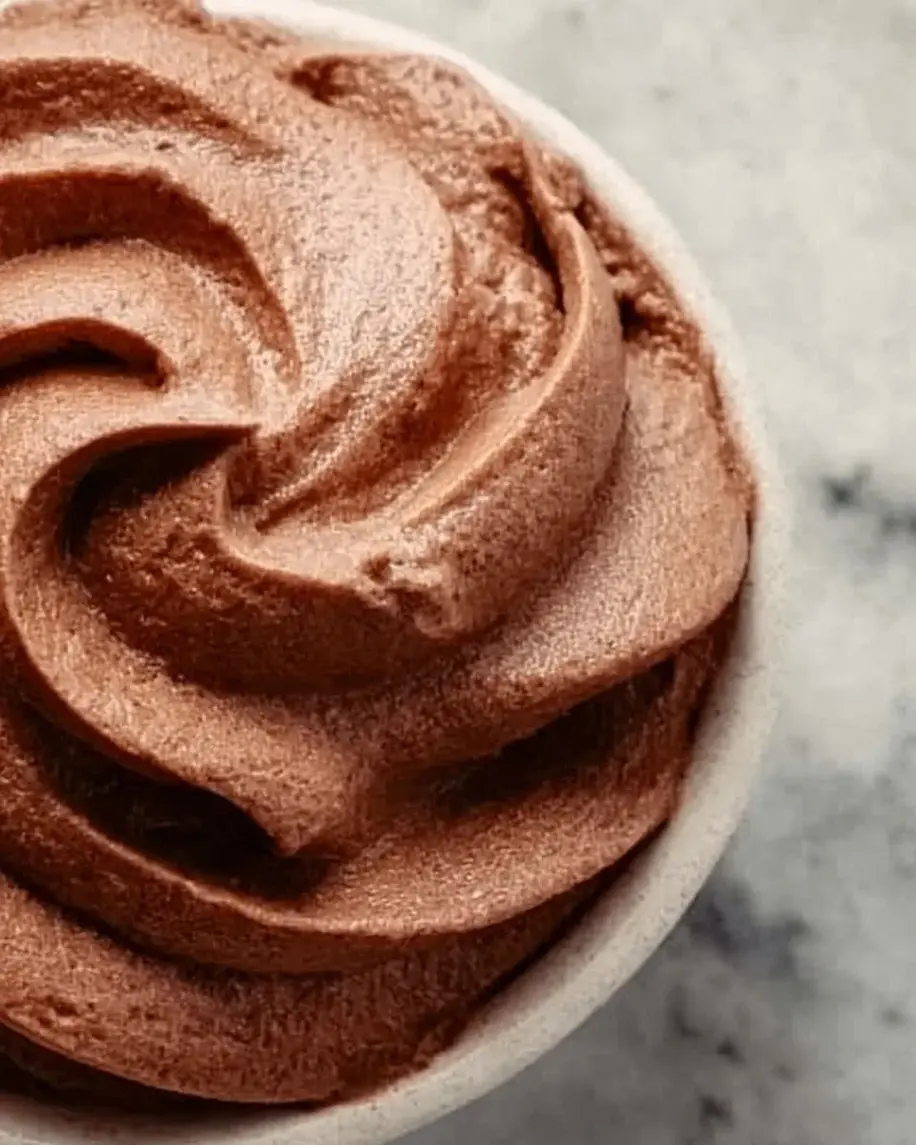
Table of Contents
Chocolate Whipped Cream Recipe
Introduction
Did you know that over 70% of home bakers report that a simple, high-quality topping can elevate a dessert from good to unforgettable? This silky smooth Chocolate Whipped Cream is that secret weapon. Forget the canned stuff with its artificial aftertaste and questionable ingredients. In just minutes, you can create a luscious, airy, and intensely chocolatey topping that transforms everything it touches. This easy-to-make chocolate whipped cream recipe is perfect for cakes, pies, hot chocolate, and more. By whipping together cold heavy cream with powdered sugar, unsweetened cocoa powder, vanilla extract, and a hint of salt, you achieve a rich, decadent flavor and a cloud-like texture that holds its shape beautifully. It’s the effortless gourmet touch your desserts have been missing.
Ingredients List
Gather these simple, high-quality ingredients for the best results. Using cold ingredients is non-negotiable for achieving maximum volume and stability.
- 1 cup (240ml) Heavy Whipping Cream, cold: The high fat content (36-40%) is essential for creating stiff, stable peaks. It should feel icy cold to the touch. Substitution: For a dairy-free version, use full-fat coconut cream that has been chilled overnight. The flavor will be slightly coconutty but delicious.
- 1/4 cup (30g) Powdered Sugar (Confectioners’ Sugar): Powdered sugar dissolves instantly and contains a small amount of cornstarch, which helps stabilize the whipped cream. Its fine texture ensures a silky, non-grainy finish. Substitution: Granulated sugar can be used in a pinch, but blend it with the cream for a minute first to dissolve, or you may get a slightly gritty texture.
- 1/4 cup (25g) Unsweetened Cocoa Powder: Use a high-quality, natural unsweetened cocoa powder for a deep, classic chocolate flavor. Dutch-processed cocoa will yield a slightly milder, less acidic taste and a darker color. Sifting is crucial to avoid lumps.
- 1 teaspoon Pure Vanilla Extract: This enhances the chocolate flavor and adds a warm, aromatic depth. Substitution: 1/2 teaspoon of almond extract or a tablespoon of coffee liqueur like Kahlúa for a mocha twist.
- 1/8 teaspoon Fine Sea Salt: A tiny pinch of salt is the secret ingredient that makes the chocolate flavor pop and balances the sweetness perfectly.
Timing
5 minutes
0 minutes
5-7 minutes
Compared to the average dessert recipe that can take hours, this chocolate whipped cream is a true kitchen miracle. From grabbing your ingredients to having a fluffy, ready-to-use topping, you’re looking at under 10 minutes of active work. This is significantly faster than making a buttercream or cooked frosting, and the payoff in flavor and texture is immense.
A bowl of rich, fluffy chocolate whipped cream, ready to dollop on your favorite dessert.
Step-by-Step Instructions
Step 1: Chill Your Tools
For the highest, most stable peaks, place your mixing bowl and beaters (or whisk attachment) in the freezer for 15-20 minutes before you begin. A cold environment prevents the cream from warming up too quickly as you whip it, which is the number one cause of runny whipped cream. If you’re short on time, you can also fill the bowl with ice water for a few minutes, then dry it thoroughly.
Step 2: Sift Dry Ingredients
In a small bowl, sift together the powdered sugar and unsweetened cocoa powder. I can’t stress this enough—sifting is mandatory! Cocoa powder is notoriously clumpy, and those little dry pockets will not incorporate smoothly into the cream, leaving you with bitter, gritty bits in your otherwise silky topping. The sifting also ensures the two powders are evenly combined.
Step 3: Whip to Soft Peaks
Pour the cold heavy cream into your chilled bowl. Using a hand mixer or stand mixer fitted with the whisk attachment, begin whipping on medium-high speed. Watch it transform from liquid to frothy, then to a thickened state. After about 1-2 minutes, you’ll reach the “soft peak” stage: when you lift the beaters, the cream will form peaks that gently curl over at the tips. This is your foundation.
Step 4: Add Flavor and Finish
With the mixer running on low speed, gradually add the sifted sugar-cocoa mixture, the vanilla extract, and the salt. Once incorporated, increase the speed back to medium-high and whip until firm, stiff peaks form. This should take another 30-60 seconds. Be vigilant! Over-whipping will turn your beautiful cream into chocolate butter. Stop when the peaks stand straight up and hold their shape firmly when the beaters are lifted. Taste and adjust if needed—sometimes I add an extra pinch of salt to make the chocolate sing.
Nutritional Information
The following nutritional estimates are for one serving (approximately 2 tablespoons) out of a total yield of about 2 cups. Values are approximate.
- Calories: 85 kcal
- Total Fat: 7g (Saturated Fat: 4.5g)
- Cholesterol: 25mg
- Sodium: 20mg
- Total Carbohydrates: 5g (Dietary Fiber: 0.5g, Sugars: 4g)
- Protein: 1g
Healthier Alternatives
Want to enjoy this chocolatey delight with a lighter footprint? Here are some smart swaps that maintain flavor without all the guilt:
- Lower-Fat Cream: Swap heavy cream for cold whipping cream (30% fat) or even well-chilled evaporated milk. The texture will be slightly less stable but still delicious. For a plant-based option, chilled aquafaba (the liquid from a can of chickpeas) can be whipped with cream of tartar and the dry ingredients for a surprisingly airy, fat-free mousse-like topping.
- Natural Sweeteners: Replace powdered sugar with 2-3 tablespoons of pure maple syrup, agave nectar, or a powdered erythritol/monk fruit blend for a sugar-free version. Add liquid sweeteners at the soft peak stage to avoid deflating the cream.
- Boosted Nutrition: Add a tablespoon of unflavored collagen peptides or protein powder (sifted in with the cocoa) for a protein boost. You can also use raw cacao powder instead of cocoa for a higher antioxidant content.
Serving Suggestions
This versatile chocolate whipped cream is the crown jewel for countless desserts. Here are my favorite ways to use it:
- Classic Topping: Dollop generously on slices of chocolate cake, pumpkin pie, cheesecake, or banana cream pie.
- Hot Drink Upgrade: A luxurious spoonful melting into a mug of hot chocolate, coffee, or a latte turns your beverage into a cafe-quality treat.
- Parfait Layer: Layer it in a glass with fresh berries, crumbled brownies, or granola for an instant, elegant dessert.
- Frosting Alternative: Use it to frost cupcakes or as a filling for whoopie pies and layer cakes. For cake filling, ensure it’s whipped to very stiff peaks for better structure.
- Fruit Dip: Serve as a dip for strawberries, pineapple chunks, or apple slices.
Common Mistakes
- Using Warm Tools or Ingredients: This is the #1 reason whipped cream fails. Everything must be cold.
- Skipping the Sift: Lumpy cocoa powder equals lumpy whipped cream. Don’t skip this step.
- Over-whipping: It happens fast. Once you see stiff peaks, stop immediately. If you accidentally make butter, you can salvage it by slowly whisking in a few more tablespoons of cold cream until it smooths out again.
- Adding Sugar Too Early: Adding dry ingredients at the beginning can inhibit the cream’s ability to incorporate air. Always whip the cream to soft peaks first.
- Using Old Cream: Check the expiration date. Cream that is near or past its date may not whip properly.
Storing Tips
Freshly whipped cream is best used immediately, but you can store it successfully:
- Refrigerator: Transfer to an airtight container and press a piece of plastic wrap directly onto the surface to prevent a skin from forming. It will keep for up to 24 hours. It may soften slightly; you can re-whip it for 15-20 seconds to refresh the peaks.
- Freezer (for specific uses): You can pipe rosettes or dollops onto a parchment-lined baking sheet and freeze until solid. Then transfer the frozen shapes to a freezer bag. They make perfect instant garnishes for hot drinks or ice cream and will keep for 1-2 months. They will soften quickly once placed.
- Do Not: Store it in a whipped cream dispenser for more than a few hours, as the cocoa can clog the mechanism.
Conclusion
Mastering this chocolate whipped cream recipe is like unlocking a new level in your dessert game. It’s incredibly simple, requires no cooking, and delivers a professional, rich chocolate flavor that far surpasses anything you can buy. In less than 10 minutes, you have a versatile topping that can dress up the simplest weeknight treat or become the star of your holiday dessert table. I promise, once you try this homemade version, you’ll never go back to the aerosol can.
Did you make this recipe? I’d love to see your creations! Tag me on Instagram @exorecipes or leave a comment and rating below. What’s your favorite dessert to top with chocolate whipped cream?
FAQs
Can I make this chocolate whipped cream ahead of time?
Yes, for best results, whip it no more than 2-3 hours before serving. Store it covered in the fridge. If it softens, a quick re-whisk will bring it back to life.