Delicious Banana Pudding Recipe: How to Make the Best Ever Recipe
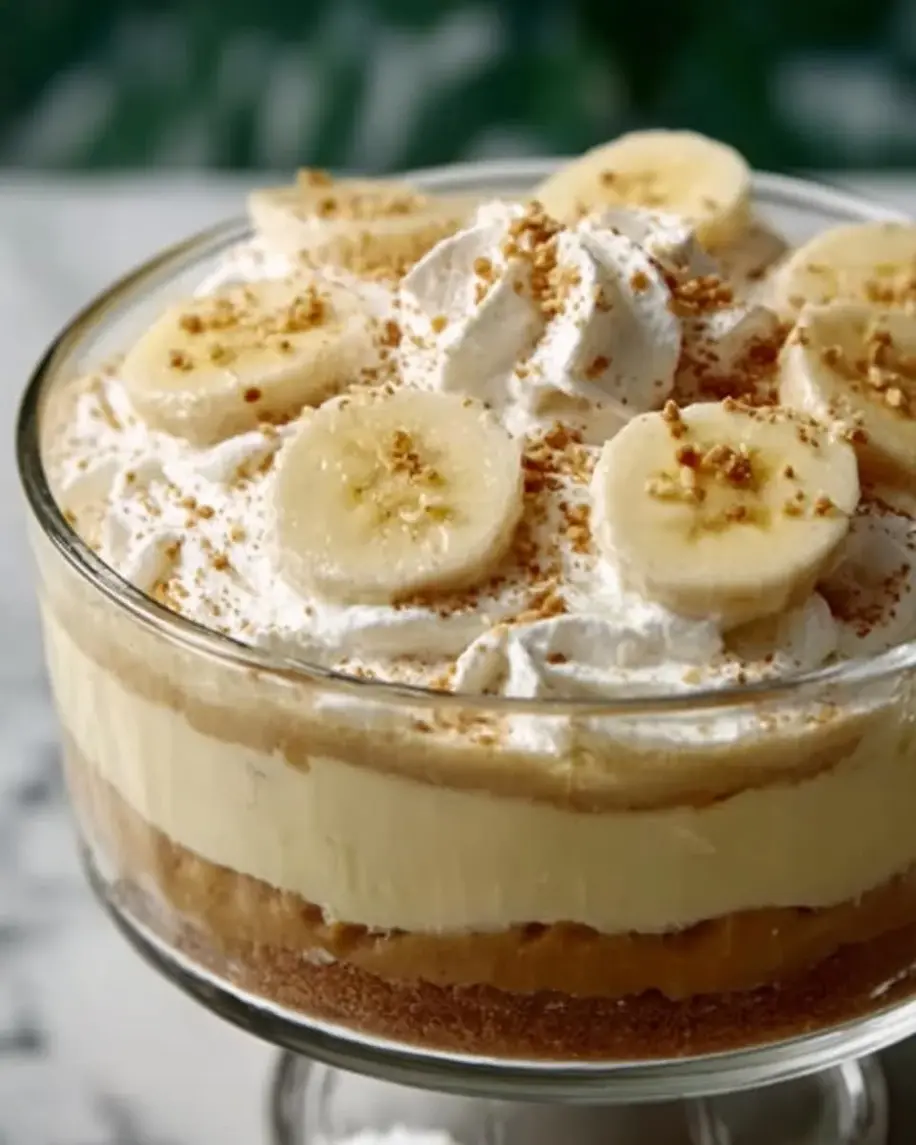
Table of Contents
Delicious Banana Pudding Recipe: How to Make the Best Ever Recipe
Introduction
Did you know that banana pudding is one of the top five most searched-for Southern dessert recipes in the United States, with over 200,000 monthly searches? This classic treat has transcended its regional roots to become a beloved staple at gatherings nationwide. So, what is the secret to making the best ever banana pudding recipe that stands out from the rest? The answer lies in the perfect harmony of textures and flavors: creamy, airy pudding, ripe bananas that offer a natural sweetness, and the nostalgic crunch of vanilla wafers. This no-bake dessert is not just a recipe; it’s a memory-maker, a dish that evokes comfort and joy with every spoonful. Whether you’re a seasoned home cook or a baking novice, this guide will walk you through creating a show-stopping dessert that will have everyone asking for seconds. Let’s dive into the art of crafting the ultimate delicious banana pudding recipe.
Ingredients List
Gathering high-quality ingredients is the first step to success. Here’s what you’ll need for this classic dessert, along with notes on substitutions and the sensory role each plays.
- For the Pudding & Filling:
- 1 (3.4 oz) box instant vanilla pudding mix – The foundation of our creamy layer. For a richer, more custard-like texture, you can substitute with cook-and-serve pudding mix, but it will add about 10 minutes of active cooking time.
- 2 cups cold whole milk – Whole milk provides the necessary fat for a luxuriously smooth pudding. For a lighter version, 2% milk works, but avoid skim milk as it can make the pudding thin and less flavorful.
- 1 (14 oz) can sweetened condensed milk – This is the magic ingredient that adds a deep, caramel-like sweetness and incredible creaminess. There is no direct substitute for its unique texture.
- 1 tablespoon pure vanilla extract – Use the real stuff! It provides a warm, aromatic depth that imitation vanilla can’t match.
- 1 (8 oz) container frozen whipped topping, thawed (like Cool Whip) – This gives the pudding its signature light, airy, and mousse-like texture. For a from-scratch feel, you can use an additional 1 cup of heavy cream, whipped with 2 tablespoons of powdered sugar.
- For Assembly & Topping:
- 1 (11 oz) box vanilla wafer cookies (like Nilla Wafers) – The iconic crunch. They soften slightly as they chill, creating the perfect textural contrast. Shortbread cookies or ladyfingers make excellent gourmet substitutions.
- 4-5 medium ripe bananas – Look for bananas that are yellow with a few brown speckles. They should be firm yet sweet, offering the best flavor without being mushy. The visual of fresh banana slices is key to the dessert’s appeal.
- 1 cup heavy whipping cream – For the fresh whipped cream topping. The high fat content (36% or more) is essential for stiff, billowy peaks.
- 2 tablespoons powdered sugar – Sweetens the whipped cream without grittiness.
- Extra vanilla wafers and banana slices for garnish – For that beautiful, professional finish.
Timing
Compared to the average baked dessert, which can take over an hour of active kitchen time plus cooling, this delicious banana pudding recipe is remarkably hands-off. The “cook time” is essentially zero, making it a fantastic last-minute or heatwave-friendly option. The majority of the time is inactive chilling, which allows the flavors to meld and the wafers to achieve their signature soft-yet-firm texture. Plan ahead for the chill time—this is non-negotiable for the best results.
A beautiful, layered banana pudding ready to be devoured. The creamy texture and fresh banana slices make it irresistible.
Step-by-Step Instructions
Step 1: Prepare the Pudding
In a large mixing bowl, whisk together the instant vanilla pudding mix and the 2 cups of cold whole milk for a full two minutes. I like to use a hand mixer on low speed to ensure it’s completely smooth and starting to thicken. Now, here’s my personal trick: pour in the entire can of sweetened condensed milk and the tablespoon of vanilla extract. Whisk again until the mixture is homogenous, thick, and gloriously shiny. Set this aside for about 5 minutes to let it set up further while you prepare the other components.
Step 2: Whip the Cream
For the filling cream, gently fold the thawed whipped topping into the pudding base. Use a large rubber spatula and a folding motion—think of turning the mixture over from the bottom—to maintain as much air as possible. This is what creates that cloud-like texture. In a separate, chilled bowl, make the fresh topping: beat the 1 cup of heavy whipping cream and 2 tablespoons of powdered sugar together until stiff peaks form. This means when you lift the beaters, the cream stands straight up. Be careful not to overbeat, or you’ll make butter!
Step 3: Combine and Layer
Now for the fun, artistic part: assembly. You’ll need a 9×13 inch baking dish or a large trifle bowl for a stunning presentation. Start with a layer of vanilla wafers, covering the bottom. Next, slice your bananas (about 1.5 bananas per layer) and arrange a single layer over the wafers. Spoon one-third of the creamy pudding mixture over the bananas and spread it evenly. Repeat this process—wafers, bananas, pudding—two more times, ending with a final layer of pudding. The key is to spread the pudding gently to avoid disturbing the layers beneath.
Step 4: Chill and Serve
Once assembled, spread the freshly whipped cream over the entire top of the pudding. This is your canvas. Get creative with your garnish: arrange a few extra vanilla wafers around the edge and fan out some delicate banana slices in the center. Now, the most critical step: cover tightly with plastic wrap and refrigerate for at least 4 hours, but ideally 6 or overnight. This patience allows the wafers to soften perfectly, the bananas to subtly flavor the cream, and all the elements to become one cohesive, incredible dessert.
Nutritional Information
The following nutritional estimates are for one serving (based on 12 servings per recipe). Please note these are approximations, as ingredients can vary.
- Calories: ~420 kcal
- Total Fat: 18g
- Saturated Fat: 11g
- Cholesterol: 45mg
- Sodium: 220mg
- Total Carbohydrates: 58g
- Dietary Fiber: 2g
- Sugars: 42g
- Protein: 6g
Healthier Alternatives
You can enjoy this classic with some mindful swaps that don’t sacrifice flavor.
- Pudding: Use sugar-free instant pudding mix and fat-free milk. The sweetened condensed milk is the main sugar source, so for a significant reduction, you could blend 1 cup of plain Greek yogurt with ½ cup of honey or maple syrup, though the texture will be tangier and less firm.
- Whipped Topping: Substitute the frozen whipped topping with an equal amount of whipped coconut cream (from chilled full-fat coconut milk) for a dairy-free option. For the fresh topping, simply sweeten the whipped cream with a zero-calorie sweetener like stevia or monk fruit.
- Cookies: Choose whole-grain vanilla wafers or almond flour-based shortbread cookies for added fiber and a nuttier flavor profile.
- General Tip: Increase the banana-to-pudding ratio. Using more banana slices naturally adds sweetness, fiber, and potassium, allowing you to slightly reduce the amount of pudding in each layer.
Serving Suggestions
While this best ever banana pudding recipe is a star on its own, pairing it thoughtfully elevates the experience.
- Beverage Pairings: Serve with strong, black coffee to cut through the sweetness, a glass of cold milk for ultimate nostalgia, or a drizzle of bourbon or rum over individual servings for an adult twist.
- Occasion Ideas: Perfect for potlucks, summer barbecues, baby showers, or as the grand finale to a Southern-style fried chicken dinner.
- Presentation: For individual servings, layer the ingredients in clear mason jars or vintage parfait glasses. This not only looks adorable but also makes serving a breeze.
Common Mistakes
- Using Overripe Bananas: Bananas that are too soft and brown will turn mushy and can make the entire pudding soggy. They also have an overpowering fermented flavor. Stick to ripe but firm.
- Not Chilling Long Enough: Serving too soon is the #1 mistake. The wafers will be unpleasantly hard, and the flavors won’t have married. Respect the chill time!
- Overmixing the Pudding & Cream: Vigorously stirring the whipped topping into the pudding will deflate it, resulting in a dense, heavy texture. Fold gently.
- Garnishing Too Early: If you add fresh banana slices to the top garnish before chilling, they will oxidize and turn brown. Add your final decorative banana slices just before serving.
Storing Tips
This dessert stores beautifully if done correctly.
- Refrigeration: Keep covered tightly with plastic wrap or in an airtight container for up to 3 days. The bananas will continue to soften, and the wafers will become more cake-like, but it will still be delicious.
- Freezing: I do not recommend freezing the assembled pudding, as the dairy and bananas will separate and become watery upon thawing, creating a grainy texture.
- Make-Ahead Strategy: You can prepare the pudding base (through Step 1) up to a day in advance and store it covered in the fridge. Assemble the layers the day you plan to serve it for the best texture.