Easy Rice Krispie Peanut Butter Balls Recipe
“`html
Table of Contents
- Easy Rice Krispie Peanut Butter Balls Recipe
- Why You’ll Love These Rice Krispie Peanut Butter Balls
- Ingredients for Rice Krispie Peanut Butter Balls
- Timing is Everything
- Step-by-Step Instructions
- Nutritional Information
- Healthier Alternatives and Swaps
- Serving Suggestions
- Common Mistakes to Avoid
- Storing Your Rice Krispie Peanut Butter Balls
- Frequently Asked Questions
Easy Rice Krispie Peanut Butter Balls Recipe
Are you searching for a quick, no-bake treat that combines beloved flavors into one delightful bite? You’re in luck!
Why You’ll Love These Rice Krispie Peanut Butter Balls
Discover the ultimate recipe for Rice Krispie Peanut Butter Balls. Perfect for parties, snacks, or holiday treats, this easy recipe combines peanut butter, Rice Krispies, and chocolate for a crowd-pleasing dessert. Try it today and wow your guests.
Effortless to Make
In a world where complicated recipes abound, the beauty of these Rice Krispie Peanut Butter Balls lies in their utter simplicity. You won’t need an oven, and the active preparation time is minimal, making them an ideal choice for busy bakers or last-minute dessert emergencies. Imagine the joy of creating a delicious treat with just a handful of pantry staples and a few easy steps!
Crowd-Pleasing Flavor Combination
Peanut butter and chocolate are a classic pairing for a reason. Add the satisfying crunch of Rice Krispies, and you have a trifecta of deliciousness that appeals to both kids and adults. These balls offer a delightful balance of creamy, sweet, and crunchy textures, ensuring every bite is a memorable experience.
Versatile Treat
Whether you’re hosting a birthday bash, packing a school lunchbox treat, or simply craving something sweet to enjoy with your afternoon coffee, these Rice Krispie Peanut Butter Balls are the answer. They’re perfectly portioned, easy to transport, and always a hit. Plus, the chocolate coating makes them look extra special, elevating them from a simple snack to a festive indulgence.
Ingredients for Rice Krispie Peanut Butter Balls
- 1 cup creamy peanut butter: The smooth, rich foundation of our balls. For an extra nutty flavor, you can opt for natural or crunchy peanut butter, but ensure it’s well-stirred.
- 1/4 cup unsalted butter, softened: This brings a lovely richness and helps bind the ingredients. You can use salted butter if that’s what you have, but adjust any added salt accordingly.
- 1/4 cup powdered sugar (confectioners’ sugar): For a hint of sweetness and to help the mixture hold its shape. Sift it if it’s lumpy for a smoother texture.
- 1 teaspoon vanilla extract: A touch of vanilla enhances all the other flavors, adding a warm, aromatic depth.
- 3 cups crispy rice cereal: The star that gives these treats their signature texture. Use standard crispy rice cereal for the best crunch.
- 1 cup chocolate chips (semisweet or milk chocolate): For dipping and coating. Semisweet offers a lovely balance, while milk chocolate provides a sweeter finish. You can also use dark chocolate for a richer taste.
- 1 tablespoon coconut oil or shortening (optional, for melting chocolate): This helps to make the melted chocolate smoother and easier to dip.
Timing is Everything
Compared to many baked goods, this recipe is incredibly fast. The average cookie recipe might take 20-30 minutes of active prep plus baking and cooling. Our Rice Krispie Peanut Butter Balls require only about 15 minutes of active mixing and rolling, followed by a crucial chilling period that ensures they set perfectly. This makes it a fantastic option when time is of the essence.
Step-by-Step Instructions
Step 1: Prepare Your Pan
Line an 8×8 inch baking pan with parchment paper, leaving some overhang on the sides. This will make it super easy to lift the mixture out later. Give it a light spray of non-stick cooking spray if you’re worried about sticking, but parchment paper is usually sufficient.
Step 2: Melt the Goodness
In a large, microwave-safe bowl, combine the creamy peanut butter and softened butter. Microwave in 30-second intervals, stirring in between, until the mixture is smooth and fully melted. Alternatively, you can melt them gently over low heat in a saucepan on the stovetop. Be careful not to overheat!
Step 3: Combine and Mix
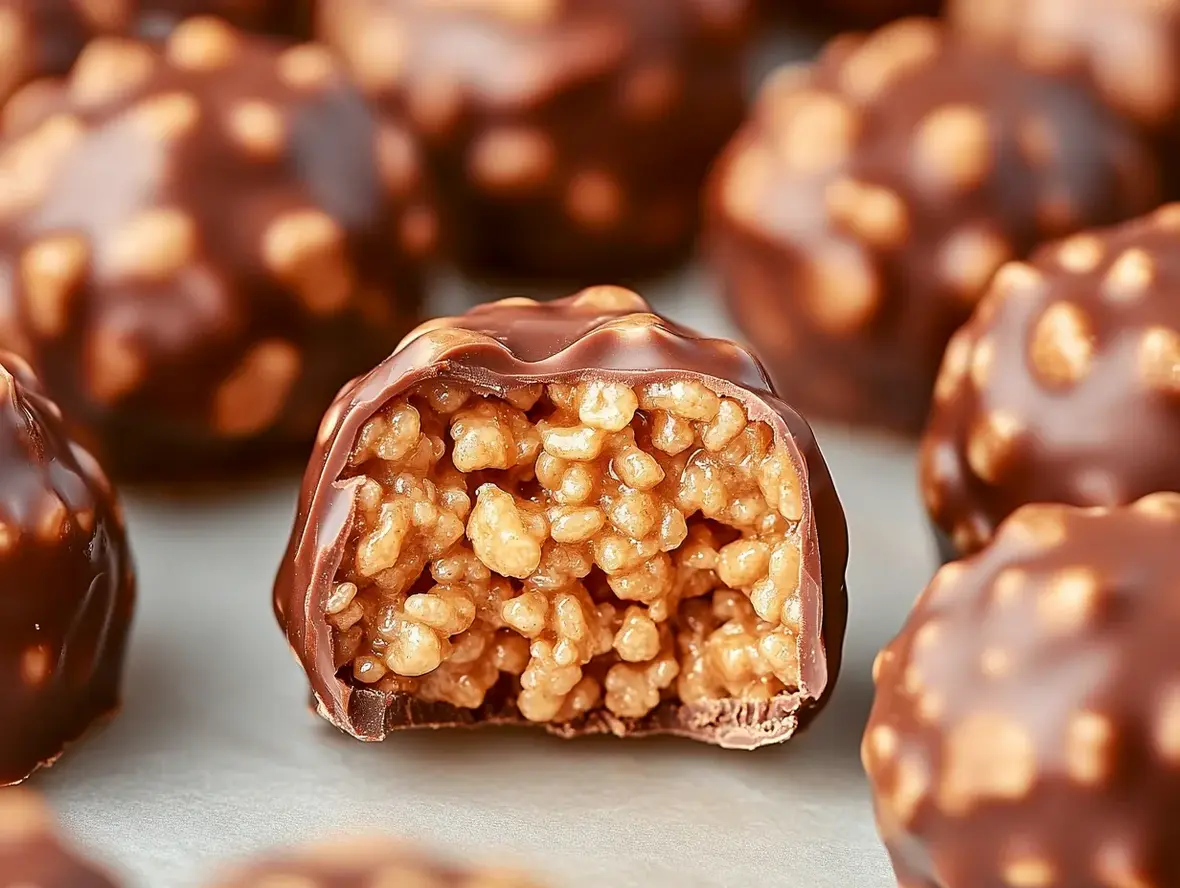
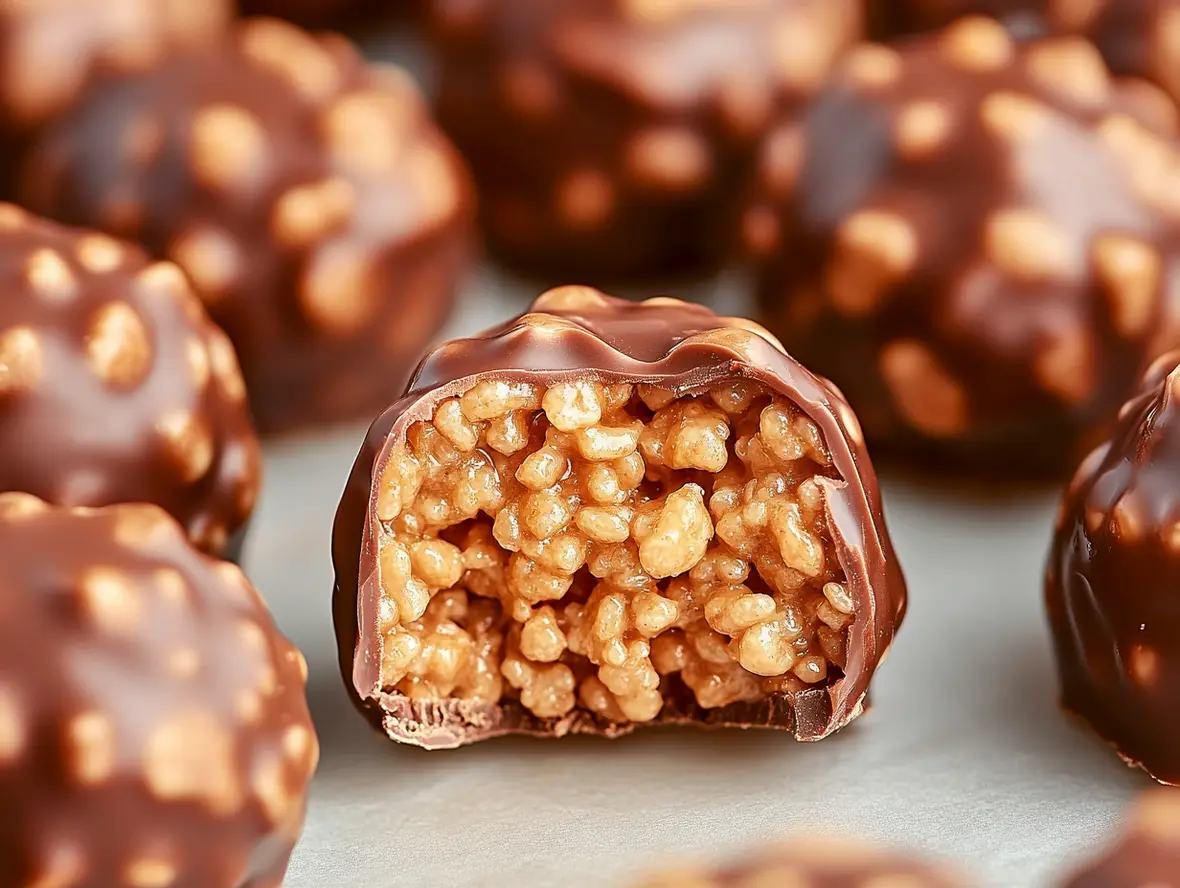
Stir the powdered sugar and vanilla extract into the melted peanut butter and butter mixture until well combined and smooth. Next, gently fold in the crispy rice cereal. You want to coat the cereal thoroughly without crushing it too much. Aim for a gooey, sticky mixture that holds together when you press it.
Step 4: Form the Balls
Once the cereal is evenly distributed, it’s time to get your hands a little sticky! Lightly grease your hands with non-stick spray or a tiny bit of butter. Scoop about 1 to 1.5 tablespoon-sized portions of the mixture and roll them into compact balls, about 1-inch in diameter. Place the rolled balls onto the prepared baking pan.
Step 5: Chill and Coat
Pop the baking pan into the refrigerator for at least 30 minutes. This chilling step is crucial! It firms up the balls, making them much easier to dip in chocolate without falling apart. While the balls are chilling, prepare your chocolate for dipping. In a microwave-safe bowl, combine the chocolate chips with the coconut oil or shortening (if using). Microwave in 30-second intervals, stirring after each, until the chocolate is smooth and completely melted.
Step 6: Let Them Set
Once the balls are firm and the chocolate is melted and smooth, dip each ball into the chocolate, using a fork or a toothpick to help coat it evenly. Let any excess chocolate drip back into the bowl. Place the chocolate-coated balls back onto the parchment-lined pan. You can drizzle extra melted chocolate over the tops for decoration if desired. Once all balls are coated, refrigerate for an additional 10-15 minutes, or until the chocolate has hardened.
Nutritional Information
Please note: Nutritional values are approximate and can vary based on specific ingredients and brands used. These are estimated per ball, assuming 24 balls per batch.
Healthier Alternatives and Swaps
Looking to make these treats a bit lighter without sacrificing flavor? Consider these swaps:
- Nut Butter: For a slightly healthier fat profile, try almond butter or cashew butter. Ensure they are natural and don’t have added sugars.
- Sweetener: Reduce the powdered sugar slightly, or experiment with a sugar substitute like erythritol or stevia, adjusting quantities to taste.
- Chocolate Coating: Opt for dark chocolate chips with a higher cocoa content (70% or more) for antioxidants and less sugar. Sugar-free chocolate chips are also an option.
- Crispy Rice Cereal: While standard is classic, consider a whole-grain-based puffed cereal if available, though it might alter the texture slightly.
Serving Suggestions
These Rice Krispie Peanut Butter Balls are wonderfully versatile. Serve them chilled as a delightful dessert after a meal, package them in small cellophane bags tied with ribbon for party favors, or arrange them on a festive platter for holiday gatherings. They pair beautifully with a glass of cold milk or a hot cup of coffee.
Common Mistakes to Avoid
- Overmixing the cereal: Be gentle when combining the cereal with the peanut butter mixture to maintain its crispiness.
- Skipping the chilling step: Chilling is essential for the balls to firm up, making them easy to roll and coat. Don’t rush this part!
- Overheating the chocolate: Melt chocolate slowly and gently to prevent it from becoming thick or seizing.
- Not greasing hands: Peanut butter mixture can be sticky. Lightly greasing your hands makes rolling the balls much easier.
Storing Your Rice Krispie Peanut Butter Balls
Store these delightful treats in an airtight container in the refrigerator for up to a week. The cold helps maintain their shape and texture. For longer storage, you can freeze them in a single layer on a parchment-lined baking sheet until firm, then transfer to a freezer-safe bag or container. They can be enjoyed straight from the freezer or thawed in the refrigerator.
Frequently Asked Questions
Can I use crunchy peanut butter?
Yes, you can! Crunchy peanut butter will add extra texture to the balls. Make sure to stir it well before measuring to incorporate the oil.
What kind of chocolate is best for dipping?
Semisweet or milk chocolate chips are classic choices. For a smoother dip, adding a teaspoon of coconut oil or shortening helps. If you want a richer flavor, dark chocolate is also a great option.
My mixture is too dry/sticky, what should I do?
If the mixture is too dry and won’t hold together, add a tiny bit more peanut butter or a tablespoon of melted butter. If it’s too sticky, try adding a little more crispy rice cereal, a tablespoon at a time.
Do I have to chill them?
Absolutely! Chilling is a crucial step. It firms up the mixture, preventing the balls from falling apart when you roll and dip them in melted chocolate.
Can I make these vegan?
Yes, you can make vegan Rice Krispie Peanut Butter Balls by using vegan peanut butter, vegan butter substitute, and vegan chocolate chips. Ensure your crispy rice cereal is also vegan-friendly.
These Easy Rice Krispie Peanut Butter Balls are a delightful blend of nostalgic crunch and creamy, nutty flavor, all wrapped up in a chocolatey embrace. They’re incredibly simple to whip up, making them perfect for any occasion, from a quick afternoon snack to a show-stopping party dessert. Give them a try and experience a taste of pure joy!
PrintPeanut Butter Balls with Rice Krispies

These delightful no-bake treats combine creamy peanut butter, crunchy Rice Krispies, and rich chocolate for a bite-sized dessert that’s perfect for any occasion. Easy to make and even easier to enjoy!
Ingredients
- 1 cuppeanut butter (creamy or crunchy)1/4 cupbutter, softened1 cuppowdered sugar2 cupsRice Krispies cereal, slightly crushed2 cupssemi-sweet chocolate chips2 tablespoonsvegetable shortening
- 1/4 cupbutter, softened1 cuppowdered sugar2 cupsRice Krispies cereal, slightly crushed2 cupssemi-sweet chocolate chips2 tablespoonsvegetable shortening
- 1 cuppowdered sugar2 cupsRice Krispies cereal, slightly crushed2 cupssemi-sweet chocolate chips2 tablespoonsvegetable shortening
- 2 cupsRice Krispies cereal, slightly crushed2 cupssemi-sweet chocolate chips2 tablespoonsvegetable shortening
- 2 cupssemi-sweet chocolate chips2 tablespoonsvegetable shortening
- 2 tablespoonsvegetable shortening
Instructions
- 1️⃣Prepare a baking sheet: Line a cookie sheet with parchment paper or wax paper to prevent sticking.
- 2️⃣Mix the base ingredients: In a large mixing bowl, cream together the peanut butter, softened butter, and powdered sugar until smooth. Fold in the slightly crushed Rice Krispies cereal and mix until evenly combined.3️⃣Shape the balls: Scoop out small portions of the mixture and roll them into bite-sized balls (about 1 inch in diameter). Place them on the prepared cookie sheet. Chill in the refrigerator for at least 30 minutes to firm up.4️⃣Melt the chocolate: In a large microwave-safe bowl, combine the chocolate chips and vegetable shortening. Heat for 1 minute, then stir. Continue heating in 20–30-second intervals, stirring after each, until the chocolate is mostly melted. Stir until smooth and glossy.5️⃣Dip the peanut butter balls: Using a fork or a dipping tool, coat each peanut butter ball in the melted chocolate. Tap off any excess chocolate and place the dipped balls back onto the lined cookie sheet.6️⃣Set the chocolate: Allow the chocolate coating to firm up at room temperature. For faster results, place the tray in the refrigerator for about 15–20 minutes.7️⃣Store: Transfer the finished peanut butter balls to an airtight container. Store them in the refrigerator for up to 1 week or freeze for longer storage (up to 3 months).
- 3️⃣Shape the balls: Scoop out small portions of the mixture and roll them into bite-sized balls (about 1 inch in diameter). Place them on the prepared cookie sheet. Chill in the refrigerator for at least 30 minutes to firm up.4️⃣Melt the chocolate: In a large microwave-safe bowl, combine the chocolate chips and vegetable shortening. Heat for 1 minute, then stir. Continue heating in 20–30-second intervals, stirring after each, until the chocolate is mostly melted. Stir until smooth and glossy.5️⃣Dip the peanut butter balls: Using a fork or a dipping tool, coat each peanut butter ball in the melted chocolate. Tap off any excess chocolate and place the dipped balls back onto the lined cookie sheet.6️⃣Set the chocolate: Allow the chocolate coating to firm up at room temperature. For faster results, place the tray in the refrigerator for about 15–20 minutes.7️⃣Store: Transfer the finished peanut butter balls to an airtight container. Store them in the refrigerator for up to 1 week or freeze for longer storage (up to 3 months).
- 4️⃣Melt the chocolate: In a large microwave-safe bowl, combine the chocolate chips and vegetable shortening. Heat for 1 minute, then stir. Continue heating in 20–30-second intervals, stirring after each, until the chocolate is mostly melted. Stir until smooth and glossy.
- 5️⃣Dip the peanut butter balls: Using a fork or a dipping tool, coat each peanut butter ball in the melted chocolate. Tap off any excess chocolate and place the dipped balls back onto the lined cookie sheet.6️⃣Set the chocolate: Allow the chocolate coating to firm up at room temperature. For faster results, place the tray in the refrigerator for about 15–20 minutes.7️⃣Store: Transfer the finished peanut butter balls to an airtight container. Store them in the refrigerator for up to 1 week or freeze for longer storage (up to 3 months).
- 6️⃣Set the chocolate: Allow the chocolate coating to firm up at room temperature. For faster results, place the tray in the refrigerator for about 15–20 minutes.7️⃣Store: Transfer the finished peanut butter balls to an airtight container. Store them in the refrigerator for up to 1 week or freeze for longer storage (up to 3 months).
- 7️⃣Store: Transfer the finished peanut butter balls to an airtight container. Store them in the refrigerator for up to 1 week or freeze for longer storage (up to 3 months).
Notes
Crush with care: Lightly crush the Rice Krispies to maintain some crunch without turning them into powder.Chocolate tips: Vegetable shortening helps the chocolate stay smooth and glossy, but you can substitute coconut oil if desired.Decorate: Add a drizzle of white chocolate or sprinkle crushed nuts on top before the chocolate sets for an extra touch.
Chocolate tips: Vegetable shortening helps the chocolate stay smooth and glossy, but you can substitute coconut oil if desired.Decorate: Add a drizzle of white chocolate or sprinkle crushed nuts on top before the chocolate sets for an extra touch.
Decorate: Add a drizzle of white chocolate or sprinkle crushed nuts on top before the chocolate sets for an extra touch.
“`