Hershey Pie – Easy No-Bake Chocolate Dessert

Hershey Pie – Easy No-Bake Chocolate Dessert: The Only Recipe You’ll Ever Need
Imagine craving a decadent chocolate treat without turning on the oven on a sweltering summer day. That’s exactly what this Hershey Pie – Easy No-Bake Chocolate Dessert offers: a simple, foolproof way to indulge in rich, chocolatey bliss. With its irresistibly creamy texture from layers of whipped topping, melted Hershey’s bars, and cream cheese, this recipe has become a go-to favorite for busy home cooks looking for effortless elegance. Drawing from classic no-bake traditions, it’s perfect for potlucks, family gatherings, or a quick weeknight dessert that feels gourmet. By following this comprehensive guide from delicetreats.com, you’ll master the art of creating a pie that’s not just tasty but also impressively simple.
The allure of this Hershey Pie – Easy No-Bake Chocolate Dessert lies in its sensory symphony. Each silky bite delivers a velvety smoothness that coats your tongue, blending the deep, melt-in-your-mouth chocolate from Hershey’s bars with the tangy undertone of cream cheese for a balanced flavor profile. The whipped topping adds a light, airy fluffiness that contrasts beautifully with the denser chocolate base, while hints of vanilla extract enhance the overall aroma, evoking memories of homemade chocolate treats. Texturally, it’s a dream—crisp cookie crust giving way to a luscious, creamy filling that feels indulgent yet not overwhelming, making every forkful an experience to savor slowly.
What sets this version of Hershey Pie – Easy No-Bake Chocolate Dessert apart, as curated by the experts at delicetreats.com, is our commitment to making it the ultimate resource for home bakers. We’ve tested and refined every step to ensure flawless results, incorporating a “Chef’s Secret” that elevates the creaminess to new heights. In this post, you’ll discover detailed ingredient spotlights, step-by-step guidance with pro tips, creative serving ideas, and answers to common questions, empowering you to create a dessert that’s not only delicious but also reliable and customizable. Let’s dive in and transform your kitchen into a haven of chocolatey perfection.
Why This Hershey Pie – Easy No-Bake Chocolate Dessert Recipe is a Game-Changer
The Chef’s Secret to this Hershey Pie – Easy No-Bake Chocolate Dessert lies in its irresistibly creamy texture, achieved by carefully folding slightly cooled melted Hershey’s bars into half of the whipped topping. This technique creates a light, fluffy chocolate layer that doesn’t deflate or become grainy, elevating the pie from a simple no-bake treat to a luxurious dessert. By ensuring the chocolate is tempered just right—cooling it slightly before mixing—you lock in that velvety consistency, making each slice feel professionally crafted.
Unbeatable Texture: The science behind the pie’s smoothness comes from the emulsion of fats in the cream cheese and whipped topping with the cocoa butter in Hershey’s bars. This combination stabilizes the mixture, preventing separation and resulting in a creamy filling that holds its shape when sliced. It’s all about the balance of dairy fats, which emulsify to create a stable, mouthwatering texture far superior to basic no-bake recipes.
Foolproof for a Reason: This recipe has been tested multiple times in our kitchens to guarantee success, even for beginners. Every step is designed with precision, from ingredient measurements to chilling times, ensuring consistent results that make Hershey Pie – Easy No-Bake Chocolate Dessert a reliable staple for any occasion.
Ingredient Spotlight: Quality Makes the Difference
Start with the Oreo or graham cracker pie crust: This ready-to-use base provides a crunchy foundation that contrasts the creamy filling, offering a satisfying snap with every bite. Quality matters here—opt for a fresh, store-bought crust without additives for the best flavor and texture. If you’re using a homemade version, ensure it’s well-pressed to avoid sogginess. For substitutions, a gluten-free crust works seamlessly if dietary needs arise, maintaining the pie’s structure without altering taste.
Next, 8 oz of softened cream cheese acts as the creamy backbone, binding the ingredients while adding a subtle tang that cuts through the sweetness. Choose full-fat cream cheese for optimal richness; lower-fat options can make the pie watery. Its role is crucial for emulsification, ensuring a smooth filling. Tested substitution: Use mascarpone for a richer, Italian-inspired twist, but adjust sugar slightly as it’s sweeter.
Half a cup of sifted confectioners’ sugar sweetens the mixture without graininess, blending seamlessly into the cream cheese for a velvety finish. Quality powdered sugar prevents lumps, enhancing the pie’s overall silkiness. Why it matters: Sifting ensures even distribution, avoiding gritty textures. Substitution: You can use granulated sugar blended into a fine powder, but be cautious of added cornstarch in some brands that might alter consistency.
A teaspoon of pure vanilla extract adds depth and aroma, elevating the chocolate flavors with its warm, floral notes. Always select pure extract over imitation for authentic taste—imitation can introduce off-flavors. Its role is to enhance the dessert’s complexity. Substitution: Almond extract for a nutty variation, but use sparingly to complement rather than overpower.
16 oz of thawed frozen whipped topping, divided, is key to the pie’s irresistibly creamy layers, providing lightness and volume. Quality matters—choose a name-brand for stability and better texture. Half is folded into the chocolate for fluffiness, the rest into the cream cheese layer. Substitution: Homemade whipped cream from heavy cream works, but it may not hold as well; stabilize with gelatin for longevity.
Finally, six Hershey’s milk chocolate bars (1.55 oz each), melted, deliver that signature chocolate intensity. Their high-quality cocoa butter ensures a glossy, smooth melt. Melting and cooling them properly is vital for the pie’s texture. Substitution: Dark chocolate bars for a richer version, but they might intensify the flavor—test with semi-sweet if you’re new to variations.
Step-by-Step Instructions
Step 1: Melting the Chocolate
Melt the six Hershey’s milk chocolate bars in the microwave in 30-second bursts, stirring between each to ensure even melting, or use a double boiler for a gentler approach until smooth. Let the mixture cool slightly before proceeding. This step creates the rich chocolate base that forms the first layer.
Pro Tip: Stir frequently to prevent overheating, which can cause the chocolate to seize and become unusable—microwaving in short intervals is key for a silky result.
Step 2: Folding the Chocolate Mixture
Once cooled, fold half of the thawed whipped topping into the melted chocolate until light and fluffy. Spread this chocolate mixture evenly into the prepared pie crust for the base layer.
Common Mistake to Avoid: Don’t add the whipped topping to hot chocolate, as it can melt and deflate the mixture; always cool the chocolate first to maintain that airy texture.
Step 3: Preparing the Cream Cheese Layer
In a large bowl, beat the softened cream cheese until smooth, then add the confectioners’ sugar and vanilla extract, mixing until creamy. Gently fold in the remaining whipped topping until fully combined, then spread this mixture over the chocolate layer.
Pro Tip: Use a stand mixer or hand blender on low speed to avoid over-beating, which incorporates too much air and can make the layer less stable.
Step 4: Adding the Top Layer
Smooth an extra layer of whipped topping across the top for a light, creamy finish, ensuring it’s evenly distributed for a polished look.
Common Mistake to Avoid: Overloading the top layer can make the pie top-heavy and prone to sliding when sliced—use just enough for coverage.
Step 5: Chilling the Pie
Refrigerate the assembled pie for at least 4 hours, or overnight for the best results, allowing the layers to set firmly.
Pro Tip: Cover the pie with plastic wrap to prevent it from absorbing odors from the fridge, ensuring the chocolate flavors remain pure.
Step 6: Garnishing Before Serving
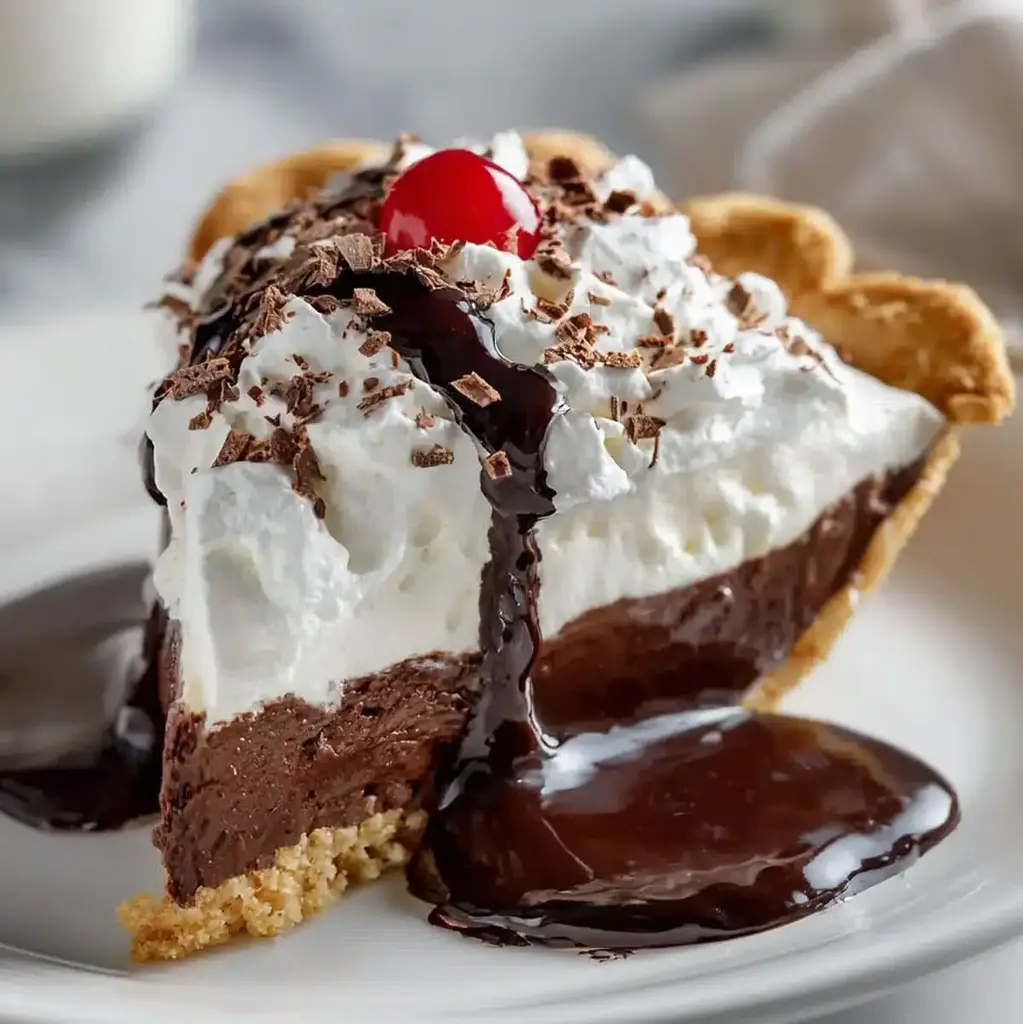
Before serving, drizzle with chocolate syrup and sprinkle crushed graham crackers or shaved chocolate for garnish, adding a final touch of elegance.
Common Mistake to Avoid: Add garnishes right before serving to keep them crisp—adding them too early can make them soggy from the pie’s moisture.
Serving & Presentation
For an impressive presentation of your Hershey Pie – Easy No-Bake Chocolate Dessert, slice it with a warm knife for clean cuts that showcase the layers. Plate each slice on a dessert plate with a swirl of chocolate syrup for a professional drizzle, and sprinkle fresh crushed graham crackers around the edges for added crunch. To elevate it further, pair with complementary sides like fresh berries for a tart contrast or a scoop of vanilla ice cream to enhance the creamy texture, making it ideal as a standalone treat or the grand finale to a meal.
Experiment with creative platings, such as serving in individual mini pie tins for a party setting, or dusting with cocoa powder for a sophisticated look. This no-bake chocolate dessert pairs wonderfully with light main courses like grilled chicken salads, allowing the richness to shine without overwhelming the palate.
Make-Ahead & Storage Solutions
Make-Ahead Strategy: Prepare the pie up to 3 days in advance by assembling all layers and refrigerating it covered. For optimal results, make the chocolate base and cream cheese mixture separately a day ahead, then combine and chill to save time.
Storing Leftovers: Store any remaining pie in an airtight container in the refrigerator for up to 3 days to maintain freshness; for longer storage, freeze individual slices wrapped in plastic and foil for up to 2 months, preserving the creamy texture.
The Best Way to Reheat: Thaw frozen slices in the refrigerator overnight, then let sit at room temperature for 10 minutes before serving to restore the original creamy consistency without melting the layers.
Frequently Asked Questions (FAQ)
How long does it take to make a Hershey Pie – Easy No-Bake Chocolate Dessert?
This recipe requires about 15 minutes of active prep time, with no baking needed. The total time, including chilling, is at least 4 hours, but for the best texture and flavor, refrigerate overnight. This makes it perfect for planning ahead without much hands-on effort.
Can I substitute oil for butter in a Hershey Pie – Easy No-Bake Chocolate Dessert recipe?
This particular recipe doesn’t use butter at all, relying on cream cheese and whipped topping for creaminess. If you’re adapting for another use, oil isn’t a direct substitute since butter’s structure is key in baked goods, but here, you can experiment with adding a neutral oil to the chocolate mixture for a slight variation—however, it might alter the texture slightly.
What are some tips for making a moist Hershey Pie – Easy No-Bake Chocolate Dessert?
To ensure your pie is irresistibly moist, focus on not over-mixing the ingredients, which can incorporate too much air and lead to a dry result. Use full-fat ingredients, chill thoroughly, and avoid any heat exposure. Additionally, folding gently preserves the whipped topping’s lightness, enhancing overall moisture.
How many people does a standard Hershey Pie – Easy No-Bake Chocolate Dessert serve?
This recipe yields 8 generous slices, making it ideal for a small gathering. You can easily adjust servings by slicing thinner for larger groups, but it’s designed to satisfy without overwhelming, perfect for family dinners or dessert parties.
Can I make this recipe vegan?
Yes, you can adapt this Hershey Pie – Easy No-Bake Chocolate Dessert for a vegan version by swapping the cream cheese for a plant-based alternative like cashew cream or vegan cream cheese, and using coconut whipped topping instead of the frozen variety. Ensure your chocolate bars are dairy-free, and opt for a vegan crust—chill times remain the same for great results.
What variations can I try with Hershey Pie – Easy No-Bake Chocolate Dessert?
For fun twists, add peanut butter to the cream cheese layer for a Reese’s-inspired flavor, or incorporate coffee granules into the chocolate mixture for a mocha vibe. These changes keep the recipe easy while personalizing it to your tastes.
Tried This Recipe? Leave a Comment!
Did you make this Hershey Pie – Easy No-Bake Chocolate Dessert? I’d love to hear how it turned out! Please leave a comment and a rating below. Your feedback helps other home cooks and supports delicetreats.com!
For more delicious inspiration, follow me on Pinterest!
Hershey Pie – Easy No-Bake Chocolate Dessert
This no-bake Hershey Pie is a creamy, chocolatey dessert made with melted Hershey’s bars, cream cheese, and whipped topping in a cookie crust. Easy to prepare, rich in flavor, and perfect for any occasion.
Ingredients
- 1Oreo or graham cracker pie crust (ready-to-use)
- 8 ozcream cheese, softened
- 1/2 cupconfectioners’ sugar, sifted
- 1 teaspoonpure vanilla extract
- 16 ozfrozen whipped topping, thawed (divided)
- 6Hershey’s milk chocolate bars (1.55 ozeach), melted
- Optional: chocolate syrup and crushed graham crackers for garnish
Instructions
- Melt Hershey’s bars in the microwave in 30-second bursts (stirring between each) or use a double boiler until smooth. Let cool slightly, then fold in half of the whipped topping until light and fluffy. Spread this chocolate mixture evenly into the prepared crust.
- In a large bowl, beat softened cream cheese until smooth. Add confectioners’ sugar and vanilla extract, mixing until creamy. Gently fold in the remaining whipped topping until fully combined. Spread this mixture over the chocolate layer.
- Smooth an extra layer of whipped topping across the top for a light, creamy finish.
- Refrigerate for at least 4 hours (overnight for best results).
- Before serving, drizzle with chocolate syrup and sprinkle crushed graham crackers or shaved chocolate for garnish.
Notes
For a lighter version, use reduced-fat cream cheese and light whipped topping.
Ensure chocolate cools slightly before folding into whipped topping to avoid melting it.
Chill overnight for the firmest slices and best flavor.
Use a gluten-free crust for a gluten-free version.
Add crushed Oreos, peanut butter, or coffee granules for fun variations.
Nutrition
- Calories: 395 kcal
- Sugar: 28 g
- Fat: 25 g
- Carbohydrates: 36 g
- Protein: 5 g
Conclusion
This recipe delivers a rich and creamy chocolate experience that combines indulgent flavors with wholesome ingredients, making it a perfect guilt-free treat for any dessert lover. Its smooth texture and subtle sweetness provide a satisfying end to your meal while keeping things nutritious. For the best results, serve it chilled with fresh berries for a refreshing twist, or try a variation by incorporating nuts for added crunch.