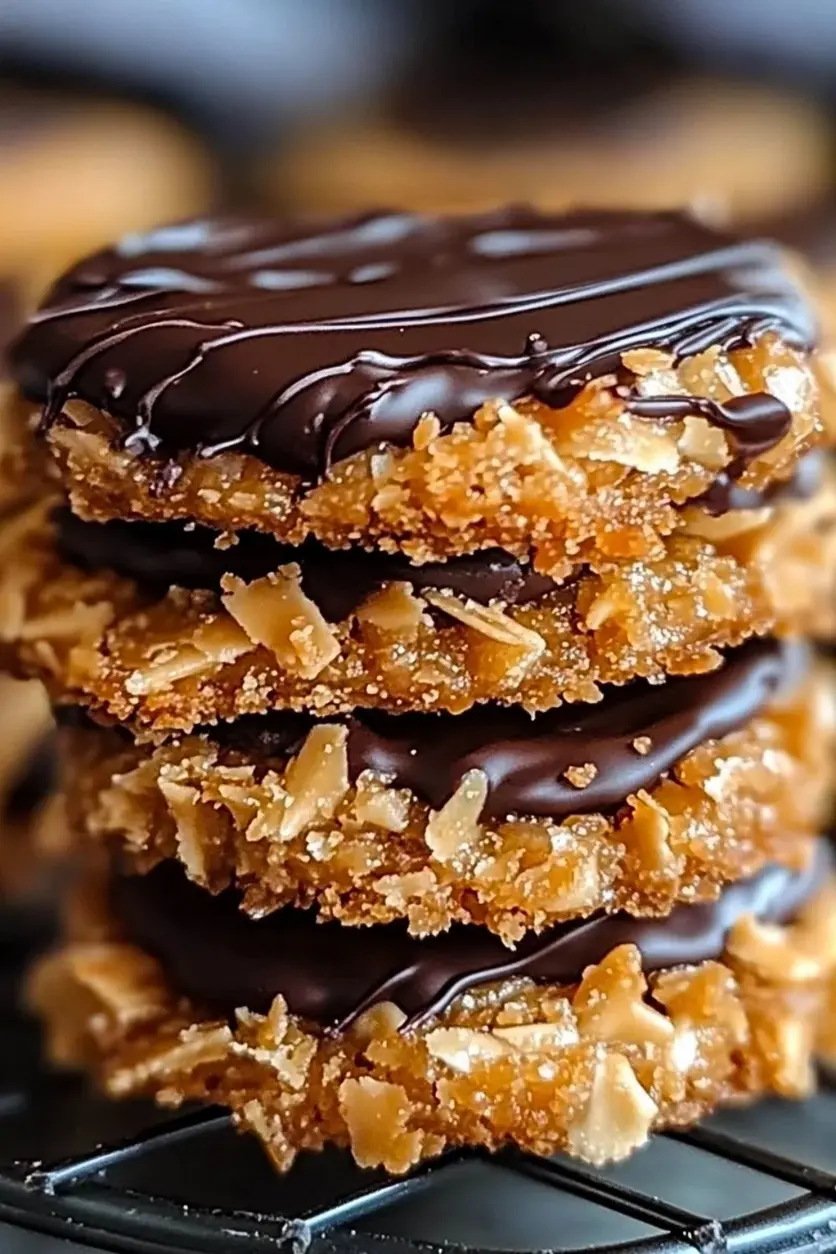
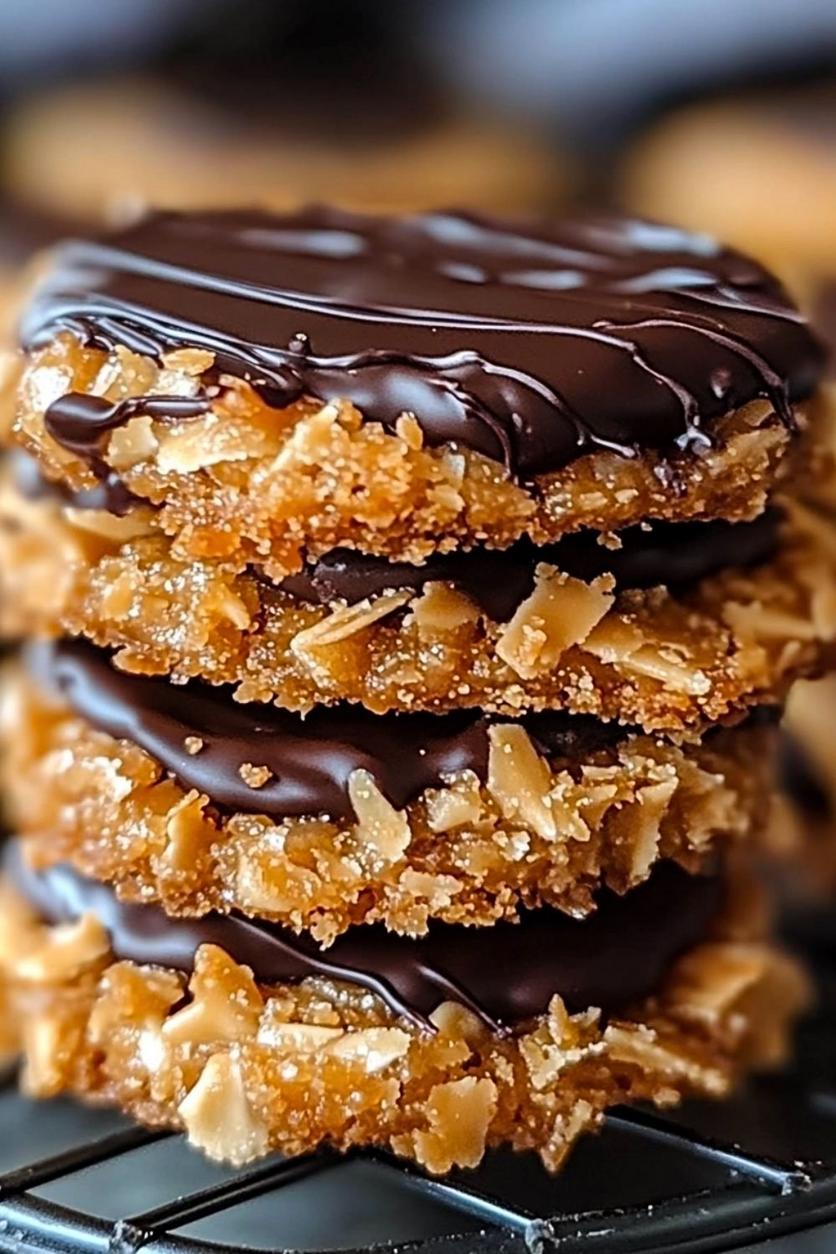
Homemade Samoas Girl Scout Cookies
“`html
Table of Contents
Homemade Samoas Girl Scout Cookies
Unwrap the Nostalgia: Homemade Samoas Cookies That Rival the Original!
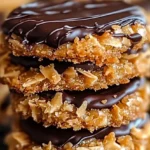
Ever find yourself daydreaming about that iconic Girl Scout cookie, the Samoa? Did you know that the average American consumes about 100 cookies per year, with nostalgic favorites like the Samoa often topping the list? If the mere mention of chewy caramel, toasted coconut, and a rich chocolate drizzle sends shivers of delight down your spine, you’re in the right place! Homemade Samoas Girl Scout Cookies are the ultimate indulgence for caramel, coconut, and chocolate lovers. With a buttery shortbread base, a chewy caramel-coconut topping, and a drizzle of rich chocolate, these cookies are truly a perfect treat for any occasion. Whether you’re recreating cherished childhood memories or embarking on a new baking challenge, this recipe is guaranteed to leave everyone impressed and asking for more. Get ready to unlock a world of flavor that’s both comforting and exciting!
The Building Blocks of Bliss: Ingredients You’ll Need
Gathering these ingredients is the first step to cookie perfection. We’ve broken them down by component to make your baking journey as smooth as possible.
For the Buttery Shortbread Base:
- 1 cup (2 sticks) unsalted butter, softened: The foundation of a tender, flaky cookie. Ensure it’s softened, not melted, for the best texture.
- ⅔ cup granulated sugar: Provides sweetness and helps with the cookie’s structure.
- 1 teaspoon vanilla extract: Enhances all the other flavors.
- 2 cups all-purpose flour: The main structure of our shortbread.
- ¼ teaspoon salt: Balances the sweetness and enhances flavor.
For the Chewy Caramel Coconut Topping:
- 1 cup packed light brown sugar: Crucial for that deep, caramel flavor and chewy texture.
- ½ cup (1 stick) unsalted butter: Brings richness and helps the caramel set.
- ¼ cup heavy cream or evaporated milk: For a smooth, luscious caramel. Evaporated milk offers a slightly richer, cooked caramel flavor.
- ½ teaspoon vanilla extract: A little extra pop of flavor!
- 2 cups shredded sweetened coconut, lightly toasted: The star of the show! Toasting brings out a nutty aroma and deeper flavor.
For the Chocolate Drizzle:
- 6 ounces semi-sweet or dark chocolate, chopped: Choose a quality chocolate for the best melt and taste.
- 1 teaspoon coconut oil or vegetable shortening (optional): Helps the chocolate achieve a smoother, glossier finish and prevents it from hardening too much.
The Clock is Ticking: Baking Timeline
When compared to the average cookie recipe, this one has a slightly longer active prep time due to the two distinct components (base and topping). However, the overall baking time is quite manageable, making it a weekend project that’s well worth the effort. The chilling time is essential for letting the flavors meld and the cookies firm up.
Crafting Your Masterpiece: Step-by-Step Instructions
Step 1: Make the Shortbread Base
- Cream It Up: In a large bowl, beat together the softened butter and granulated sugar with an electric mixer until light and fluffy. This process incorporates air, which is key to a tender cookie. Mix in the vanilla extract.
- Dry Ingredients: In a separate medium bowl, whisk together the all-purpose flour and salt.
- Combine Gently: Gradually add the dry ingredients to the wet ingredients, mixing on low speed until just combined. Be careful not to overmix; we want a tender dough, not a tough one. The dough might be crumbly at this stage.
- Form and Chill: Turn the dough out onto a lightly floured surface and gently knead it a few times until it just comes together. Pat or roll it out to about ¼-inch thickness. Use a floured 2-inch round cutter (or even a glass rim) to cut out circles. Place the circles onto baking sheets lined with parchment paper. Prick each cookie a few times with a fork to prevent them from puffing up too much. Chill the cut-out cookies in the refrigerator for at least 15-20 minutes while you prepare the topping. This chilling step helps them hold their shape.
- Bake to Golden: Preheat your oven to 350°F (175°C). Bake the chilled cookie centers for 10-12 minutes, or until the edges are lightly golden brown. Let them cool on the baking sheet for a few minutes before transferring them to a wire rack to cool completely.
Step 2: Prepare the Caramel Coconut Topping
- Melt and Combine: In a medium saucepan over medium heat, combine the light brown sugar, butter, and heavy cream (or evaporated milk). Stir constantly until the butter is melted and the sugar is dissolved.
- Simmer to Caramel: Bring the mixture to a gentle boil, stirring constantly. Reduce the heat to low and let it simmer for 2-3 minutes, stirring occasionally. It should thicken slightly.
- Add Coconut and Flavor: Remove the saucepan from the heat. Stir in the vanilla extract and the toasted shredded coconut until everything is well combined and the coconut is evenly coated. If you haven’t toasted your coconut yet, now’s the time! Spread it on a small baking sheet and toast in a 350°F oven for 5-7 minutes, watching carefully to prevent burning, then cool before adding to the caramel.
Step 3: Assemble the Cookies
- Top ‘Em Off: Once the shortbread bases have cooled completely, generously spoon the caramel coconut mixture onto the top of each cookie. Spread it out evenly, creating a beautiful, luscious layer.
Step 4: Drizzle with Chocolate
- Melt the Chocolate: Place the chopped chocolate and optional coconut oil (or shortening) in a microwave-safe bowl. Microwave in 30-second intervals, stirring between each, until smooth and fully melted. Alternatively, you can melt it using a double boiler.
- Drizzle Away: Transfer the melted chocolate to a piping bag with a small round tip, or a plastic zip-top bag with a corner snipped off. Drizzle the chocolate decoratively over the caramel coconut topping on each cookie.
Step 5: Chill and Serve
- Let it Set: Place the cookies back onto the wire rack (or a baking sheet if they’re on the rack). Refrigerate for at least 15-20 minutes, or until the chocolate has set and the caramel has firmed up. This step is crucial to prevent a melty mess.
- Enjoy Your Creation! Once set, your homemade Samoas are ready to be devoured!
Nutritional Snapshot: What’s Inside?
While precise nutritional values can vary based on exact ingredients and portion sizes, a typical homemade Samoa cookie (per cookie) is estimated to contain:
- Calories: 250-300 kcal
- Fat: 15-20g (including saturated fat)
- Carbohydrates: 25-35g (including sugars)
- Protein: 2-4g
- Fiber: 1-2g
Note: These are approximations. For exact calculations, use your specific ingredients and a nutrition calculator.
Healthier Twists Without Sacrificing Flavor
Looking for a slightly lighter version? You can make smart swaps:
- Flour Power: Experiment with using half whole wheat flour for the shortbread base for added fiber.
- Sugar Savvy: Reduce the sugar slightly in both the base and the caramel, or use a sugar alternative like erythritol or stevia blends (adjusting for sweetness levels).
- Coconut Kick: Opt for unsweetened shredded coconut and add a touch more vanilla to compensate for the lost sweetness.
- Darker Chocolate: Use a higher percentage dark chocolate (70% or more) for the drizzle, as it contains less sugar.
- Portion Control: Simply enjoy one or two cookies and savor them!
Serving Suggestions: Elevate Your Cookie Experience
These homemade Samoas are a treat on their own, but here are a few ideas to make them even more special:
- Classic Pairing: A tall glass of cold milk is the quintessential partner for any cookie, especially these.
- Coffee Companion: Enjoy with a cup of coffee or latte – the rich flavors complement each other beautifully.
- Dessert Delight: Crumble a cookie over a scoop of vanilla ice cream or use as a base for mini cheesecakes.
- Gift Giving: Package them elegantly in cookie tins or cellophane bags for a thoughtful homemade gift.
Common Mistakes to Avoid
To ensure your homemade Samoas turn out perfectly, steer clear of these common pitfalls:
- Overmixing the Dough: Overworking the shortbread dough will develop gluten, resulting in tough, rather than tender, cookies. Mix until just combined.
- Melted Butter for Shortbread: Using melted butter instead of softened butter will change the texture of the shortbread, making it greasy and less firm.
- Burning the Coconut: Toasted coconut adds wonderful flavor, but burnt coconut is bitter. Watch it closely during toasting!
- Not Chilling the Dough: Chilling the cut-out cookie bases helps them maintain their shape during baking. Don’t skip this step!
- Cutting the Caramel Too Soon: Allow the chocolate drizzle to fully set before attempting to remove the cookies from the parchment.
Storing Your Homemade Treasures
Proper storage will keep your homemade Samoas fresh and delicious:
- Airtight Container: Once the chocolate has completely set, store the cookies in an airtight container at room temperature.
- Layering: If stacking, place parchment paper between layers of cookies to prevent the topping from sticking to the bottom of the cookies above.
- Shelf Life: Homemade Samoas are best enjoyed within 3-5 days. While they might still be good for longer, the caramel can become quite hard.
- Refrigeration: If your kitchen is particularly warm and the caramel seems soft, you can store them in the refrigerator, but allow them to come to room temperature for about 15 minutes before serving for the best texture.
Your Samoas Success Story
There you have it – your very own batch of homemade Samoas that capture all the magic of the beloved Girl Scout cookie! From the buttery crumble of the base to the irresistible chew of the caramel-coconut layer and the finishing touch of chocolate, these cookies are a true testament to the joy of baking from scratch. They’re perfect for school bake sales, holiday gatherings, or simply as a well-deserved personal treat. So, roll up your sleeves, get baking, and savor the sweet reward of nostalgia and deliciousness. Happy baking!
Frequently Asked Questions
***Why are my shortbread cookies spreading too much?***
This is usually because the butter wasn’t cold enough when you started creaming, or the dough was overmixed. Ensure your butter is softened but not melted, and mix the dough only until it just comes together.
***Can I make the caramel topping ahead of time?***
The caramel topping is best made just before you assemble the cookies. If made too far in advance, it can harden or become difficult to spread.
***My chocolate drizzle seized up. What happened?***
Chocolate seizing usually happens when a tiny bit of liquid comes into contact with it during melting, or if it overheats. Try adding a bit more warm liquid (like a teaspoon of oil or cream) and stirring vigorously to see if you can save it. If not, you may need to melt a fresh batch.
***Can I use pre-made shortbread cookies as a base?***
While you could, using store-bought shortbread might change the texture and flavor profile significantly. The homemade shortbread base is designed to complement the topping perfectly, so it’s highly recommended to make it from scratch.
***How important is toasting the coconut?***
Toasting the coconut is highly recommended! It deepens its flavor, adds a delightful nutty aroma, and brings out a more complex taste that truly elevates the cookie. Unsweetened coconut will taste a bit bland. If using sweetened, you might find the overall cookie too sweet.
***Can I make these cookies vegan?***
Yes, you can adapt this recipe for vegan Samoa cookies. Use vegan butter, a plant-based milk (like oat or soy) for the caramel, and vegan chocolate for the drizzle. Ensure your coconut is also sourced sustainably.
Homemade Samoas Girl Scout Cookies
Homemade Samoas Girl Scout Cookies are the ultimate indulgence for caramel, coconut, and chocolate lovers. With a buttery shortbread base, a chewy caramel-coconut topping, and a drizzle of rich chocolate, these cookies are a perfect treat for any occasion. Whether you’re recreating childhood memories or trying a new baking challenge, this recipe will leave everyone impressed!
Ingredients
- For the Shortbread Base:
- For the Topping:
Instructions
- Preheat the Oven:Preheat your oven to 350°F (175°C). Line a baking sheet with parchment paper.
- Make the Shortbread Base:Cream the butter and sugar together in a bowl until light and fluffy.Stir in the vanilla extract, then gradually add the flour and mix until a dough forms.Roll out the dough to 1/4-inch thickness. Use a 2-inch round cutter to cut out the cookies, then cut a small hole in the center of each round.
- Cream the butter and sugar together in a bowl until light and fluffy.
- Stir in the vanilla extract, then gradually add the flour and mix until a dough forms.
- Roll out the dough to 1/4-inch thickness. Use a 2-inch round cutter to cut out the cookies, then cut a small hole in the center of each round.
- Bake the Cookies:Place the cut-out cookies on the prepared baking sheet. Bake for 10-12 minutes, or until the edges are lightly golden. Let cool completely on a wire rack.
- Place the cut-out cookies on the prepared baking sheet. Bake for 10-12 minutes, or until the edges are lightly golden. Let cool completely on a wire rack.
- Toast the Coconut:Spread the shredded coconut on a baking sheet and toast for 5-7 minutes, stirring occasionally, until golden brown.
- Spread the shredded coconut on a baking sheet and toast for 5-7 minutes, stirring occasionally, until golden brown.
- Prepare the Topping:Heat the caramel sauce in a saucepan until smooth and pourable. Add a tablespoon of milk if needed.Mix the toasted coconut into the caramel until well combined.
- Heat the caramel sauce in a saucepan until smooth and pourable. Add a tablespoon of milk if needed.
- Mix the toasted coconut into the caramel until well combined.
- Assemble the Cookies:Spoon the caramel-coconut mixture onto each shortbread cookie, spreading it evenly. Let set for 15-20 minutes.
- Spoon the caramel-coconut mixture onto each shortbread cookie, spreading it evenly. Let set for 15-20 minutes.
- Dip and Drizzle with Chocolate:Dip the bottoms of each cookie into the melted chocolate, allowing the excess to drip off. Place back on parchment paper.Drizzle the tops of the cookies with the remaining melted chocolate for the classic Samoas look.
- Dip the bottoms of each cookie into the melted chocolate, allowing the excess to drip off. Place back on parchment paper.
- Drizzle the tops of the cookies with the remaining melted chocolate for the classic Samoas look.
- Let the Cookies Set:Allow the cookies to set at room temperature, or place them in the refrigerator for faster results.
- Allow the cookies to set at room temperature, or place them in the refrigerator for faster results.
Notes
Storage Tips:Store cookies in an airtight container at room temperature for up to 5 days or in the fridge for up to a week.Freeze individually wrapped cookies for up to 2 months and thaw before serving.
Store cookies in an airtight container at room temperature for up to 5 days or in the fridge for up to a week.
Freeze individually wrapped cookies for up to 2 months and thaw before serving.
Tips for Success:Toasting the coconut is key for maximum flavor.Use high-quality chocolate for the best results.Work quickly with the caramel-coconut topping as it thickens as it cools.
Toasting the coconut is key for maximum flavor.
Use high-quality chocolate for the best results.
Work quickly with the caramel-coconut topping as it thickens as it cools.
“`