Hostess Chocolate Cupcakes – Easy Creamy Recipe
“`html
Table of Contents
- Nostalgia in Every Bite: Crafting Hostess Chocolate Cupcakes
- Ingredients You’ll Need
- Timing is Everything
- Step-by-Step Guide
- Step 1: Preheat Oven and Prepare Pans
- Step 2: Whisk Together Dry Ingredients
- Step 3: Cream Butter and Sugar
- Step 4: Add Eggs and Vanilla
- Step 5: Alternate Adding Wet and Dry Ingredients
- Step 6: Fill Cupcake Liners
- Step 7: Bake the Cupcakes
- Step 8: Make the Marshmallow Filling
- Step 9: Fill the Cupcakes
- Step 10: Make the Chocolate Ganache
- Step 11: Make the White Icing
- Step 12: Decorate and Serve
- Nutritional Snapshot
- Healthier Approaches Without Sacrificing Flavor
- Serving Suggestions
- Common Pitfalls to Avoid
- Keeping Them Fresh
- Frequently Asked Questions
Hostess Chocolate Cupcakes – Easy Creamy Recipe
Nostalgia in Every Bite: Crafting Hostess Chocolate Cupcakes
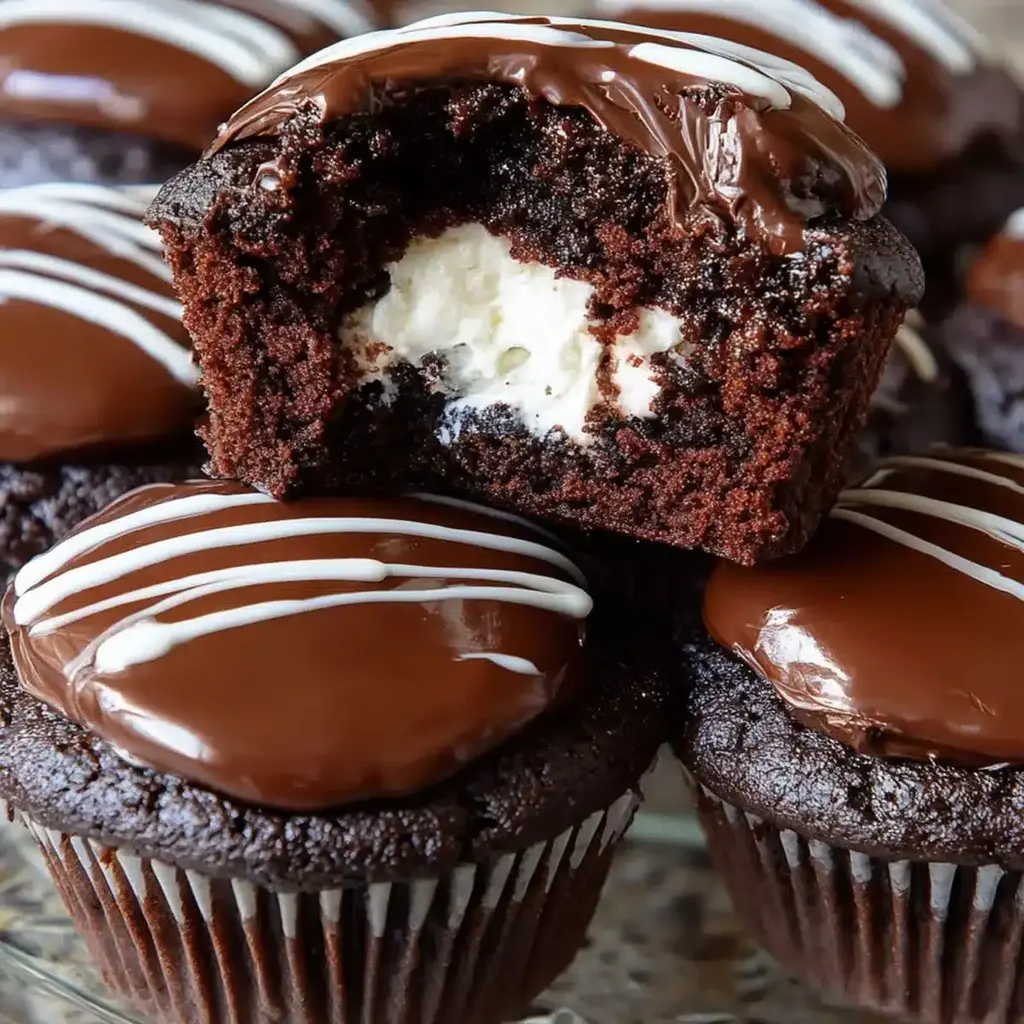
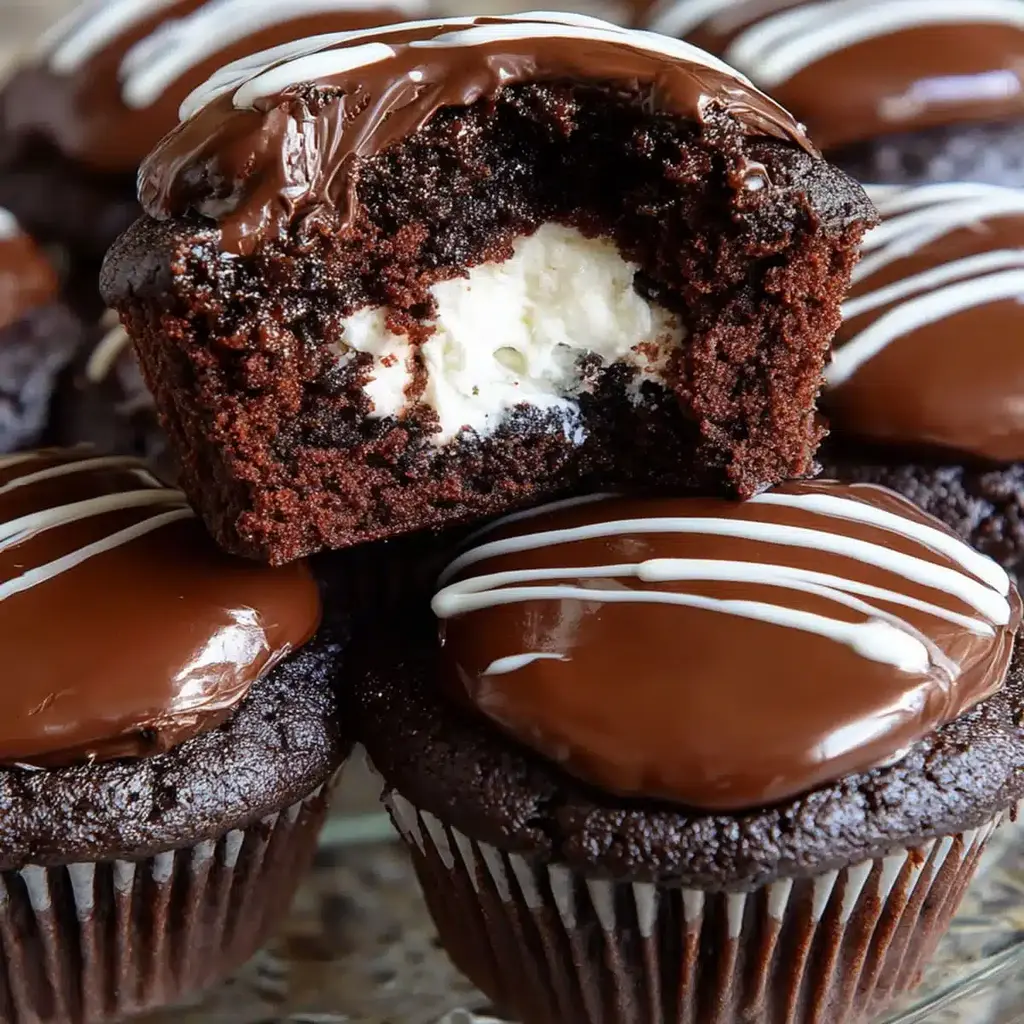
Are you craving a taste of childhood? Did you know that recreating those beloved Hostess Chocolate Cupcakes from scratch is not only possible but incredibly rewarding? Often, store-bought versions lack the authentic, moist texture and rich flavor that everyone craves. This recipe is your ticket to achieving that perfect, bakery-style chocolate cupcake, complete with a luscious marshmallow cream filling, a glossy chocolate ganache, and that signature white icing swirl. It’s a trip down memory lane that’s surprisingly easy to make with simple ingredients, delivering a nostalgic snack cake experience that’s far superior to any processed treat.
Ingredients You’ll Need
Gather these simple pantry staples to bring this iconic treat to life.
For the Cupcakes
- 2 cups All-Purpose Flour: The foundation for a tender crumb.
- 1 ½ cups Granulated Sugar: For sweetness and moisture.
- ¾ cup Unsweetened Cocoa Powder: The heart of our deep chocolate flavor. Use a good quality one for best results!
- 1 ½ teaspoons Baking Soda: The leavening agent that gives these cakes their lift.
- ¾ teaspoon Baking Powder: Works with baking soda for a perfectly risen cupcake.
- ¾ teaspoon Salt: Enhances all the other flavors.
- 2 large Eggs: Room temperature to emulsify beautifully.
- 1 cup Buttermilk: For incredible tenderness and a slight tang. If you don’t have buttermilk, mix 1 cup of milk with 1 tablespoon of lemon juice or white vinegar and let it sit for 5-10 minutes.
- ½ cup Vegetable Oil: Ensures a supremely moist crumb. Canola or other neutral oil works too.
- 2 teaspoons Vanilla Extract: Amplifies the chocolate and adds depth.
- 1 cup Hot Water or Hot Brewed Coffee: This is the secret to a super moist and rich chocolate cake! Coffee deepens the chocolate flavor without making it taste like coffee.
For the Marshmallow Filling
- 4 ounces Cream Cheese, softened: For a creamy, stable filling.
- ¼ cup (½ stick) Unsalted Butter, softened: Adds richness and helps with texture.
- 1 teaspoon Vanilla Extract: For a hint of sweetness.
- 1 ½ cups Powdered Sugar, sifted: Adjust for sweetness and consistency.
- ¼ cup Marshmallow Fluff (or creme): The key to that classic marshmallow flavor and cloud-like texture.
For the Chocolate Ganache
- 6 ounces Semi-sweet Chocolate, finely chopped: Good quality chocolate melts better.
- ½ cup Heavy Cream: For a smooth, glossy finish.
For the White Icing Swirl
- ½ cup Unsalted Butter, softened: The base for our swirl.
- 1 ½ cups Powdered Sugar, sifted: For sweetness and structure.
- 2-3 tablespoons Milk: To achieve the perfect piping consistency.
- ½ teaspoon Vanilla Extract: For a touch of flavor.
Timing is Everything
30 minutes
20-24 minutes
54 minutes (plus cooling & decorating)
60-75 minutes
While the average cake recipe can take a bit longer, this streamlined approach gets you to deliciousness efficiently. Remember to factor in cooling time before filling and decorating!
Step-by-Step Guide
Step 1: Preheat Oven and Prepare Pans
Begin by preheating your oven to 350°F (175°C). Line two standard 12-cup muffin tins with cupcake liners. This ensures your beautiful cupcakes won’t stick and makes for easy cleanup.
Step 2: Whisk Together Dry Ingredients
In a large mixing bowl, whisk together the all-purpose flour, granulated sugar, unsweetened cocoa powder, baking soda, baking powder, and salt. Whisking thoroughly at this stage helps to break up any lumps and evenly distribute the leavening agents, ensuring a consistent rise.
Step 3: Cream Butter and Sugar
In a separate, larger bowl, cream together the softened butter and granulated sugar until light and fluffy. This process incorporates air into the batter, contributing to the cake’s tender texture. Use an electric mixer (handheld or stand mixer) for best results.
Step 4: Add Eggs and Vanilla
Beat in the room temperature eggs, one at a time, ensuring each is fully incorporated before adding the next. Stir in the vanilla extract. This creates a stable emulsion.
Step 5: Alternate Adding Wet and Dry Ingredients
Add about one-third of the dry ingredient mixture to the creamed butter mixture and mix on low speed until just combined. Then, add half of the buttermilk and mix again. Continue alternating, adding another third of the dry ingredients, the rest of the buttermilk, and finally the last of the dry ingredients. Mix until just combined after each addition. Be careful not to overmix, as this can lead to tough cupcakes.
Step 6: Fill Cupcake Liners
Gently stir in the vegetable oil and vanilla extract into the batter until just combined. Finally, carefully pour in the hot water or hot coffee. The batter will be quite thin – this is normal and is key to moistness! Stir until smooth.
Step 7: Bake the Cupcakes
Divide the batter evenly among the prepared cupcake liners, filling each about two-thirds full. Bake for 20-24 minutes, or until a wooden skewer inserted into the center of a cupcake comes out clean. Let the cupcakes cool in the muffin tins for about 5-10 minutes before transferring them to a wire rack to cool completely. This prevents them from breaking.
Step 8: Make the Marshmallow Filling
While the cupcakes cool, prepare the filling. In a medium bowl, beat together the softened cream cheese and softened butter until smooth and creamy. Add the vanilla extract and powdered sugar (sifted to prevent lumps), mixing on low speed until incorporated. Then, fold in the marshmallow fluff until the filling is light, airy, and well combined. You can use an electric mixer for this or a sturdy spatula.
Step 9: Fill the Cupcakes
Once the cupcakes have cooled completely, it’s time to fill them. You can use a piping bag with a large round tip, or simply use a small knife to cut a small cone or hollow out the center of each cupcake. Spoon or pipe a generous amount of the marshmallow filling into the cavity. Aim for a fluffy, generous dollop.
Step 10: Make the Chocolate Ganache
Place the finely chopped semi-sweet chocolate in a heatproof bowl. Heat the heavy cream in a small saucepan over medium heat until it just begins to simmer around the edges (do not boil). Pour the hot cream over the chocolate and let it sit for 5 minutes. Then, whisk gently until the chocolate is completely melted and the ganache is smooth and glossy. Let it cool slightly until it reaches a thick but pourable consistency.
Step 11: Make the White Icing
In a small bowl, beat the softened butter until creamy. Gradually add the sifted powdered sugar and vanilla extract, mixing until well combined. Add milk, one tablespoon at a time, beating until the icing reaches a smooth, pipeable consistency. Transfer this to a piping bag fitted with a star tip.
Step 12: Decorate and Serve
Spoon or gently pour the slightly cooled chocolate ganache over the marshmallow-filled cupcakes, allowing it to drip slightly down the sides. Immediately after, pipe the white icing swirl on top of the chocolate ganache. For the classic look, a simple spiral or rosette works perfectly. Let the ganache and icing set slightly before serving.
Nutritional Snapshot
While exact nutritional values can vary based on specific brands and ingredient amounts, a typical Hostess-style chocolate cupcake made from scratch is generally:
- Calories: 350-450 per cupcake
- Fat: 18-25g
- Carbohydrates: 40-55g
- Protein: 4-6g
- Sugar: 30-40g
Note: These are estimates. For precise nutritional information, consult a reliable recipe calculator with your specific ingredients.
Healthier Approaches Without Sacrificing Flavor
Want to enjoy these treats with a slightly lighter touch? Try these swaps:
- Flour: Substitute half of the all-purpose flour with whole wheat pastry flour for added fiber, or a gluten-free blend if needed.
- Sugar: Reduce the sugar by ¼ cup in the cake batter. Use a natural sweetener alternative like maple syrup (adjust liquid content) or a sugar substitute if preferred, but be mindful of flavor changes.
- Fat: In the filling, you can use light cream cheese and reduce the butter slightly, or use unsweetened applesauce in place of some of the oil in the cake batter (though this may slightly alter texture).
- Toppings: Use dark chocolate with a higher cocoa percentage for the ganache for less sugar. For the white icing, you might opt for a lighter whipped cream topping or a glaze made with skim milk and powdered sugar.
Serving Suggestions
These Hostess Chocolate Cupcakes are perfect as is, but here are a few ideas to elevate your experience:
- Serve them as a delightful after-school snack.
- Pair them with a glass of cold milk for ultimate comfort.
- Offer them at birthday parties or potlucks for a guaranteed crowd-pleaser.
- Enjoy one with a cup of coffee or tea for a midday treat.
Common Pitfalls to Avoid
To ensure perfection, steer clear of these common mistakes:
- Overmixing the Batter: This develops gluten, leading to tough cupcakes. Mix only until ingredients are just combined.
- Using Cold Ingredients: Ensure eggs, buttermilk, and butter for the filling and icing are at room temperature for smooth incorporation.
- Opening the Oven Door Too Soon: Resist peeking! Opening the oven door can cause cupcakes to sink.
- Not Cooling Completely: Filling and frosting warm cupcakes will melt your fillings and icings, leading to a sloppy mess. Patience is key!
- Overfilling the Liners: Filling them more than two-thirds full can cause the batter to overflow, resulting in unevenly baked or misshapen cupcakes.
Keeping Them Fresh
Store these delightful cupcakes properly to maintain their freshness:
- Room Temperature: Unfrosted or fully decorated cupcakes can be stored in an airtight container at room temperature for up to 2-3 days.
- Refrigeration: For longer storage, especially in warm climates or if using dairy-heavy frosting, refrigerate them in an airtight container for up to 5 days. Let them come to room temperature for about 30 minutes before serving for best texture.
- Freezing: While possible, they are best enjoyed fresh. If you must freeze, wrap them tightly in plastic wrap and then in foil, and freeze for up to 1 month. Thaw overnight in the refrigerator.
Ready to bake up some magic? This recipe is a journey back to simpler times, delivering a taste that’s both familiar and incredibly delicious. Give it a try and let us know what you think in the comments below!

Frequently Asked Questions
***Can I make these cupcakes ahead of time?***
Yes, you can bake the cupcakes a day in advance and store them at room temperature in an airtight container. The filling, ganache, and icing can also be made ahead and stored separately. Assemble the cupcakes later for the freshest results!
***How do I achieve the classic white icing swirl?***
The key is the consistency of the white icing. It should be thick enough to hold its shape but not too stiff. Use a piping bag with a star tip for the classic look. Start in the center and pipe outwards in a spiral motion, or create a rosette shape.
***What if I don’t have buttermilk?***
No problem! You can easily make a substitute by mixing 1 cup of regular milk (dairy or non-dairy) with 1 tablespoon of white vinegar or lemon juice. Let it sit for 5-10 minutes until it thickens and curdles slightly. This will give your cupcakes that same tenderizing effect.
***Can I use butter instead of oil in the cupcake batter?***
While oil is preferred for its ability to create an incredibly moist and tender crumb due to its liquid state at room temperature, you can substitute melted butter. Use the same amount (½ cup). However, be aware that using butter might result in a slightly denser cake compared to using oil.
***How long will the marshmallow filling last?***
The marshmallow filling, made with cream cheese and butter, should be stored in an airtight container in the refrigerator and will last for about 3-4 days. Ensure it’s fully cooled and covered properly.
Hostess Chocolate Cupcakes – Easy Creamy Recipe
Moist and rich homemade Hostess chocolate cupcakes filled with fluffy marshmallow cream, topped with glossy chocolate ganache and the classic white icing swirl. A nostalgic snack cake, made entirely from scratch with simple ingredients and bakery-style flavor.
Ingredients
- 1 cup(130g) all-purpose flour
- 1 cup(207g) sugar
- 6 tbsp(43g) unsweetened cocoa powder
- 1 tspbaking soda
- 1/2 tspsalt
- 1large egg
- 1/2 cup(120ml) milk
- 1/2 cup(120ml) vegetable oil
- 3/4 tspvanilla extract
- 1/2 cup(120ml) hot water
- 1/4 cup(56g) unsalted butter (room temperature, for filling)
- 1/2 cup(58g) powdered sugar (for filling)
- 5 ozmarshmallow creme
- 4 oz(113g) semi-sweet chocolate chips
- 6 tbsp(90ml) heavy whipping cream
- 2 tbspunsalted butter (room temperature, for icing)
- 1/2 cuppowdered sugar (for icing)
- 1 tbspmilk
- Splash of vanilla extract
Instructions
- Preheat oven to 300°F (148°C) and line a cupcake pan with liners.
- In a large bowl, whisk together flour, sugar, cocoa powder, baking soda, and salt.
- In a separate bowl, whisk together egg, milk, vegetable oil, and vanilla extract.
- Combine wet and dry mixtures, then slowly mix in hot water until smooth and thin.
- Fill cupcake liners slightly over halfway and bake for 18–23 minutes. Cool for 2 minutes in the pan, then transfer to a rack.
- To make the filling, beat butter until smooth, add powdered sugar gradually, then mix in marshmallow creme until fluffy.
- Core each cooled cupcake and fill the center with marshmallow filling. Replace the trimmed cupcake top.
- For the ganache, pour hot cream over chocolate chips, let sit 2 minutes, then whisk until smooth. Spread over cupcakes.
- To make the swirl icing, beat butter until smooth, add powdered sugar, then milk and vanilla. Pipe the swirl using a small round tip.
- Refrigerate cupcakes until ready to serve. Serve slightly chilled.
Notes
Use unsweetened cocoa powder, not Dutch-processed, for best flavor.
Don’t overfill the cupcake liners to avoid overflow.
Practice the swirl design on parchment before piping onto cupcakes.
Cupcakes can be made a day ahead and frosted before serving.
Unfrosted cupcakes can be frozen for up to 3 months.
Nutrition
- Calories: 309
- Sugar: 30.6g
- Fat: 15.8g
- Carbohydrates: 41.9g
- Protein: 2.7g
“`