Korean Style Pot Roast Recipe
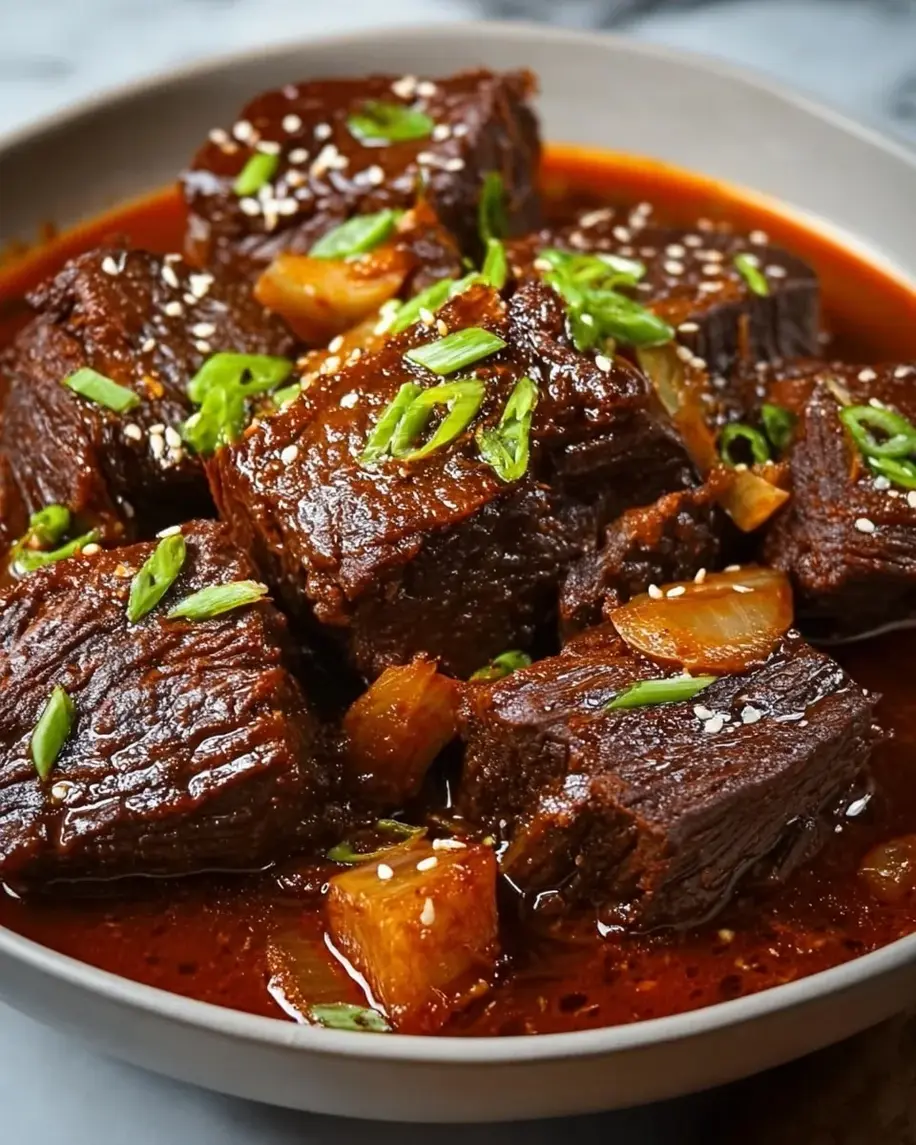
Table of Contents
Korean Style Pot Roast Recipe
Introduction
Did you know that over 70% of home cooks are looking to “globalize” their weeknight dinners? If you’re searching for a comforting, familiar dish with an exciting, flavor-packed twist, this Korean Style Pot Roast is your answer. This recipe transforms the classic American pot roast into a deeply savory, slightly spicy, and aromatic masterpiece by harnessing the power of Korean pantry staples like gochujang, soy sauce, and sesame oil. The slow-roasting method ensures the beef becomes impossibly tender, soaking up every drop of the rich, complex marinade. Perfect for a family dinner or a special occasion, this dish brings the warmth of Korean cuisine right to your table with minimal fuss.
Ingredients List
Gather these ingredients to create the foundation of your Korean pot roast. Each component adds a layer of flavor, from umami depth to aromatic warmth.
- For the Roast & Marinade:
- 3-4 lb chuck roast or beef brisket – Look for a well-marbled cut; the fat renders down during cooking, creating a melt-in-your-mouth texture.
- 1/2 cup soy sauce – The salty, umami backbone. For a gluten-free option, use tamari or coconut aminos (which will be slightly sweeter).
- 1/4 cup gochujang (Korean red chili paste) – Provides a deep, fermented chili flavor with mild heat and subtle sweetness. Start with less if sensitive to spice.
- 3 tbsp toasted sesame oil – Imparts a distinct, nutty aroma that is quintessentially Korean. Do not substitute with regular sesame oil.
- 1/4 cup brown sugar or honey – Balances the saltiness and spice with caramelized sweetness.
- 8-10 cloves garlic, minced – Fresh is best for a pungent, aromatic punch.
- 2-inch piece ginger, grated – Adds a bright, zesty warmth that cuts through the richness.
- 1 Asian pear or Bosc pear, grated (optional but recommended) – A traditional Korean tenderizer that adds natural sweetness and enzymes to break down the meat fibers.
- 1 tbsp rice vinegar – A touch of acidity to brighten the marinade.
- 1 tsp freshly ground black pepper
- For Braising:
- 2 tbsp neutral oil (avocado, canola) – For searing.
- 1 large yellow onion, roughly chopped – Becomes sweet and soft during roasting.
- 2 large carrots, cut into 2-inch chunks – Adds earthy sweetness.
- 4-5 stalks green onion, whites only (save greens for garnish)
- 1-2 cups beef broth or water – To create the braising liquid.
- For Garnish:
- Thinly sliced green onions
- Toasted sesame seeds
- Fresh cilantro or perilla leaves (optional)
Timing
20 minutes (plus 2-24 hours marinating)
3 – 3.5 hours
3.5 – 4 hours (active time: 30 min)
While the total clock time is similar to a traditional pot roast (which averages 3-4 hours), the active prep time for this recipe is significantly less—about 30 minutes. The magic happens in the oven, freeing you up. The extended marinating time is the secret weapon that infuses the meat with flavor all the way through, a step often skipped in standard recipes that can lead to bland, only-surface-level seasoning.
This Korean Style Pot Roast, slow-cooked to tender perfection, is a comforting dinner with a spicy, savory kick.
Step-by-Step Instructions
Step 1: Marinate the Beef
In a large bowl, whisk together the soy sauce, gochujang, sesame oil, brown sugar, minced garlic, grated ginger, grated pear (if using), rice vinegar, and black pepper. This is your flavor powerhouse. Place the chuck roast in a large resealable bag or a deep dish. Pour the marinade over the meat, ensuring it’s completely coated. Seal the bag or cover the dish tightly. I recommend letting this marinate in the refrigerator for at least 2 hours, but for truly transformative flavor, aim for overnight (up to 24 hours). The longer it marinates, the more profound the savory-spicy-sweet notes will be in the finished roast.
Step 2: Sear the Roast
Preheat your oven to 325°F (163°C). Remove the roast from the marinade, but reserve all the marinade liquid—this is liquid gold. Pat the roast dry thoroughly with paper towels; this is crucial for achieving a proper sear. Heat the neutral oil in a large Dutch oven or heavy-bottomed oven-safe pot over medium-high heat. Once the oil is shimmering, carefully place the roast in the pot. Sear for 4-5 minutes per side, until a deep, caramelized brown crust forms. This step isn’t just for color; it builds foundational flavor through the Maillard reaction.
Step 3: Build the Braising Liquid
Transfer the seared roast to a plate temporarily. In the same pot, add the chopped onion, carrot chunks, and the white parts of the green onions. Sauté for 4-5 minutes until they just begin to soften and pick up the browned bits (fond) from the bottom of the pot. Pour in the reserved marinade and 1 cup of beef broth. Stir, scraping up all the delicious fond. This creates the braising liquid that will tenderize and flavor the meat as it cooks.
Step 4: Slow Roast to Perfection
Return the seared roast to the pot, nestling it into the vegetables and liquid. The liquid should come about halfway up the sides of the meat. Add more broth if needed. Bring the liquid to a gentle simmer on the stovetop. Then, cover the pot tightly with its lid and carefully transfer it to the preheated oven. Let it roast, undisturbed, for 3 to 3.5 hours. The roast is done when it is fork-tender and easily pulls apart. You can check at the 2.5-hour mark, but resist the urge to open the lid too often, as this lets heat escape.
Step 5: Rest and Slice
Once perfectly tender, carefully remove the pot from the oven. Using tongs or two large forks, transfer the roast to a clean cutting board. Let it rest for at least 15-20 minutes. This allows the juices, which have been driven to the center by the heat, to redistribute throughout the meat. Slicing it too soon will result in a dry roast. While it rests, you can skim excess fat from the surface of the braising liquid if desired.
Step 6: Serve and Garnish
Slice the rested roast against the grain into ½-inch thick slices. This shortens the muscle fibers, ensuring each bite is tender. Arrange the slices on a platter with the softened carrots and onions from the pot. Spoon the rich, reduced braising liquid over the top. Finish with a generous sprinkle of sliced green onions and toasted sesame seeds. For an extra fresh note, add a few cilantro or perilla leaves.
Nutritional Information
The following estimates are for a 6-ounce serving of sliced beef with braising liquid and vegetables, based on 8 servings per roast.
- Calories: ~420 kcal
- Protein: ~45g
- Total Fat: ~22g
- Saturated Fat: ~8g
- Carbohydrates: ~15g
- Dietary Fiber: ~2g
- Sugars: ~10g (primarily from pear/brown sugar)
- Sodium: ~950mg (varies with soy sauce brand; using low-sodium soy sauce can reduce this significantly)
Healthier Alternatives
You can easily adapt this recipe to fit various dietary needs without sacrificing the core Korean flavors:
- Lower Sodium: Use low-sodium soy sauce or tamari, and consider reducing the amount by 1-2 tablespoons, compensating with a splash of water or extra grated pear for moisture.
- Reduced Sugar: Substitute the brown sugar with monk fruit sweetener or reduce the amount by half. The pear also provides natural sweetness.
- Leaner Cut: While chuck roast is ideal for tenderness, you can use a bottom round roast. Be extra vigilant with marinating time and cooking until fork-tender to prevent dryness.
- Gluten-Free: Ensure your gochujang is gluten-free (many brands are) and use tamari or coconut aminos instead of soy sauce.
Serving Suggestions
This robust roast is a complete meal with the braised vegetables, but traditional Korean sides (banchan) elevate it into a feast:
- Steamed White or Brown Rice: A must for soaking up the incredible sauce.
- Quick Kimchi Salad: The spicy, fermented crunch provides a perfect contrast to the rich, tender meat.
- Sautéed Greens: Bok choy or spinach quickly sautéed with garlic and a dash of sesame oil.
- Korean Radish Salad (Musaengchae): A sweet, tangy, and crunchy shredded radish salad that cleanses the palate.
- For a Low-Carb Option: Serve over cauliflower rice or with a side of zucchini noodles.
Common Mistakes
- Not Patting the Meat Dry Before Searing: Wet meat