Mint Fudge Recipe
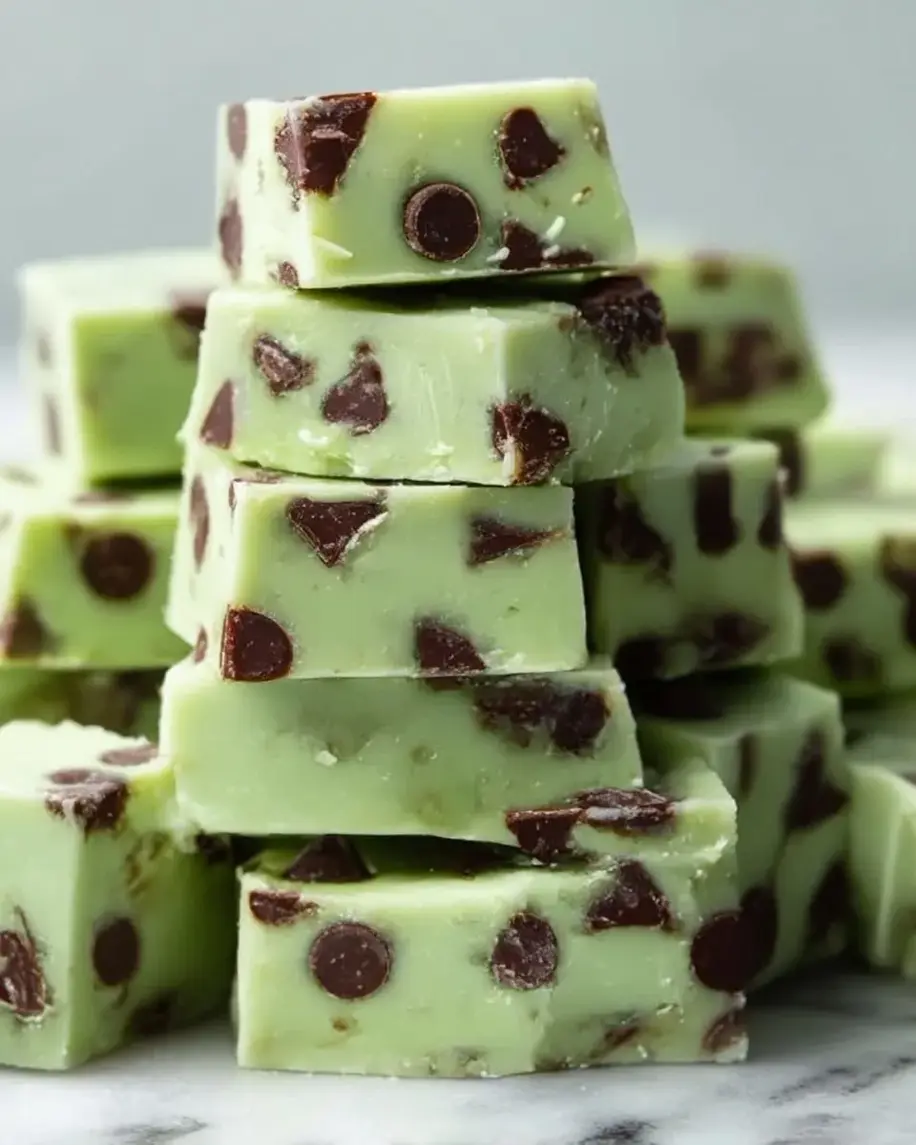
Table of Contents
Mint Fudge Recipe
Introduction
Did you know that over 75% of home bakers report that fudge is their most requested holiday treat? This Mint Fudge recipe is here to elevate that classic demand into a creamy, refreshing masterpiece. Combining the luxurious sweetness of white chocolate with the invigorating coolness of peppermint, this fudge is a melt-in-your-mouth sensation that delights the senses. Perfect for holiday gatherings, gift boxes, or simply satisfying a sweet craving, this no-bake dessert comes together with stunning ease. Its festive green hue and smooth texture make it as beautiful as it is delicious. If you’re looking for a foolproof, crowd-pleasing treat that requires minimal effort but delivers maximum flavor impact, you’ve found your recipe. Let’s dive into creating this creamy, minty delight that’s sure to become a seasonal staple in your kitchen.
Ingredients List
Gathering high-quality ingredients is the first secret to perfect fudge. Here’s what you’ll need for this mint fudge recipe, along with sensory notes and smart substitutions.
- 3 cups (18 oz) high-quality white chocolate chips: The base of our fudge. Look for chips with real cocoa butter for the creamiest melt and richest flavor. They should have a smooth, ivory appearance. Substitution: You can use chopped white chocolate baking bars for an even silkier texture.
- 1 (14 oz) can of sweetened condensed milk: This is the magic ingredient that creates the fudge’s signature smooth, firm-yet-soft texture without any graininess. It should be thick and pale yellow.
- 3 tablespoons unsalted butter: Adds richness and a velvety mouthfeel. Use it at room temperature for easier blending.
- 1 teaspoon pure peppermint extract: This provides the authentic, refreshing mint flavor. Avoid imitation extracts for the best taste. Substitution: For a milder mint, use 1/2 tsp peppermint and 1/2 tsp vanilla extract.
- 8-10 drops green food coloring (optional): For that iconic festive look. Gel food coloring gives vibrant color without thinning the mixture.
- 1/4 cup crushed candy canes or peppermint candies: Adds a delightful crunch and visual sparkle on top. The red and white specks create a beautiful contrast against the green fudge.
- Pinch of salt: Just a pinch to balance the sweetness and enhance all the other flavors.
Timing
One of the biggest advantages of this mint fudge recipe is its incredible efficiency. Compared to traditional stovetop fudge recipes that require precise temperature monitoring and 30+ minutes of active cooking and beating, this no-bake version slashes active kitchen time by over 75%. Your total hands-on commitment is just about 15 minutes. The majority of the time is passive chilling in the refrigerator, allowing the fudge to set up perfectly firm and sliceable. This makes it an ideal last-minute dessert or a stress-free addition to a busy holiday baking schedule.
Creamy, refreshing mint fudge with a festive green color and crushed candy cane topping.
Step-by-Step Instructions
Step 1: Prepare Your Pan
Line an 8×8 inch square baking pan with parchment paper, leaving a slight overhang on two opposite sides. This “sling” is your best friend—it will allow you to lift the entire block of set fudge out of the pan effortlessly for clean, professional-looking slices. Lightly grease the parchment paper with a tiny bit of butter or non-stick spray to ensure absolutely no sticking. Place the prepared pan on your counter, ready to go. This simple prep step is crucial for perfect results later.
Step 2: Melt the Chocolate
In a medium-sized, heatproof bowl, combine the white chocolate chips, sweetened condensed milk, and butter. Create a double boiler by placing the bowl over a saucepan of gently simmering water, ensuring the bottom of the bowl does not touch the water. Stir the mixture constantly and gently with a silicone spatula. The goal is to melt everything together slowly and evenly until it’s completely smooth, glossy, and free of any lumps. This should take about 4-5 minutes. Pro Tip: Never melt this mixture directly over high heat or in the microwave, as white chocolate is very sensitive and can easily seize or burn, ruining the texture.
Step 3: Combine and Flavor
Once your mixture is perfectly smooth, remove the bowl from the heat. Stir in the peppermint extract and the pinch of salt. The aroma will instantly become wonderfully minty and inviting. If using green food coloring, add it now, a few drops at a time, stirring thoroughly until you achieve your desired shade of festive green. Remember, the color will deepen slightly as it sets. Give the mixture a final vigorous stir for about 30 seconds to ensure everything is fully incorporated and the texture is luxuriously creamy.
Step 4: Pour and Set
Immediately pour the mint fudge mixture into your prepared pan. Use your spatula to spread it into an even layer, nudging it gently into the corners. Now, generously sprinkle the top with the crushed candy canes or peppermint candies, gently pressing them in so they adhere. This not only adds flavor and crunch but creates a gorgeous, festive finish. Carefully transfer the pan to your refrigerator. Allow the fudge to chill, completely undisturbed, for at least 2 hours, or until it is very firm to the touch. For the cleanest cuts, I often let mine set for 3-4 hours or even overnight.
Step 5: Slice and Serve
Using the parchment paper sling, lift the entire block of fudge out of the pan and onto a clean cutting board. Peel away the parchment paper. Using a large, sharp knife (wiping it clean with a hot, damp cloth between cuts for pristine edges), slice the fudge into 1-inch squares. For a professional touch, you can trim off the very edges first. Arrange the mint fudge squares on a serving platter and watch them disappear! The fudge should be firm yet yield softly to the bite, releasing its cool, creamy, sweet flavor.
Nutritional Information
The following nutritional estimates are for one piece (based on 64 pieces per batch). Please note these are approximations, as ingredients can vary.
- Calories: ~85 kcal
- Total Fat: 4g
- Saturated Fat: 2.5g
- Cholesterol: 5mg
- Sodium: 15mg
- Total Carbohydrates: 11g
- Sugars: 11g
- Protein: 1g
Healthier Alternatives
Love the flavor but want to lighten it up? Here are some smart, flavorful swaps that maintain the spirit of the recipe:
- Lower-Sugar Chocolate: Use a high-quality sugar-free white chocolate baking bar. Be sure it’s designed for melting.
- Lighter “Milk”: Swap the regular sweetened condensed milk for a reduced-fat or a “light” version. The texture will be nearly identical.
- Butter Swap: Substitute the butter with coconut oil. It will solidify well when chilled and add a subtle, pleasant flavor note.
- Natural Color: Skip the artificial food coloring. For a natural green tint, blend a tiny pinch of matcha powder or spinach powder into the condensed milk before heating. The flavor will be undetectable.
- Topping Twist: Instead of candy canes, top with a sprinkle of crushed freeze-dried raspberries for a tart contrast, or a dusting of unsweetened cocoa powder.
Serving Suggestions
This mint fudge is incredibly versatile. Here’s how to make it the star of any occasion:
- Holiday Platter: Arrange squares on a tiered stand with other Christmas cookies, brownies, and truffles for a stunning dessert table.
- Gift Giving: Package in clear cellophane bags tied with a ribbon, or in small decorative tins. Layer with parchment paper for a beautiful homemade gift.
- Dessert Pairing: Serve alongside a rich, dark chocolate mousse or a cup of strong, hot coffee to balance the sweetness.
- Ice Cream Topping: Crumble a square over a bowl of vanilla bean or chocolate ice cream for an indulgent sundae.
- After-Dinner Mint: Place a single small square on each guest’s saucer with their coffee or tea at the end of a meal.
Common Mistakes
Avoid these pitfalls to ensure your mint fudge is perfect every single time:
- Rushing the Melt: Applying high, direct heat to white chocolate causes it to seize into a grainy, clumpy mess. Always use a gentle double boiler method.
- Undermixing: Not stirring thoroughly after adding the extract and color can lead to uneven flavor and marbling. Stir vigorously for a full 30 seconds.
- Insufficient Chilling: Cutting the fudge before it’s fully set results in messy, sticky slices. Patience is key—wait the full 2 hours minimum.
- Wrong Pan Size: Using a pan larger than 8×8 inches will make the fudge layer too thin and difficult to slice. Using a smaller pan makes it too thick and may prevent proper setting in the center.
- Stale Candy Topping: Crushing candy canes that have been open and absorbing moisture for weeks leads to a chewy, sticky topping instead of a satisfying crunch. Use fresh, hard candies.
Storing Tips
Proper storage keeps your fudge fresh and delicious for as long as possible:
- Room Temperature: In an airtight container layered with parchment paper, the fudge will keep for up to 1 week in a cool, dry place.