No Bake Lemon Pie Recipe
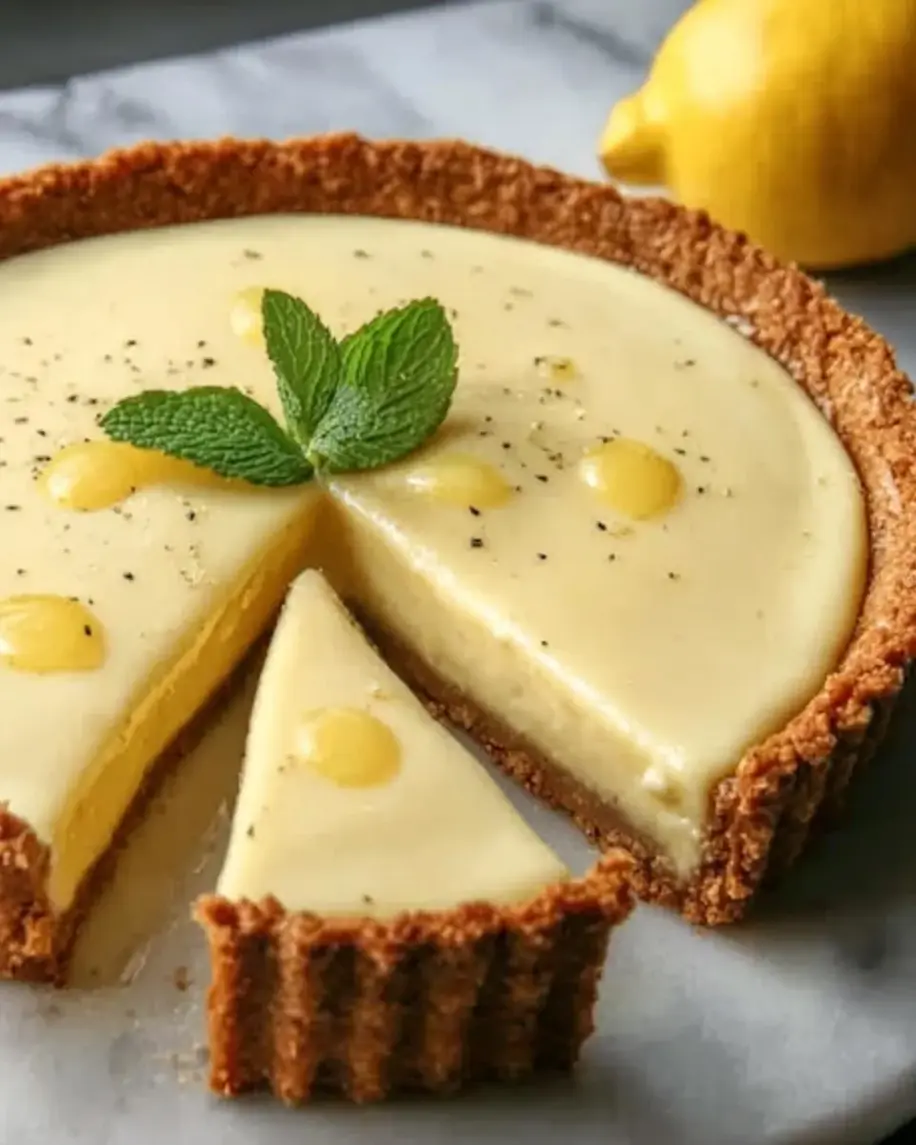
Table of Contents
No Bake Lemon Pie Recipe
Introduction
Did you know that over 70% of home bakers actively seek no-bake dessert recipes during the warmer months to avoid heating up the kitchen? This No Bake Lemon Pie is the perfect answer to that demand, offering a refreshingly tangy and creamy escape that requires zero oven time. The magic of this dessert lies in its brilliant simplicity: the acid from freshly squeezed lemon juice reacts with the proteins in sweetened condensed milk, creating a lusciously thick and stable filling without any eggs or cooking. Set into a crisp, buttery graham cracker crust and crowned with billowy whipped cream, this pie delivers a perfect symphony of sweet and tart flavors that will brighten any table. It’s the ideal make-ahead treat for busy hosts, novice bakers, or anyone craving a burst of citrus sunshine.
Ingredients List
Gather these simple, high-quality ingredients for the best flavor and texture. Using fresh lemons is non-negotiable for that vibrant, authentic tang.
- For the Crust:
- 1 ½ cups graham cracker crumbs (about 10-12 full sheets) – Look for a fine, sandy texture that will pack firmly. Substitution: Digestive biscuits or vanilla wafers work beautifully for a different flavor profile.
- ⅓ cup granulated sugar – Adds sweetness and helps the crust caramelize slightly as it sets.
- 6 tablespoons unsalted butter, melted – The binding agent. Use high-quality butter for a rich, toasty aroma. Substitution: For a dairy-free version, refined coconut oil works, though the flavor will be subtly different.
- For the Lemon Filling:
- 1 can (14 oz) sweetened condensed milk – The creamy, sweet base of the filling. It should be thick and pale yellow.
- ¾ cup freshly squeezed lemon juice (from about 4-5 medium lemons) – This is the star. The juice should be vibrant, cloudy, and intensely fragrant. Bottled juice lacks the necessary acidity and fresh flavor. Sensory Tip: Roll the lemons firmly on the counter before juicing to maximize yield.
- Zest of 2 lemons – The essential oils in the zest provide an incredible floral, citrusy punch that elevates the entire pie.
- 1 teaspoon pure vanilla extract – Rounds out the sharp citrus notes with warmth.
- A pinch of fine sea salt – Balances the sweetness and enhances all the flavors.
- For the Topping & Garnish:
- 1 ½ cups heavy whipping cream, cold – For a light, cloud-like topping. Ensure it’s very cold for best whipping results.
- 3 tablespoons powdered sugar – Sweetens and stabilizes the whipped cream slightly.
- Fresh berries (raspberries, blueberries, or sliced strawberries) and additional lemon zest or thin slices for garnish – Adds color, freshness, and a delightful textural contrast.
Timing
Compared to a traditional baked lemon meringue pie, which can take over an hour of active cooking and baking time plus cooling, this no-bake version slashes your kitchen commitment by more than half. The vast majority of the “work” is passive chilling time, freeing you up to prepare the rest of your meal or simply relax. The 20-minute prep is a realistic estimate for even a first-time maker.
A slice of refreshing No Bake Lemon Pie, showcasing the creamy filling and crisp crust, topped with whipped cream and fresh berries.
Step-by-Step Instructions
Step 1: Prepare the Crust
In a medium mixing bowl, combine the graham cracker crumbs and granulated sugar. Pour the melted butter over the crumb mixture. Using a fork, stir until every crumb is evenly moistened and the mixture resembles wet sand. It should hold together when pinched. Transfer the mixture to a standard 9-inch pie plate. Starting from the center, press the crumbs firmly and evenly into the bottom and up the sides of the plate. I like to use the bottom of a flat measuring cup to achieve a compact, level base. Once formed, place the crust in the refrigerator to firm up while you make the filling. This pre-chill helps prevent the crust from crumbling when you add the liquid filling.
Step 2: Make the Lemon Filling
In a large bowl, pour in the entire can of sweetened condensed milk. Add the fresh lemon juice, lemon zest, vanilla extract, and pinch of salt. Now, here’s where the kitchen science happens: whisk vigorously for about 1-2 minutes. You will witness the mixture transform before your eyes—it will thicken noticeably, becoming smooth, creamy, and pale yellow. The acid in the lemon juice causes the milk proteins to coagulate, creating the perfect pudding-like consistency without heat. Taste it (you know you want to)! It should be boldly tart, sweet, and incredibly fragrant. Set aside for a moment.
Step 3: Assemble and Chill
Retrieve your chilled pie crust from the refrigerator. Pour the thickened lemon filling into the crust. Use a spatula to spread it into an even layer, gently tapping the pie plate on the counter to remove any air bubbles. For a clean finish, run a spoon or offset spatula in a circular motion from the center out to create a smooth surface. Now, cover the pie loosely with plastic wrap, ensuring the wrap does not touch the surface of the filling. This is crucial for the setting process. Place the pie in the refrigerator and let it chill for at least 3 hours, though 4-6 hours or overnight is ideal for a perfectly firm, sliceable texture.
Step 4: Add Toppings and Serve
Just before serving, prepare the whipped cream topping. In a chilled metal or glass bowl, combine the cold heavy cream and powdered sugar. Using a hand mixer or stand mixer fitted with the whisk attachment, beat on medium-high speed until medium-stiff peaks form. Be careful not to overbeat into butter. Remove the fully set pie from the refrigerator. Either spread the whipped cream evenly over the entire surface or pipe decorative swirls around the edges. Garnish generously with your choice of fresh berries and a final sprinkle of lemon zest or a few thin lemon slices for a stunning presentation. Use a sharp knife dipped in hot water and wiped dry to get clean slices.
Nutritional Information
The following nutritional estimate is for one slice (1/8th of the pie) including the whipped cream topping. Values are approximate.
- Calories: ~480 kcal
- Total Fat: 28g
- Saturated Fat: 17g
- Carbohydrates: 52g
- Sugar: 42g
- Protein: 6g
- Sodium: 180mg
Healthier Alternatives
You can easily adapt this recipe for different dietary needs without sacrificing the essential bright, creamy experience.
- Lower-Sugar Crust: Omit the granulated sugar in the crust entirely. The graham crackers and butter provide enough flavor and structure for a subtly sweet base.
- Lighter Filling: Use fat-free sweetened condensed milk. The setting power remains the same, though the final texture may be slightly less rich. For a significant sugar reduction, look for a “low-sugar” or “keto” condensed milk alternative, but be sure to check that it will still set with acid.
- Dairy-Free/Vegan: For the crust, use vegan butter or coconut oil. For the filling, a full-fat coconut milk that has been simmered down with a natural sweetener (like maple syrup) to a thick, condensed consistency can work as a substitute, though the flavor profile will shift to coconut-lemon. Agar-agar may be needed to help it set firmly.
- Topping Swap: Substitute the sweetened whipped cream with a dollop of Greek yogurt sweetened with a touch of honey, or use a light coconut whipped cream.
Serving Suggestions
This pie is a versatile star. Serve it as the grand finale to a summer barbecue alongside grilled meats and fresh salads. For a elegant dinner party, pair a slender slice with a glass of chilled Moscato d’Asti or a tart raspberry coulis drizzled on the plate. It also makes a fantastic component of a dessert buffet—cut it into smaller, bite-sized squares for easy grazing. A cup of strong black coffee or herbal mint tea provides a wonderful bitter contrast to the pie’s sweetness.
Common Mistakes
- Using Bottled Lemon Juice: This is the #1 mistake. Bottled juice lacks the necessary acidity and fresh flavor, resulting in a flat, sometimes metallic-tasting filling that may not set properly.
- Under-Whisking the Filling: If you don’t whisk the lemon juice and condensed milk together vigorously enough, the filling may not thicken adequately and could remain runny.
- Not Chilling Long Enough: Impatience leads to a soupy pie. The full 3+ hour chill is non-negotiable for clean slices. If you’re short on time, pop it in the freezer for 90 minutes, but let it sit at room temperature for 10 minutes before slicing.
- A Crumbly Crust: This happens from not using enough butter or not pressing the crumbs firmly enough into the plate. The mixture should hold together like damp sand.
- Overbeating the Whipped Cream: Whipped cream turns to butter if beaten too long. Stop as soon as it holds soft peaks that curl over slightly.
Storing Tips
This pie stores beautifully. Keep it covered tightly with plastic wrap or in an airtight container in the refrigerator for up to 4 days. For best texture, add the whipped cream and fresh berry garnish just before serving. The unfilled crust can be made 2-3 days ahead and stored at room temperature, tightly wrapped. The lemon filling can also be made 1 day ahead and stored separately in the fridge; just give it a quick stir before pouring into the crust. Freezing is not recommended as the filling may separate and become watery upon thawing, and the crust will lose its crisp texture.
Conclusion
This No Bake Lemon Pie is more than just a dessert; it’s a guaranteed crowd-pleaser that masters the art of effortless elegance. With its vibrant, sunshiny flavor and foolproof method, it proves that the most impressive treats often come from the simplest techniques. Whether you’re a seasoned baker or a kitchen newbie, this pie is