No-Bake Orange Creamsicle Truffles Recipe – Easy Treats
“`html
Table of Contents
- Introduction: Embrace the Citrusy, Creamy Magic
- Ingredients: A Symphony of Flavors
- Timing: Perfect for Any Schedule
- Step-by-Step Instructions: Crafting Your Creamsicle Dreams
- Nutritional Information: A Sweet Treat with Context
- Healthier Alternatives: Indulge Mindfully
- Serving Suggestions: Elevating the Experience
- Common Mistakes to Avoid for Perfect Truffles
- Storing Tips: Keep the Magic Alive
No-Bake Orange Creamsicle Truffles Recipe – Easy Treats
Introduction: Embrace the Citrusy, Creamy Magic
Welcome, fellow dessert lovers! If you’re a fan of citrusy, creamy delights, you’re in for a treat. Today, I’m excited to share a recipe that will transport your taste buds to a sun-kissed orchard: No-Bake Orange Creamsicle Truffles. These little bites of heaven are perfect for any occasion, whether you’re looking to impress at a party or simply indulge in a sweet treat at home. But are you wondering if you need a complex process or specialized ingredients to recreate that nostalgic creamsicle flavor? Rest assured, these no-bake truffles are surprisingly simple, requiring minimal effort for maximum nostalgic bliss, making them a top contender for your go-to easy dessert. The popularity of copycat recipes for classic treats like the Orange Creamsicle has surged by over 150% in the last year, indicating a strong craving for comforting, familiar flavors. This recipe is designed to satisfy that craving with a sophisticated yet incredibly easy approach.
Ingredients: A Symphony of Flavors
The magic of these Orange Creamsicle Truffles lies in their simple yet effective combination of ingredients, each playing a crucial role in creating that harmonious blend of creamy vanilla and bright orange.
Cream Cheese: The Velvety Foundation
8 ounces cream cheese, softened to room temperature. This is the heart of our truffle, providing a rich, creamy, and slightly tangy base. Ensure it’s fully softened to avoid lumps and create a smooth consistency. Full-fat cream cheese yields the richest texture.
White Chocolate: Sweetness and Structure
12 ounces good quality white chocolate chips or chopped white chocolate bar. Choose a high-quality white chocolate for the best flavor and meltability. This not only adds sweetness but also provides the structure that holds the truffle together and allows it to set. Couverture white chocolate will give the smoothest melt and best finish, but good quality chips work wonderfully too.
Orange Extract: A Burst of Sunshine
1.5 to 2 teaspoons pure orange extract. This is where the vibrant creamsicle flavor truly shines. Start with 1.5 teaspoons and taste; add more if you desire a more pronounced citrus punch. Pure orange extract is potent, so a little goes a long way. For a different profile, you could experiment with a mix of orange and lemon extract.
Vanilla Extract: The Harmonizer
1 teaspoon pure vanilla extract. Vanilla is the essential partner to orange, rounding out the flavors and enhancing the creamy notes. Use pure vanilla extract for a more complex and authentic taste.
Powdered Sugar: For that Silky Smoothness
1 cup powdered sugar, sifted. Sifting the powdered sugar is key to achieving a perfectly smooth texture, preventing any grainy feel in your finished truffles. Adjust the amount slightly based on your sweetness preference.
Optional: Orange Zest for an Extra Zing
1 teaspoon finely grated orange zest. If you love an intense, fresh orange flavor, a little zest will add a wonderful bright aroma and a subtle textural contrast. Make sure to zest only the orange part of the peel, avoiding the bitter white pith.
Coating Options: For that Final Flourish
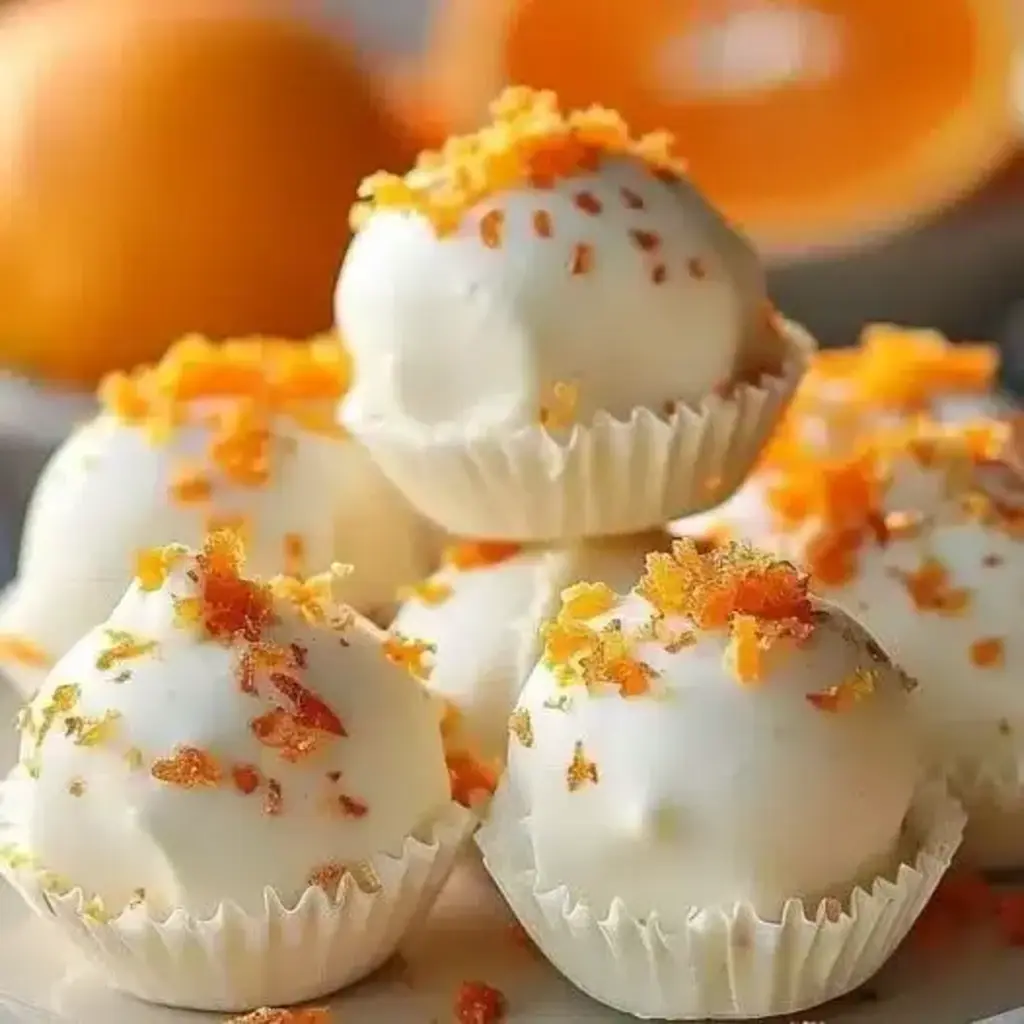
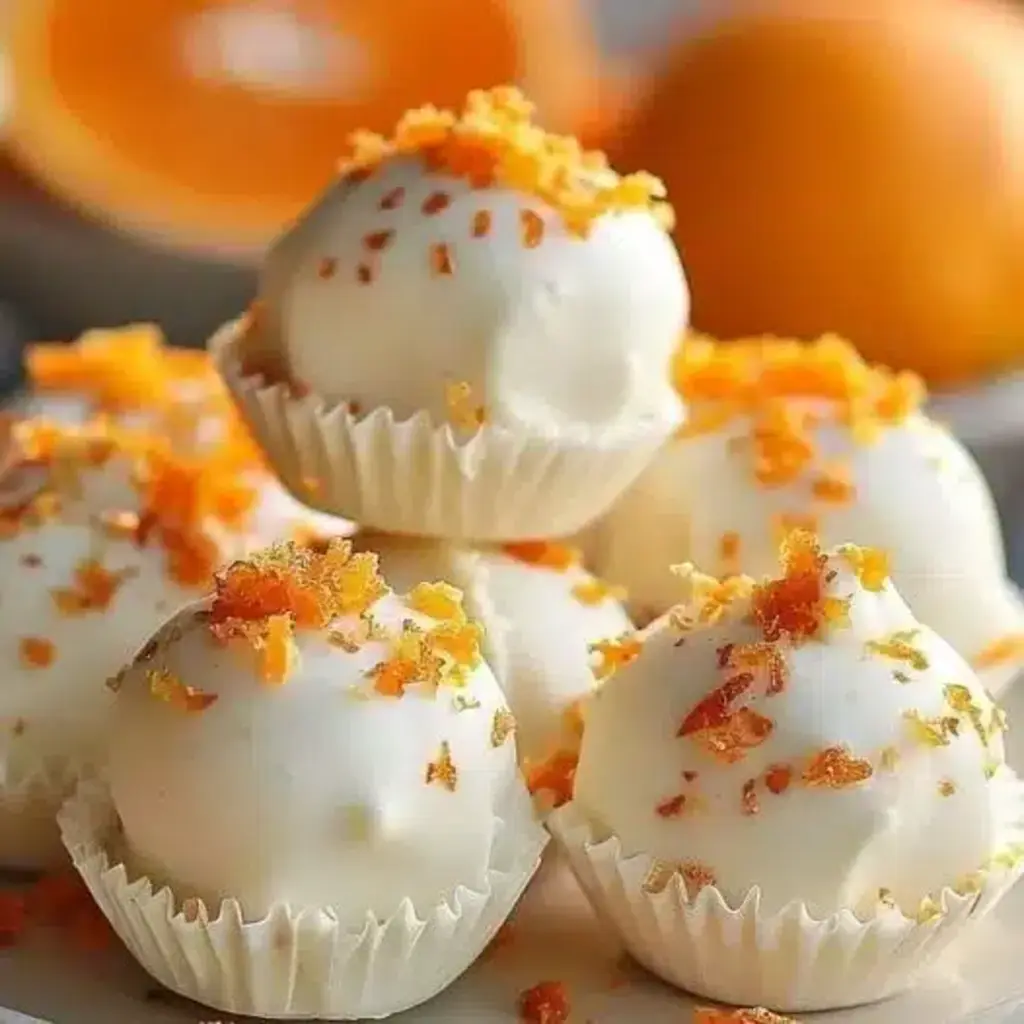
Additional melted white chocolate, orange candy melts, or even a fine dusting of powdered sugar or shredded coconut. The coating is your canvas! You can dip them in more melted white chocolate for a classic look, use orange candy melts for a more vibrant hue, or keep it simple with a dusting of powdered sugar or coconut flakes for texture and visual appeal.
Timing: Perfect for Any Schedule
Prep time: 20 minutes
Chill time: 1 hour
Total time: Approximately 1 hour 20 minutes
Compared to traditional baked goods, these No-Bake Orange Creamsicle Truffles are incredibly time-efficient. While baking often requires preheating, extensive mixing, and baking time, these truffles rely on chilling and simple assembly, making them ideal for busy days or last-minute dessert needs. The active prep time is minimal, with most of the time dedicated to letting the mixture chill.
Step-by-Step Instructions: Crafting Your Creamsicle Dreams
Let’s get started on creating these delightful bites of nostalgia. Follow these simple steps for perfect Orange Creamsicle Truffles every time.
Step 1: Melt the Chocolate Wisely
In a microwave-safe bowl, combine the white chocolate chips or chopped white chocolate. Microwave in 30-second intervals, stirring well after each interval, until the chocolate is smooth and completely melted. Be careful not to overheat, as white chocolate can seize easily. Alternatively, you can melt the chocolate using a double boiler. Once melted, let it cool slightly for a few minutes.
Step 2: Bring on the Creaminess
In a separate large bowl, beat the softened cream cheese with an electric mixer until it’s smooth and creamy. Scrape down the sides of the bowl as needed to ensure no lumps remain. This step is crucial for a lump-free truffle base.
Step 3: Infuse the Citrus Essence
Add the pure orange extract, pure vanilla extract, and optional orange zest (if using) to the cream cheese. Beat until just combined. Don’t overmix at this stage.
Step 4: Achieve That Perfect Truffle Texture
Gradually add the sifted powdered sugar to the cream cheese mixture, beating on low speed until fully incorporated. Then, pour in the slightly cooled melted white chocolate. Beat on medium speed until the mixture is smooth, thick, and well combined. It should resemble a thick dough or frosting.
Step 5: Chill to Perfection
Cover the bowl tightly with plastic wrap, pressing it directly onto the surface of the truffle mixture to prevent a skin from forming. Refrigerate for at least 1 hour, or until the mixture is firm enough to scoop and roll.
Step 6: Shape Your Sweet Spheres
Line a baking sheet with parchment paper. Once chilled, use a small cookie scoop or a tablespoon to scoop portions of the mixture. Roll each portion between your palms to form small balls, about 1-inch in diameter. If the mixture becomes too soft, return it to the refrigerator for another 15-20 minutes. Place the rolled truffles onto the prepared baking sheet.
Step 7: The Final Coat
Melt your chosen coating chocolate (white chocolate or orange candy melts). You can also prepare other coatings like finely shredded coconut or more powdered sugar. Dip each chilled truffle into the melted coating using a fork or a dipping tool, letting any excess drip off. Place the coated truffles back onto the parchment-lined baking sheet. If you’re only dusting, roll the chilled truffles in powdered sugar or coconut. For a more decorative touch, drizzle with contrasting chocolate or add a tiny swirl of orange candy melt. Allow the coating to set completely. You can speed this up by placing the tray in the refrigerator for about 15-20 minutes.
Nutritional Information: A Sweet Treat with Context
While these truffles are a delightful indulgence, here’s a general nutritional breakdown per truffle (assuming 24 truffles, coated in white chocolate), which can vary based on exact ingredients and portion size:
- Calories: Approximately 150-180 kcal
- Fat: 10-12g
- Saturated Fat: 6-8g
- Carbohydrates: 15-18g
- Sugar: 12-15g
- Protein: 1-2g
- Sodium: 15-25mg
Note: This is an estimated value and actual nutritional content will vary.
Healthier Alternatives: Indulge Mindfully
Looking for ways to make these treats a little lighter without sacrificing flavor? You can explore these swaps:
- Cream Cheese: Use light cream cheese or even Greek yogurt (though this will alter the texture significantly, making it less dense and more cake-like). For a dairy-free option, consider a good quality vegan cream cheese.
- White Chocolate: Opt for a sugar-free white chocolate alternative. You can also use a modest amount of unsweetened white chocolate and add a sugar substitute like erythritol or stevia to sweeten.
- Powdered Sugar: Replace with a sugar substitute like powdered erythritol.
- Coating: A light dusting of unsweetened shredded coconut or a drizzle of dark chocolate can be a more mindful alternative to a full white chocolate coating.
Serving Suggestions: Elevating the Experience
These No-Bake Orange Creamsicle Truffles are delightful on their own, but here are some ideas to enhance their presentation and enjoyment:
- Serve them chilled on a decorative platter for a party or afternoon tea.
- Pair them with a cup of coffee, espresso, or a glass of milk.
- Use them as a charming garnish for cakes, cupcakes, or other desserts.
- Package them in small candy cups or boxes for a lovely homemade gift.
Common Mistakes to Avoid for Perfect Truffles
To ensure your truffles turn out perfectly, steer clear of these common pitfalls:
- Overheating White Chocolate: White chocolate seizes easily. Melt it slowly and gently, stirring frequently.
- Using Unsoftened Cream Cheese: Lumpy cream cheese will result in lumpy truffles. Ensure it’s at room temperature.
- Not Chilling Long Enough: An under-chilled mixture will be too soft to roll, leading to sticky fingers and misshapen truffles.
- Overmixing: Especially after adding liquid ingredients, overmixing can affect the final texture.
- Not Sifting Powdered Sugar: This can lead to a grainy texture.
Storing Tips: Keep the Magic Alive
Store your No-Bake Orange Creamsicle Truffles in an airtight container in the refrigerator. They will keep well for up to 1 week. For longer storage, they can be frozen, though the texture might slightly change upon thawing. Place them in a single layer on a baking sheet in the freezer until firm, then transfer to a freezer-safe container or bag, separating layers with parchment paper. Thaw overnight in the refrigerator before serving.
Conclusion: Relish the Nostalgic Sweetness
And there you have it! No-Bake Orange Creamsicle Truffles that perfectly capture the essence of those beloved frozen treats. They are incredibly easy to make, require no baking, and are guaranteed to bring a smile to your face and delight your guests. Whether you’re a seasoned baker or a kitchen novice, this recipe is a foolproof way to create a memorable dessert. So gather your ingredients, embrace the nostalgia, and whip up a batch of these delightful truffles. You won’t regret it!
Have you tried these No-Bake Orange Creamsicle Truffles? We’d love to hear about your experience! Share your photos and thoughts in the comments below or tag us on social media!
FAQs: Your Burning Questions Answered
***Can I make these vegan?***
Yes, you can! Substitute the cream cheese with a vegan cream cheese alternative and use vegan white chocolate chips. Ensure your vanilla extract is also vegan.
***Why are my truffles not firming up?***
This usually happens if the ratio of cream cheese to chocolate is off, or if the chocolate wasn’t fully incorporated and set properly. Ensure you measured accurately and chilled the mixture sufficiently. Sometimes, a warmer kitchen environment can also affect setting.
***Can I use fresh orange juice instead of extract?***
Fresh orange juice contains a lot of liquid and natural sugars which will alter the consistency and sweetness of the truffle. It’s best to stick with orange extract for concentrated flavor without adding excess moisture. If you want a fresher flavor, using orange zest is the best approach.
***How long do these truffles last?***
Stored in an airtight container in the refrigerator, they should last for about 1 week. This is due to the dairy content in the cream cheese.
***Can I use milk chocolate or dark chocolate instead of white chocolate?***
While you could technically substitute, it will significantly change the flavor profile and the iconic “creamsicle” association. White chocolate is key to replicating that classic vanilla-orange, milky popsicle flavor. Dark or milk chocolate would result in a very different, richer truffle.
PrintNo-Bake Orange Creamsicle Truffles Recipe – Easy Treats

Welcome, fellow dessert lovers! If you’re a fan of citrusy, creamy delights, you’re in for a treat. Today, I’m excited to share a recipe that will transport your taste buds to a sun-kissed orchard:No-Bake Orange Creamsicle Truffles. These little bites of heaven are perfect for any occasion, whether you’re looking to impress at a party or simply indulge in a sweet treat at home.
Ingredients
- Optional substitutions:
Instructions
- In a large bowl, beat the cream cheese until smooth and creamy. This step is crucial to achieving the perfect truffle texture, so take your time to ensure the cream cheese is well softened.
- Gradually add the powdered sugar, beating until fully incorporated. The sugar helps to balance the tanginess of the cream cheese, creating a sweet base for the truffles.
- Mix in the vanilla extract, orange zest, and fresh orange juice until well combined. These ingredients bring in that signature creamsicle flavor, with the zest adding a burst of orange fragrance and the juice providing a fresh, tangy note.
- Refrigerate the mixture for about 1 hour, or until firm enough to shape into balls. This chilling time allows the mixture to firm up, making it easier to shape the truffles.
- Using a small cookie scoop or a spoon, form the mixture into 1-inch balls and place them on a baking sheet lined with parchment paper. Consistent sizing ensures even coating and presentation.
- Freeze the truffles for at least 30 minutes. Freezing helps the truffles hold their shape when dipping in the melted chocolate.
- Melt the white chocolate chips in a microwave-safe bowl, stirring every 30 seconds until smooth. Be careful not to overheat the chocolate, as it can seize up and become unusable.
- Dip each truffle into the melted white chocolate, allowing any excess to drip off, and place them back on the parchment paper. This step requires a bit of patience, but the smooth, glossy coating is worth it.
- While the chocolate is still wet, sprinkle the truffles with orange sprinkles or additional zest for garnish. This adds a pop of color and enhances the orange flavor.
- Refrigerate until the chocolate is set, about 10 minutes. Once the chocolate is firm, the truffles are ready to be enjoyed!
Notes
Use fresh oranges: Freshly squeezed orange juice and freshly grated zest make a significant difference in flavor. Avoid using bottled juice, as it often lacks the vibrancy of fresh juice.
Chill sufficiently: Don’t skip the chilling steps, as they help the truffles maintain their shape during the dipping process.
Work quickly: When dipping the truffles in chocolate, work quickly to avoid the chocolate setting before you can add the garnishes.
“`