No-Bake Turtle Mini Cheesecakes: A Delicious Indulgence
Ingredients
Scale
- 1 1/2 cupschocolate cookie crumbs (finely crushed)
- 5 tbspunsalted butter, melted
- 2 cupscream cheese, softened to room temperature
- 1/2 cuppowdered sugar, sifted
- 1 tspvanilla extract
- 1 cupheavy cream, whipped to stiff peaks
- 1/2 cupcaramel sauce
- 1/2 cuphot fudge sauce
- 1/2 cupchopped pecans (or substitute walnuts for a twist)
- 1/4 cupchopped almonds (optional, for extra crunch)
Instructions
- To begin, grab a medium bowl and combine the finely crushed chocolate cookie crumbs with melted unsalted butter. Mix these two ingredients thoroughly until the blend resembles wet sand—this indicates that the crumbs are adequately coated with butter, which will bind them together when pressed into the molds. Next, take your mini cheesecake molds or muffin tin lined with cupcake liners and evenly distribute the crumb mixture into each one. Use your fingers or the back of a spoon to firmly press the mixture into the bottoms. This step is critical as it forms the solid and flavorful base of your cheesecakes. Once shaped, place the molds in the refrigerator for about 20 minutes to allow the crust to set and firm up.
- While the crust is chilling, it’s time to prepare the cheesecake filling. In a large mixing bowl, beat the softened cream cheese, sifted powdered sugar, and vanilla extract until the mixture is smooth and creamy. This can be done using an electric mixer for easier blending. The goal here is to eliminate any lumps and achieve a silky consistency. Once combined, gently fold in the whipped heavy cream using a spatula. Be cautious during this step; the idea is to keep as much air in the whipped cream as possible. This folding technique will give your filling a light and airy texture, making the cheesecakes melt in your mouth.
- After your crust has set and the filling is ready, it’s time to assemble your mini cheesecakes! Take the chilled crusts out of the refrigerator and spoon the creamy cheesecake mixture evenly over each one. Use a spatula to smooth the tops for an even surface. It’s important that each mini cheesecake is filled to the top for a lovely presentation. Once they’re all filled, place the molds back into the refrigerator and allow them to chill for at least four hours or until the filling is fully set. This chilling time is essential, as it helps the filling firm up and develop those delicious flavors.
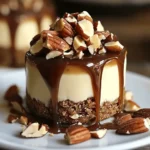
- Once the cheesecakes have set, the fun part begins—adding the toppings! Drizzle each chilled cheesecake with generous amounts of caramel and hot fudge sauce. Feel free to get creative with the drizzling technique to achieve a beautiful aesthetic. Then, sprinkle the tops with chopped pecans and almonds (if using), ensuring every cheesecake is filled with crunchy goodness. This combination of rich sauces and crunchy nuts further enhances the delightful turtle flavor profile, making every bite a true indulgence.
- With the topping added, it’s finally time to serve these mini cheesecake treasures! Carefully remove each cheesecake from the molds, taking care to retain their shape. Serve them chilled on a decorative platter or individual dessert plates. As you watch them disappear, you’ll receive plenty of compliments for your incredible dessert skills!
Notes
These cheesecakes can be made ahead of time and stored in the refrigerator. They are perfect for parties and special occasions.
Nutrition
- Calories: 350 kcal
- Protein: 5 g
Find it online: https://www.delicetreats.com/no-bake-turtle-mini-cheesecakes/