Nun’s Puffs Recipe – Light, Airy, and Easy
“`html
Table of Contents
- Nun’s Puffs: A Heavenly Delight
- The Delicate Ingredients
- Perfecting the Puffs: Timing is Key
- Crafting Your Nun’s Puffs: Step-by-Step
- Step 1: Preheat Oven and Prepare Baking Sheets
- Step 2: The Foundation – Boiling Water and Butter
- Step 3: Incorporating Flour and Creating the Dough (Pâté à Choux)
- Step 4: Cooling the Dough for Perfect Eggs
- Step 5: The Magic of Eggs
- Step 6: Shaping and Baking to Golden Perfection
- Step 7: The Final Touch – Honey Drizzle
- Nutritional Snapshot
- Healthier Swaps without Sacrificing Flavor
- Serving Suggestions for Every Occasion
- Common Pitfalls and How to Avoid Them
- Storing Your Nun’s Puffs
- Frequently Asked Questions
Nun’s Puffs Recipe – Light, Airy, and Easy
Nun’s Puffs: A Heavenly Delight
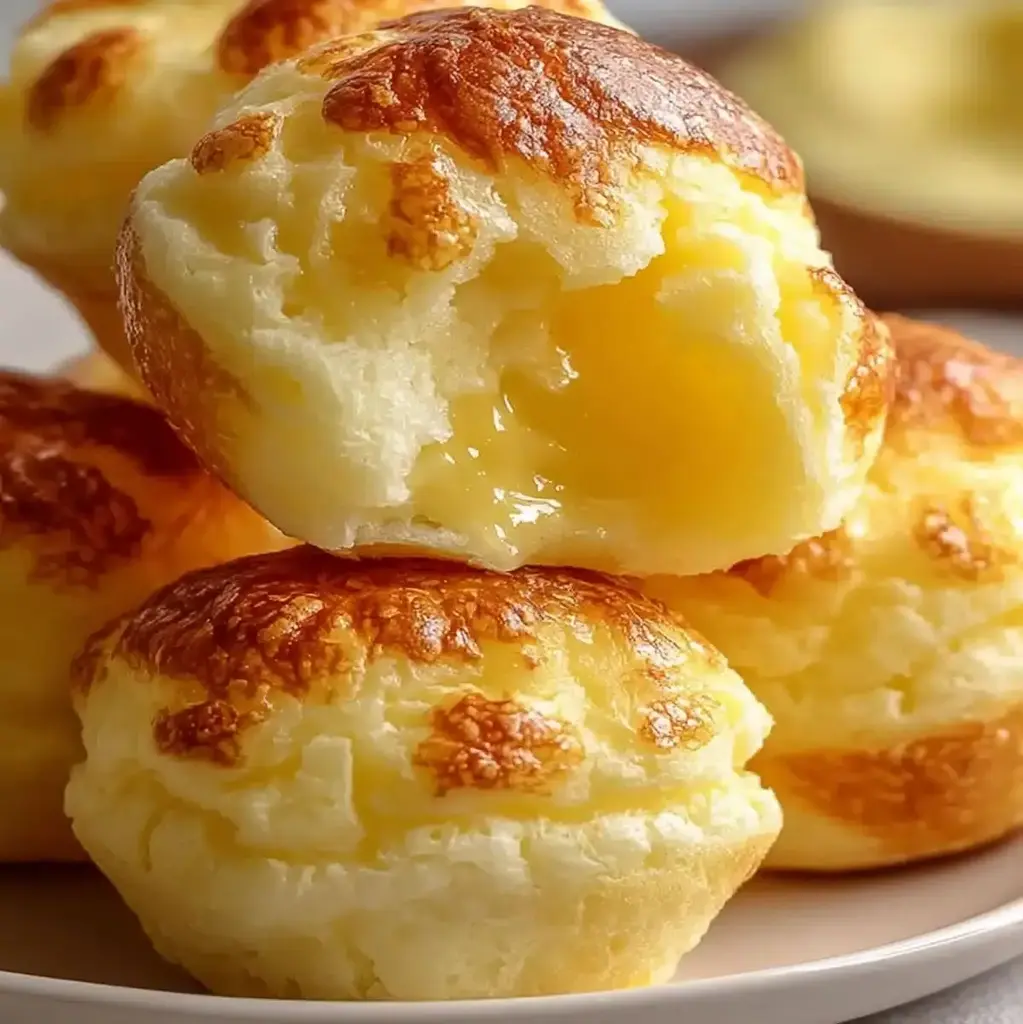
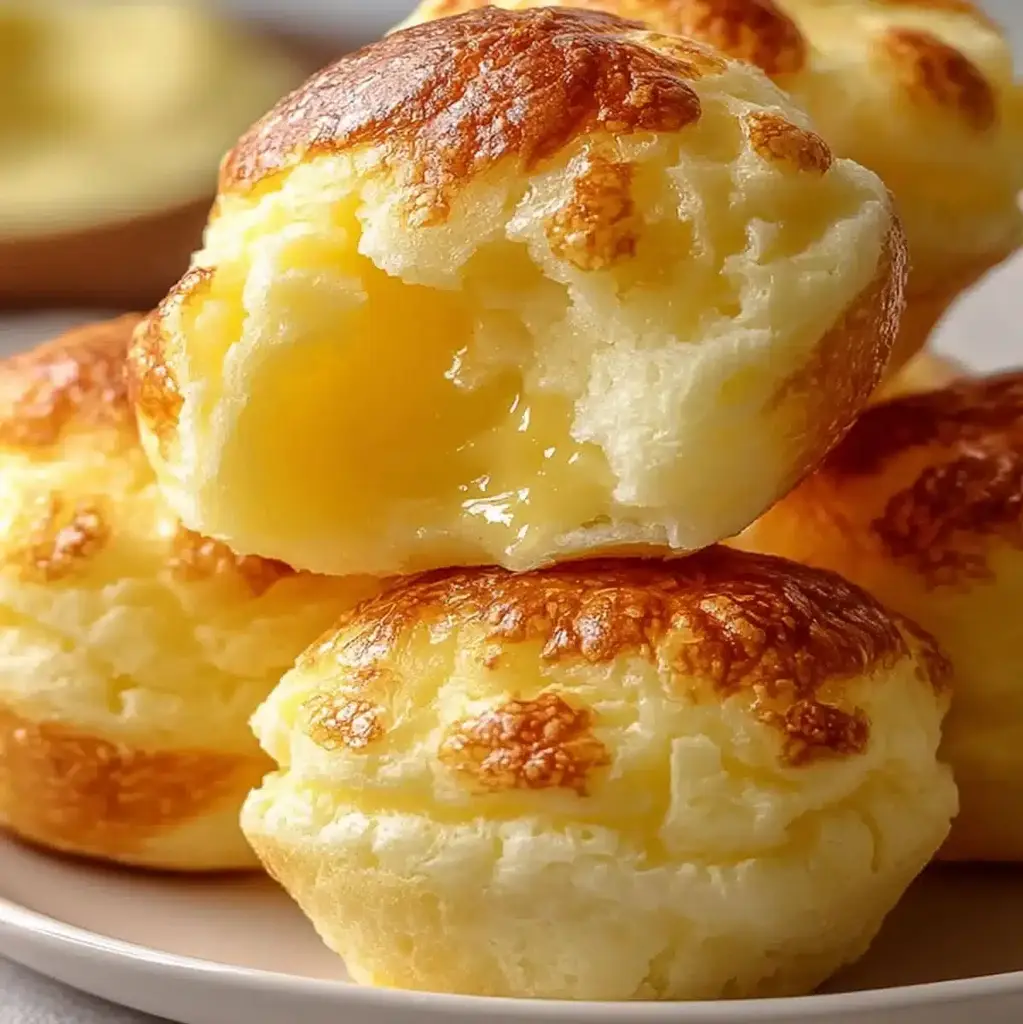
Are you searching for a dessert or brunch treat that feels both elegant and surprisingly simple to make? In a world where many impressive-looking pastries require advanced skills, data suggests that home bakers are increasingly seeking recipes that deliver a high reward for a moderate effort. This is where Nun’s Puffs, also known as choux à la crème or simply choux pastry, truly shine. These delightful French-style pastries are characterized by their ethereally light and airy texture, a satisfyingly crisp exterior, and a tender, almost custardy interior. Drizzled generously with golden honey, they transform a simple baked good into a mini-masterpiece, perfect for impressing guests or simply treating yourself to a moment of pure bliss. Forget fussy techniques; these puffs are a testament to how simple ingredients and precise execution can create something truly magical.
The Delicate Ingredients
The beauty of Nun’s Puffs lies in their minimal yet impactful ingredient list. Each component plays a crucial role in achieving that signature light and airy texture. Here’s what you’ll need:
- Water: 1 cup (240ml). This forms the base liquid for our dough. It needs to be at a rolling boil to properly gelatinize the starch in the flour.
- Unsalted Butter: 1/2 cup (113g). Melted butter adds richness and tenderness. Using unsalted gives you better control over the final saltiness. If you only have salted butter, omit the added salt.
- Salt: 1/4 teaspoon. Even in a sweet pastry, a pinch of salt enhances flavor and balances the sweetness.
- All-Purpose Flour: 1 cup (125g). Sifted flour ensures no lumps and that it incorporates evenly into the wet ingredients, creating a smooth dough.
- Large Eggs: 4. These are the workhorses! Eggs provide structure, leavening (as they bake and steam), richness, and that desirable custardy interior texture. Ensure they are at room temperature for better incorporation.
- Honey: For drizzling. Choose a good quality, flavorful honey – acacia, wildflower, or even a lavender honey can add a beautiful aromatic note.
Perfecting the Puffs: Timing is Key
While Nun’s Puffs are relatively easy, timing is essential for success. Here’s a breakdown:
Compared to other classic French pastries like croissants or macarons, Nun’s Puffs are significantly quicker to prepare, making them an ideal choice for a weekend project or a spontaneous dessert craving. The active preparation time is minimal, with most of the time dedicated to baking and cooling.
Crafting Your Nun’s Puffs: Step-by-Step
Step 1: Preheat Oven and Prepare Baking Sheets
First things first, let’s get our oven nice and hot! Preheat your oven to 400°F (200°C). Line two baking sheets with parchment paper. This prevents sticking and ensures your beautiful puffs lift off cleanly. You can also lightly grease the baking sheets if you prefer, but parchment is generally foolproof.
Step 2: The Foundation – Boiling Water and Butter
In a medium saucepan, combine the water, unsalted butter, and salt. Place the saucepan over medium heat. Bring the mixture to a rolling boil, ensuring the butter is completely melted and the water is bubbling vigorously. This step is crucial for creating the right steam to puff up our pastry.
Step 3: Incorporating Flour and Creating the Dough (Pâté à Choux)
Once boiling, remove the saucepan from the heat immediately. Add all the sifted all-purpose flour at once. Stir vigorously with a wooden spoon or heatproof spatula until the mixture comes together and forms a smooth ball of dough. Continue to stir and “cook” the dough on low heat for another 1-2 minutes. This crucial step dries out the dough slightly, allowing it to absorb the eggs properly without becoming too wet. You’ll notice a thin film forming on the bottom of the pan – that’s exactly what you want!
Step 4: Cooling the Dough for Perfect Eggs
Transfer the dough ball to the bowl of a stand mixer fitted with the paddle attachment, or to a large mixing bowl if using a hand mixer or spatula. Let it cool for about 5-10 minutes, stirring occasionally. The dough needs to cool down enough so that it doesn’t scramble the eggs when you add them. It should be warm to the touch, but not hot.
Step 5: The Magic of Eggs
With the mixer on low speed (or using your spatula/hand mixer), add the room-temperature eggs one at a time. Make sure each egg is fully incorporated into the dough before adding the next. The dough will look separated and a bit messy at first, but keep mixing, and it will come back together. For the final egg, you might not need all of it, or you might need a little more. The consistency you’re looking for is a thick, smooth, and glossy batter that forms a “V” shape when the paddle/beater is lifted. It should be soft enough to pipe or spoon easily, but firm enough to hold its shape.
Step 6: Shaping and Baking to Golden Perfection
Now for the fun part! You can either spoon mounds of dough onto the prepared baking sheets, about 2 inches in diameter and spaced about 2 inches apart, or pipe them using a pastry bag with a large round tip. For a smoother finish, you can dip your finger in water and gently smooth down any peaks. Place the baking sheets in the preheated oven. Bake at 400°F (200°C) for 15 minutes. **Without opening the oven door**, reduce the temperature to 350°F (175°C) and continue baking for another 15-20 minutes, or until the puffs are golden brown, firm, and sound hollow when tapped lightly on the bottom. This two-stage baking process is key: high heat to puff them up, and lower heat to dry them out and prevent collapsing.
Step 7: The Final Touch – Honey Drizzle
While the puffs are baking, gently warm your honey in a small saucepan or microwave-safe bowl. You want it fluid and pourable, but not hot. Once the Nun’s Puffs are out of the oven, let them cool on a wire rack for a few minutes. Then, generously drizzle the warm honey over the tops. The warmth of the puffs will help the honey adhere beautifully.
Nutritional Snapshot
While exact nutritional values can vary based on ingredient brands and portion sizes, a typical Nun’s Puff (before honey) is relatively low in calories and fat compared to many other pastries, focusing on carbohydrates for energy. Each puff contains:
- Calories: Approximately 60-80 kcal
- Carbohydrates: 8-10g
- Protein: 2-3g
- Fat: 3-4g
Adding honey will increase the caloric and carbohydrate content. These figures are for a plain, unfilled puff.
Healthier Swaps without Sacrificing Flavor
While traditional Nun’s Puffs are delightful, here are some ways to make them a bit lighter:
- Whole Wheat Pastry Flour: Substitute half of the all-purpose flour with whole wheat pastry flour for added fiber and nutrients. The texture might be slightly denser but still delicious.
- Reduced Butter: Although butter is key for flavor and texture, you can try slightly reducing it (e.g., to 1/3 cup) and replacing the liquid with more water, though this may impact the final richness.
- Natural Sweetener: Instead of a heavy honey drizzle, consider a light dusting of powdered erythritol or a very thin drizzle of maple syrup for a less intense sugar hit.
- Lighter Toppings: Top with fresh berries or a dollop of Greek yogurt instead of cream for a fresher, lighter finish.
Serving Suggestions for Every Occasion
Nun’s Puffs are incredibly versatile:
- Brunch Bliss: Serve them alongside fresh fruit salad, yogurt parfaits, or a light quiche for an elegant brunch spread.
- Afternoon Tea: Perfectly paired with a pot of Earl Grey or a refreshing iced tea.
- Dessert Delight: Offer them as a light dessert after a rich meal, perhaps with a very small scoop of vanilla bean ice cream or a berry coulis.
- Simple Treat: Enjoy them as is with your morning coffee – they are a sweet treat that doesn’t feel overly heavy.
Common Pitfalls and How to Avoid Them
Even with a simple recipe, a few common mistakes can lead to less-than-perfect puffs:
- Opening the Oven Door Too Soon: This is the cardinal sin! The sudden change in temperature can cause your beautiful puffs to deflate. Resist the urge until the very end.
- Not Cooking the Dough Enough (Step 3): If the flour isn’t properly cooked out, the dough will absorb too much liquid from the eggs, resulting in greasy, flat puffs that don’t rise well.
- Over/Under-Mixing Eggs: Adding eggs too quickly or to a dough that’s too hot can scramble them. Not incorporating them fully can lead to an uneven texture.
- Undercooking the Puffs: If they aren’t baked long enough to dry out, they will collapse as they cool. Ensure they are golden brown and feel firm.
Storing Your Nun’s Puffs
Nun’s Puffs are best enjoyed fresh, ideally within a few hours of baking. If you have leftovers:
- At Room Temperature: Store completely cooled, undrizzled puffs in an airtight container for up to 24 hours. They may lose some crispness but will remain edible for a short period.
- In the Refrigerator: For longer storage, place cooled puffs in an airtight container. They will become softer but can be crisped up slightly by reheating in a low oven (around 250°F/120°C) for 5-10 minutes.
- Freezing: Unbaked puffs can be frozen on a baking sheet until solid, then transferred to a freezer bag. Bake directly from frozen, adding a few extra minutes to the baking time. Baked puffs can also be frozen and reheated.
Frequently Asked Questions
***Does the size of the eggs matter?***
Yes, significantly! This recipe is based on large eggs (about 50-55g each). Using smaller or larger eggs can alter the dough consistency dramatically, affecting the rise and texture of your puffs. It’s best to use large eggs and adjust the final consistency by adding a little more or less of the last egg.
***Can I make the dough ahead of time?***
You can make the dough up to a few hours in advance and let it rest in the refrigerator before adding the eggs. However, the dough is best when eggs are added and the puffs are baked relatively soon after. For longer storage, freezing unbaked piped puffs is the best option.
***Why did my puffs deflate after coming out of the oven?***
This usually happens if the puffs are underbaked. They need to be baked long enough for the internal structure to set and dry out completely. If they cool before they are sufficiently dry, they will collapse under their own weight. Ensure they are deeply golden brown and sound hollow when tapped.
***Can I fill these puffs?***
Absolutely! While the honey drizzle is classic and delicious, Nun’s Puffs are famously used for filled pastries. Once cooled, you can slice them horizontally and fill with whipped cream, pastry cream (crème pâtissière), ice cream, or even a savory filling.
Nun’s Puffs Recipe – Light, Airy, and Easy

Nun’s Puffs are light, airy French-style pastries with a crisp exterior and custardy center, drizzled with honey for the perfect sweet brunch or dessert treat.
Ingredients
- 1/2 cupunsalted butter
- 1 cupwhole milk
- 3/4 cupall-purpose flour
- 4large eggs
- 1 tablespoongranulated sugar
- 1/4 teaspoonsalt
- Honey or powdered sugar, for serving
Instructions
- Preheat your oven to 375°F (190°C) and generously grease a standard muffin tin.
- In a medium saucepan over medium heat, melt the butter and add the milk. Bring just to a boil.
- Quickly add the flour all at once and stir vigorously until the mixture pulls away from the sides of the pan and forms a ball.
- Remove from heat and let cool for 5 minutes.
- Add the eggs one at a time, beating well after each addition until the dough is smooth and glossy.
- Stir in the sugar and salt.
- Spoon the batter evenly into the muffin cups, filling each about halfway.
- Bake for 30–35 minutes or until golden brown and puffed. Do not open the oven during baking.
- Serve warm with a drizzle of honey or a dusting of powdered sugar.
Notes
Do not open the oven during baking or the puffs may collapse.
Let the batter cool slightly before adding eggs to avoid scrambling.
Use room temperature eggs for best puff.
Nutrition
- Calories: 180
- Sugar: 5g
- Fat: 12g
- Carbohydrates: 13g
- Protein: 4g
“`