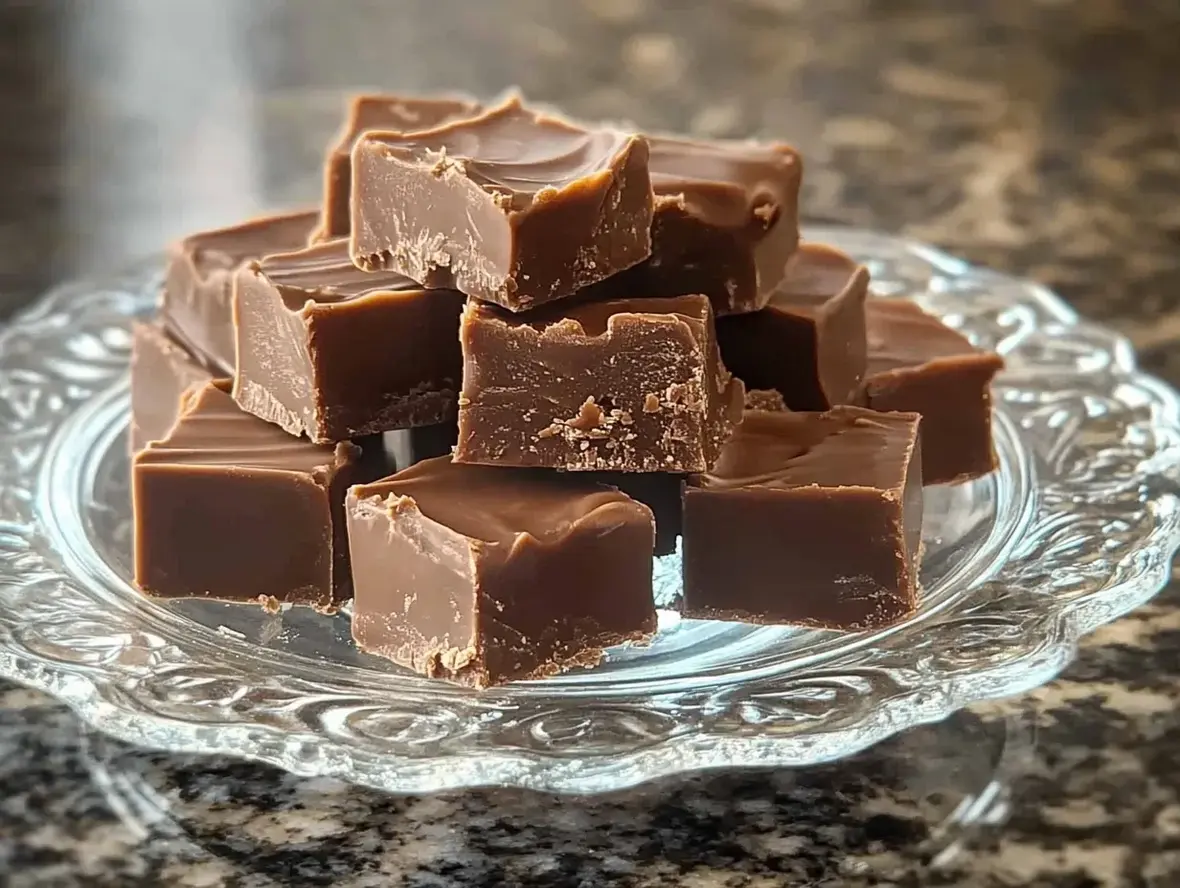
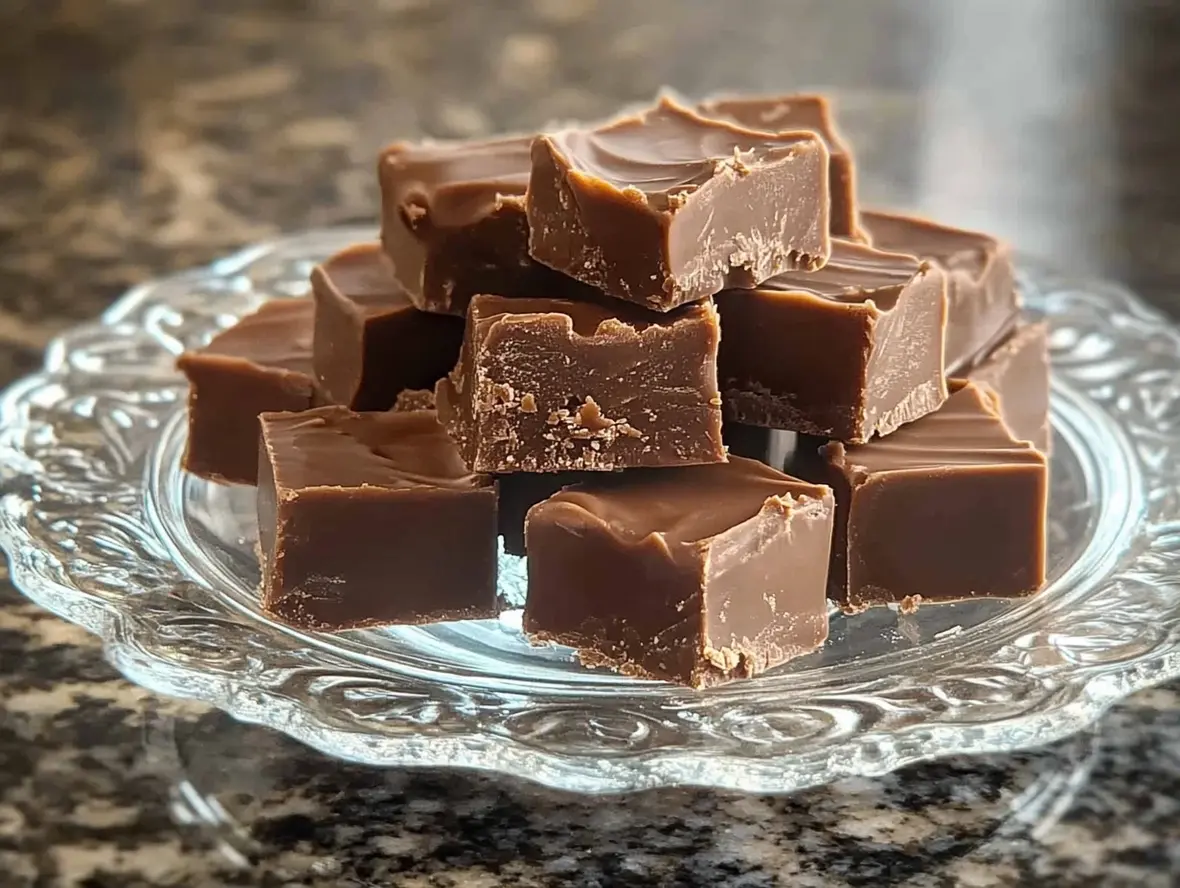
Old Fashioned Fudge Recipe – Timeless and Delicious
“`html
Table of Contents
Old Fashioned Fudge Recipe – Timeless and Delicious
Craving a taste of nostalgia? Did you know that over 70% of people remember homemade fudge from their childhood as a comforting and joyous treat?
If you’re among them, or simply looking to create some sweet memories, you’re in the right place! This Old Fashioned Fudge recipe is a journey back to simpler times, a celebration of rich, creamy, melt-in-your-mouth goodness. Forget complicated techniques and fancy ingredients; this is the traditional way, passed down through generations, designed to bring pure, unadulterated joy to your taste buds. Whether it’s for a holiday gathering, a special occasion, or just a Tuesday that needs a little extra sweetness, this classic treat is guaranteed to be a hit. Get ready to dive into the art of making fudge the way it was meant to be – simple, satisfying, and utterly delicious.
Ingredients: The Building Blocks of Bliss
The beauty of old-fashioned fudge lies in its simplicity. These are core ingredients that, when combined with a little patience and the right technique, transform into a decadent delight. We’re aiming for a rich, deep chocolate flavor with a smooth, creamy texture. While substitutions are possible, keep in mind they might alter the final taste and texture.
- 2 cups granulated sugar: The sweet foundation. This unrefined, crystalline sugar provides structure and sweetness. Ensure it’s fine enough to dissolve well.
- 3/4 cup unsalted butter: Adds richness, moisture, and helps bind the fudge. Use good quality butter for the best flavor.
- 1/2 cup evaporated milk: Crucial for that smooth, creamy consistency. Evaporated milk has a slightly caramelized flavor and lower water content, preventing crystallization. Substitution: Regular whole milk can be used, but you might need to simmer slightly longer, and the texture could be a touch softer.
- 1 teaspoon vanilla extract: Enhances the chocolate flavor and adds a warm aroma. Use pure vanilla extract for the best results.
- 6 ounces (about 1 cup) semi-sweet chocolate chips: The star of the show! These provide the deep chocolate flavor. For a richer, darker fudge, consider using a good quality bittersweet chocolate bar chopped finely. Substitution: Milk chocolate chips can be used for a sweeter, milder fudge.
- 7 ounces (about 1 1/4 cups) marshmallow creme (or fluff): This is the secret to the impossibly smooth and creamy texture. It stabilizes the fudge and prevents graininess. Substitution: You can finely chop marshmallows, but this can be trickier to incorporate evenly and may result in a slightly less smooth texture.
- Optional: 1/2 cup chopped nuts (walnuts or pecans): For a delightful crunch and added flavor dimension.
Timing is Everything
Crafting perfect fudge requires a bit of patience, especially when it comes to temperature. This recipe is designed to be straightforward, but don’t rush the cooling process!
Compared to some more elaborate fudge recipes that might involve multiple stages or candy thermometers for precise stages like “soft ball,” this recipe is relatively quick to prepare and cook, making it an excellent choice for beginners or for when you need a sweet treat without an excessive time commitment. The majority of the time is passive setting time.
Step-by-Step Instructions: Your Path to Fudge Perfection
Follow these steps carefully, and you’ll be rewarded with incredibly delicious, homemade fudge.
Step 1: Prepare Your Pan
Line an 8×8 inch baking pan with parchment paper, leaving an overhang on two opposite sides. This overhang will act as handles, making it easy to lift the fudge out once it’s set. Lightly grease the parchment paper with butter or cooking spray. This ensures the fudge doesn’t stick.
Step 2: Combine Ingredients
In a heavy-bottomed saucepan (a 3-quart size is ideal to prevent boiling over), combine the granulated sugar, butter, and evaporated milk. Stir these ingredients together until the butter is melted and the sugar begins to dissolve. This should be done over medium heat.
Step 3: Boil and Stir
Bring the mixture to a rolling boil, stirring constantly. A rolling boil is one that cannot be stirred down. Once it reaches a steady boil, start your timer for exactly 5 minutes. Continue to stir continuously during this period to prevent scorching on the bottom of the pan.
Step 4: The Magic Temperature
After 5 minutes of boiling, remove the saucepan from the heat. Stir in the chocolate chips and marshmallow creme. Continue to stir until both are completely melted and the mixture is smooth and glossy. This is where the magic happens – the marshmallows create an incredibly creamy and stable fudge base. If you’re adding nuts, stir them in now.
Step 5: Cooling and Mixing
This is a critical step for texture. Let the mixture stand UNDISTURBED for 12-15 minutes. Do NOT stir during this time. This cooling period is essential for the fudge to set properly and achieve the correct consistency. After it has cooled, stir in the vanilla extract. Then, begin to beat the fudge vigorously with a wooden spoon or a spatula for about 1-2 minutes. You’ll notice the fudge start to thicken and lose its gloss, becoming opaque. This beating incorporates air and helps create that characteristic smooth, slightly granular texture.
Step 6: Cutting and Enjoying
Pour the thickened fudge into your prepared pan, spreading it evenly with your spatula. Do not try to spread it too thin. Let the fudge cool completely at room temperature for at least 2-4 hours, or until firm to the touch. Once firm, use the parchment paper overhangs to lift the fudge out of the pan. Place it on a cutting board and cut into squares using a sharp knife. For clean cuts, you can warm your knife slightly in hot water and wipe it dry between cuts.
Nutritional Information
Please note that nutritional information is an estimate and can vary based on ingredients used, portion sizes, and specific brands. This is a general guideline per serving (assuming 16-20 servings).
- Calories: Approximately 200-250 kcal
- Total Fat: 10-15g
- Saturated Fat: 6-9g
- Cholesterol: 25-35mg
- Sodium: 80-100mg
- Total Carbohydrates: 30-35g
- Sugars: 25-30g
- Protein: 1-2g
Healthier Alternatives & Flavor Swaps
While traditional fudge is an indulgence, you can make slight tweaks without sacrificing too much of its charm. For a richer flavor, try using dark chocolate (70% cocoa or higher) instead of semi-sweet. You can also fold in a tablespoon of unsweetened cocoa powder along with the chocolate chips for an even deeper chocolate taste. For a lighter option, consider using a sugar substitute specifically designed for baking, adjusting quantities as per the product’s instructions, though this may slightly affect texture. For flavor variations, add a pinch of sea salt to enhance the sweetness, or a teaspoon of instant espresso powder to deepen the chocolate flavor.
Serving Suggestions
Old-fashioned fudge is best served at room temperature. It makes a wonderful standalone treat, a perfect accompaniment to a cup of coffee or tea, and a delightful addition to any dessert platter. It’s a classic gift for holidays, birthdays, or just to show someone you care. Pair it with fresh berries for a lovely contrast in textures and flavors.
Common Mistakes to Avoid
- Incorrect Temperature: Not boiling long enough or over-boiling can lead to grainy or too-soft fudge. Use a reliable candy thermometer if unsure.
- Stirring During Cooling: Resist the urge to stir the fudge while it’s cooling untouched. This is crucial for setting the proper texture.
- Crowding the Pan: Using a pan that’s too large can result in thin, dry fudge. An 8×8 inch pan is ideal for this recipe’s quantity.
- High Humidity: Fudge making can be tricky on humid days, as moisture in the air can affect sugar crystallization. Try to make fudge on a dry day if possible.
Storing Your Delicious Fudge
Store your old-fashioned fudge in an airtight container at room temperature for up to 1 week. If it’s very warm where you live, you can store it in the refrigerator, but ensure it’s well-wrapped to prevent it from drying out or absorbing other odors. When storing, it’s best to separate layers with parchment paper to prevent sticking.
Savor the Sweetness of Tradition
This Old Fashioned Fudge recipe is more than just a sweet treat; it’s a connection to tradition, a source of comfort, and a simple way to create lasting memories. The rich, creamy texture and deep chocolate flavor are simply irresistible. Give this recipe a try, and experience the timeless delight of homemade fudge. Don’t forget to share your successes and any creative twists you’ve tried in the comments below!
Frequently Asked Questions (FAQs)
What makes this fudge “old-fashioned”?
The term “old-fashioned” typically refers to fudge made using the traditional method, often involving boiling sugar, butter, and milk to a specific temperature, then cooling and beating it. This recipe uses marshmallow creme, which is a modern, simpler way to achieve the same classic smooth texture without precise temperature control needed for the “soft ball” stage.
Can I use a different type of milk?
Yes, you can use regular whole milk, but evaporated milk is preferred because its lower water content helps prevent crystallization and adds a richer flavor. If using regular milk, you might need to boil the mixture slightly longer.
My fudge turned out grainy. What did I do wrong?
Graininess usually occurs due to uncontrolled crystallization of sugar. This can happen if you stir the mixture too much *after* taking it off the heat, or if you don’t let it cool undisturbed for the specified time before beating. It can also be caused by rapidly cooling the mixture.
How do I get smooth fudge instead of hard fudge?
The key to smooth fudge is the addition of marshmallow creme (or fluff) and proper cooling and beating. Over-boiling can also lead to hard fudge, so be mindful of the cooking time. Letting the mixture cool undisturbed for about 12-15 minutes is crucial before you start beating it.
Can I make this fudge in the microwave?
While there are microwave fudge recipes, this specific old-fashioned method relies on stovetop boiling and a specific cooling process that is best achieved on the stovetop. Microwave cooking can be less consistent for candy making.
Old-Fashioned Chocolate Fudge
This rich andcreamy chocolate fudgeis a timeless treat. Perfect for holidays, gift-giving, or satisfying your sweet tooth, it’s made with simple ingredients and a whole lot of love!
Ingredients
- 1 cupWhole Milk1 tspVanilla Extract4 tbspUnsalted Butter, softened and sliced2 cupsGranulated White Sugar½ cupUnsweetened Cocoa Powder
- 1 tspVanilla Extract4 tbspUnsalted Butter, softened and sliced2 cupsGranulated White Sugar½ cupUnsweetened Cocoa Powder
- 4 tbspUnsalted Butter, softened and sliced2 cupsGranulated White Sugar½ cupUnsweetened Cocoa Powder
- 2 cupsGranulated White Sugar½ cupUnsweetened Cocoa Powder
- ½ cupUnsweetened Cocoa Powder
Instructions
- 1️⃣Gather your ingredients:Assemble all ingredients to ensure a smooth cooking process.2️⃣Prepare the pan:Liberally grease an 8-inch square baking dish to prevent sticking. Set aside.3️⃣Mix the base:In a medium saucepan, combine the granulated sugar and cocoa powder. Stir in the milk until the mixture is smooth and uniform.4️⃣Heat the mixture:Heat the mixture over medium-high heat, stirring constantly, until it comes to a rolling boil.5️⃣Simmer and monitor:Reduce the heat to a gentle simmer. Insert a candy thermometer and let the mixture cook undisturbed until it reaches 238°F (114°C), about 10 minutes.No thermometer?Perform the water test: drop a small amount of the mixture into cold water. If it forms a soft ball that flattens when pressed, it’s ready.6️⃣Cool the mixture:Remove the saucepan from heat and let it cool to 110°F (43°C). This will take about 50-70 minutes. Do not stir during this cooling phase.7️⃣Incorporate butter and vanilla:Once cooled, add the softened butter and vanilla extract. Beat the mixture vigorously with a wooden spoon until it thickens and loses its glossy shine.8️⃣Pour and shape:Transfer the fudge mixture into the greased pan. Spread it evenly using a spatula or your hands.9️⃣Cool and cut:Let the fudge cool completely at room temperature or in the fridge. Once set, cut into 1-inch squares.
- Assemble all ingredients to ensure a smooth cooking process.
- 2️⃣Prepare the pan:Liberally grease an 8-inch square baking dish to prevent sticking. Set aside.3️⃣Mix the base:In a medium saucepan, combine the granulated sugar and cocoa powder. Stir in the milk until the mixture is smooth and uniform.4️⃣Heat the mixture:Heat the mixture over medium-high heat, stirring constantly, until it comes to a rolling boil.5️⃣Simmer and monitor:Reduce the heat to a gentle simmer. Insert a candy thermometer and let the mixture cook undisturbed until it reaches 238°F (114°C), about 10 minutes.No thermometer?Perform the water test: drop a small amount of the mixture into cold water. If it forms a soft ball that flattens when pressed, it’s ready.6️⃣Cool the mixture:Remove the saucepan from heat and let it cool to 110°F (43°C). This will take about 50-70 minutes. Do not stir during this cooling phase.7️⃣Incorporate butter and vanilla:Once cooled, add the softened butter and vanilla extract. Beat the mixture vigorously with a wooden spoon until it thickens and loses its glossy shine.8️⃣Pour and shape:Transfer the fudge mixture into the greased pan. Spread it evenly using a spatula or your hands.9️⃣Cool and cut:Let the fudge cool completely at room temperature or in the fridge. Once set, cut into 1-inch squares.
- Liberally grease an 8-inch square baking dish to prevent sticking. Set aside.3️⃣Mix the base:In a medium saucepan, combine the granulated sugar and cocoa powder. Stir in the milk until the mixture is smooth and uniform.4️⃣Heat the mixture:Heat the mixture over medium-high heat, stirring constantly, until it comes to a rolling boil.5️⃣Simmer and monitor:Reduce the heat to a gentle simmer. Insert a candy thermometer and let the mixture cook undisturbed until it reaches 238°F (114°C), about 10 minutes.No thermometer?Perform the water test: drop a small amount of the mixture into cold water. If it forms a soft ball that flattens when pressed, it’s ready.6️⃣Cool the mixture:Remove the saucepan from heat and let it cool to 110°F (43°C). This will take about 50-70 minutes. Do not stir during this cooling phase.7️⃣Incorporate butter and vanilla:Once cooled, add the softened butter and vanilla extract. Beat the mixture vigorously with a wooden spoon until it thickens and loses its glossy shine.8️⃣Pour and shape:Transfer the fudge mixture into the greased pan. Spread it evenly using a spatula or your hands.9️⃣Cool and cut:Let the fudge cool completely at room temperature or in the fridge. Once set, cut into 1-inch squares.
- 3️⃣Mix the base:
- In a medium saucepan, combine the granulated sugar and cocoa powder. Stir in the milk until the mixture is smooth and uniform.4️⃣Heat the mixture:Heat the mixture over medium-high heat, stirring constantly, until it comes to a rolling boil.5️⃣Simmer and monitor:Reduce the heat to a gentle simmer. Insert a candy thermometer and let the mixture cook undisturbed until it reaches 238°F (114°C), about 10 minutes.No thermometer?Perform the water test: drop a small amount of the mixture into cold water. If it forms a soft ball that flattens when pressed, it’s ready.6️⃣Cool the mixture:Remove the saucepan from heat and let it cool to 110°F (43°C). This will take about 50-70 minutes. Do not stir during this cooling phase.7️⃣Incorporate butter and vanilla:Once cooled, add the softened butter and vanilla extract. Beat the mixture vigorously with a wooden spoon until it thickens and loses its glossy shine.8️⃣Pour and shape:Transfer the fudge mixture into the greased pan. Spread it evenly using a spatula or your hands.9️⃣Cool and cut:Let the fudge cool completely at room temperature or in the fridge. Once set, cut into 1-inch squares.
- 4️⃣Heat the mixture:Heat the mixture over medium-high heat, stirring constantly, until it comes to a rolling boil.5️⃣Simmer and monitor:Reduce the heat to a gentle simmer. Insert a candy thermometer and let the mixture cook undisturbed until it reaches 238°F (114°C), about 10 minutes.No thermometer?Perform the water test: drop a small amount of the mixture into cold water. If it forms a soft ball that flattens when pressed, it’s ready.6️⃣Cool the mixture:Remove the saucepan from heat and let it cool to 110°F (43°C). This will take about 50-70 minutes. Do not stir during this cooling phase.7️⃣Incorporate butter and vanilla:Once cooled, add the softened butter and vanilla extract. Beat the mixture vigorously with a wooden spoon until it thickens and loses its glossy shine.8️⃣Pour and shape:Transfer the fudge mixture into the greased pan. Spread it evenly using a spatula or your hands.9️⃣Cool and cut:Let the fudge cool completely at room temperature or in the fridge. Once set, cut into 1-inch squares.
- Heat the mixture over medium-high heat, stirring constantly, until it comes to a rolling boil.
- 5️⃣Simmer and monitor:Reduce the heat to a gentle simmer. Insert a candy thermometer and let the mixture cook undisturbed until it reaches 238°F (114°C), about 10 minutes.No thermometer?Perform the water test: drop a small amount of the mixture into cold water. If it forms a soft ball that flattens when pressed, it’s ready.6️⃣Cool the mixture:Remove the saucepan from heat and let it cool to 110°F (43°C). This will take about 50-70 minutes. Do not stir during this cooling phase.7️⃣Incorporate butter and vanilla:Once cooled, add the softened butter and vanilla extract. Beat the mixture vigorously with a wooden spoon until it thickens and loses its glossy shine.8️⃣Pour and shape:Transfer the fudge mixture into the greased pan. Spread it evenly using a spatula or your hands.9️⃣Cool and cut:Let the fudge cool completely at room temperature or in the fridge. Once set, cut into 1-inch squares.
- Reduce the heat to a gentle simmer. Insert a candy thermometer and let the mixture cook undisturbed until it reaches 238°F (114°C), about 10 minutes.No thermometer?Perform the water test: drop a small amount of the mixture into cold water. If it forms a soft ball that flattens when pressed, it’s ready.6️⃣Cool the mixture:Remove the saucepan from heat and let it cool to 110°F (43°C). This will take about 50-70 minutes. Do not stir during this cooling phase.7️⃣Incorporate butter and vanilla:Once cooled, add the softened butter and vanilla extract. Beat the mixture vigorously with a wooden spoon until it thickens and loses its glossy shine.8️⃣Pour and shape:Transfer the fudge mixture into the greased pan. Spread it evenly using a spatula or your hands.9️⃣Cool and cut:Let the fudge cool completely at room temperature or in the fridge. Once set, cut into 1-inch squares.
- No thermometer?Perform the water test: drop a small amount of the mixture into cold water. If it forms a soft ball that flattens when pressed, it’s ready.
- 6️⃣Cool the mixture:Remove the saucepan from heat and let it cool to 110°F (43°C). This will take about 50-70 minutes. Do not stir during this cooling phase.7️⃣Incorporate butter and vanilla:Once cooled, add the softened butter and vanilla extract. Beat the mixture vigorously with a wooden spoon until it thickens and loses its glossy shine.8️⃣Pour and shape:Transfer the fudge mixture into the greased pan. Spread it evenly using a spatula or your hands.9️⃣Cool and cut:Let the fudge cool completely at room temperature or in the fridge. Once set, cut into 1-inch squares.
- Remove the saucepan from heat and let it cool to 110°F (43°C). This will take about 50-70 minutes. Do not stir during this cooling phase.7️⃣Incorporate butter and vanilla:Once cooled, add the softened butter and vanilla extract. Beat the mixture vigorously with a wooden spoon until it thickens and loses its glossy shine.8️⃣Pour and shape:Transfer the fudge mixture into the greased pan. Spread it evenly using a spatula or your hands.9️⃣Cool and cut:Let the fudge cool completely at room temperature or in the fridge. Once set, cut into 1-inch squares.
- 7️⃣Incorporate butter and vanilla:
- Once cooled, add the softened butter and vanilla extract. Beat the mixture vigorously with a wooden spoon until it thickens and loses its glossy shine.8️⃣Pour and shape:Transfer the fudge mixture into the greased pan. Spread it evenly using a spatula or your hands.9️⃣Cool and cut:Let the fudge cool completely at room temperature or in the fridge. Once set, cut into 1-inch squares.
- 8️⃣Pour and shape:Transfer the fudge mixture into the greased pan. Spread it evenly using a spatula or your hands.9️⃣Cool and cut:Let the fudge cool completely at room temperature or in the fridge. Once set, cut into 1-inch squares.
- Transfer the fudge mixture into the greased pan. Spread it evenly using a spatula or your hands.
- 9️⃣Cool and cut:Let the fudge cool completely at room temperature or in the fridge. Once set, cut into 1-inch squares.
- Let the fudge cool completely at room temperature or in the fridge. Once set, cut into 1-inch squares.
Notes
For extra flavor, mix in chopped nuts or mini marshmallows before pouring the fudge into the pan.Store fudge in an airtight container at room temperature for up to a week, or refrigerate for longer freshness.Be patient while beating—this step is crucial for achieving the perfect texture!
Store fudge in an airtight container at room temperature for up to a week, or refrigerate for longer freshness.Be patient while beating—this step is crucial for achieving the perfect texture!
Be patient while beating—this step is crucial for achieving the perfect texture!
“`