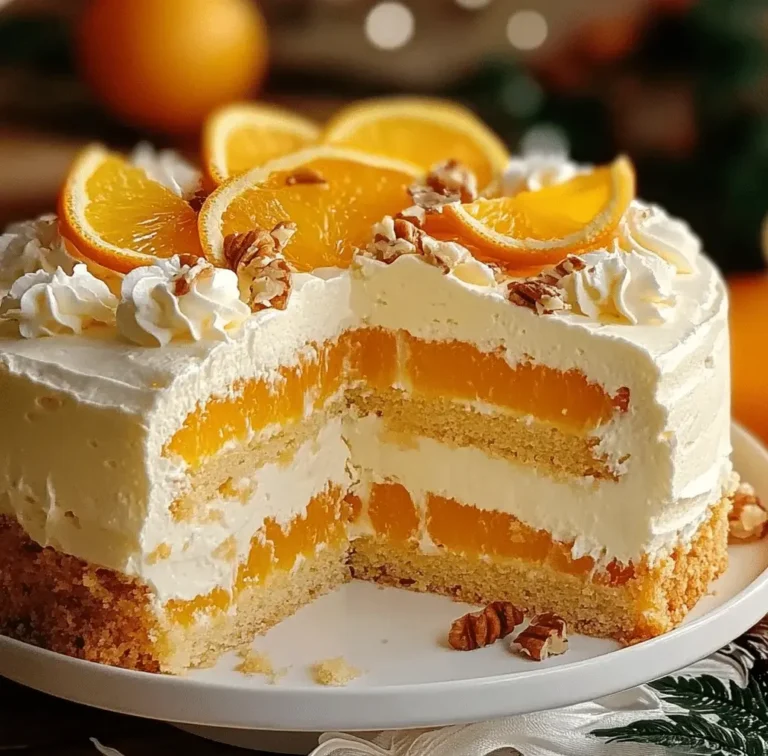
Orange Creamsicle Ice Cream Cake Recipe
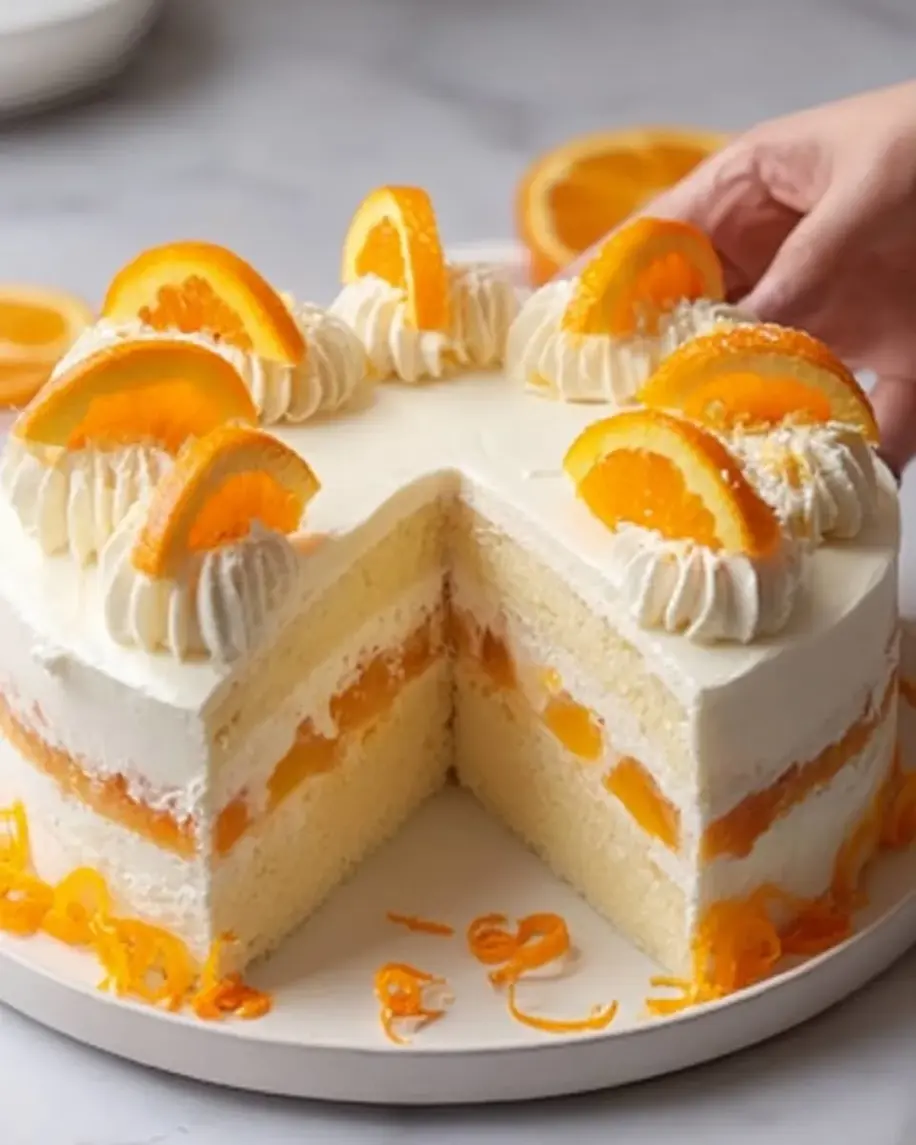
Table of Contents
Orange Creamsicle Ice Cream Cake Recipe
Introduction
Did you know that over 65% of people crave nostalgic, cold desserts during the summer months? This Orange Creamsicle Ice Cream Cake is the ultimate answer to that craving, masterfully blending the bright, zesty punch of fresh oranges with the smooth, creamy luxury of vanilla ice cream. This dessert isn’t just a treat; it’s a sensory experience that transports you back to carefree childhood summers with every bite. The moist, tender orange cake base provides the perfect foundation for the fluffy, layered ice cream mixtures, creating a stunning centerpiece that’s as beautiful as it is delicious. Perfect for birthdays, barbecues, or simply beating the heat, this cake is a guaranteed crowd-pleaser that combines simplicity with show-stopping results.
Ingredients List
Gather these fresh, high-quality ingredients for the best flavor and texture. For the best results, ensure your dairy ingredients are cold and your oranges are ripe and juicy.
For the Orange Cake Base:
- 1 ½ cups all-purpose flour – The foundation for a light, tender crumb.
- 1 cup granulated sugar – For balanced sweetness that complements the citrus.
- ½ cup unsalted butter, softened – Creates a rich, moist texture. Substitution: For a dairy-free version, use high-quality vegan butter or refined coconut oil.
- 2 large eggs, room temperature – Acts as a binder and adds structure.
- ½ cup fresh orange juice – Use freshly squeezed for a vibrant, authentic citrus flavor. The aroma is incredible!
- Zest of 2 large oranges – This is where the intense orange oil and fragrance live. Don’t skip it!
- 1 tsp baking powder & ½ tsp baking soda – Leavening agents for the perfect rise.
- ½ cup whole milk or buttermilk – Buttermilk will add a lovely subtle tang. Substitution: Any plant-based milk works well.
For the Orange Creamsicle Ice Cream Layers:
- 2 quarts (approx. 1.9 L) vanilla ice cream, divided – The creamy, classic base. Let it soften slightly for easy mixing.
- 1 (12 oz) can frozen orange juice concentrate, thawed – This concentrate packs a powerful, nostalgic orange creamsicle punch. Substitution: For a less sweet version, use 1 cup of fresh orange juice reduced by half over low heat.
- 1 (8 oz) container frozen whipped topping, thawed – Adds incredible airy lightness to the ice cream texture.
- 1 tsp pure vanilla extract – Enhances the vanilla notes in the ice cream.
For Topping & Assembly:
- Additional whipped cream or whipped topping – For decorative piping.
- Orange candy slices or fresh orange segments – For a beautiful, colorful garnish that hints at the flavor inside.
- Optional: A 9-inch springform pan for easy release and a clean presentation.
Timing
While the total time includes essential freezing, the active hands-on time is under an hour. This is significantly less than many layered ice cream cakes that require making custard from scratch. The key is strategic planning: bake the cake in the morning, prepare the ice cream mixtures in the afternoon, and let it set in the freezer until your evening event. Compared to the average ice cream cake recipe, our method uses pre-softened ice cream for easier layering, saving you time and effort without sacrificing any homemade charm.
This stunning Orange Creamsicle Ice Cream Cake is a nostalgic showstopper, perfect for any celebration.
Step-by-Step Instructions
Step 1: Prepare the Orange Cake Base
Preheat your oven to 350°F (175°C). Grease and flour a 9-inch round cake pan (or springform pan) thoroughly. In a medium bowl, whisk together the flour, baking powder, baking soda, and a pinch of salt. In a separate large bowl, use a hand mixer or stand mixer to cream the softened butter and granulated sugar together for 3-4 minutes until the mixture is light, fluffy, and pale in color. This step is crucial for a tender cake. Beat in the eggs, one at a time, ensuring each is fully incorporated before adding the next. Then, mix in the fresh orange juice, orange zest, and vanilla extract. The kitchen will smell amazing! Gradually add the dry ingredients to the wet ingredients, alternating with the milk, beginning and ending with the dry ingredients. Mix just until combined—overmixing leads to a tough cake. Pour the beautiful orange-scented batter into your prepared pan and smooth the top. Bake for 25-30 minutes, or until a toothpick inserted into the center comes out clean. Let the cake cool in the pan for 10 minutes, then turn it out onto a wire rack to cool completely. Pro Tip: For a perfectly flat top, level the cake with a serrated knife once it’s completely cool.
Step 2: Make the Orange Creamsicle Ice Cream Mixtures
While the cake cools, prepare your ice cream mixtures. Let the vanilla ice cream sit on the counter for 15-20 minutes until it’s soft enough to stir but not melted. Divide the softened ice cream evenly between two large mixing bowls. In the first bowl, this will remain your vanilla layer. Gently fold in half of the thawed whipped topping until just combined. This keeps it creamy and light. In the second bowl, create your orange creamsicle layer. Fold in the thawed orange juice concentrate, the remaining whipped topping, and the teaspoon of vanilla extract. Mix until you have a uniform, vibrant orange color and no streaks remain. The aroma is pure childhood nostalgia! Place both bowls in the freezer for 15-20 minutes to firm up slightly, which makes layering much cleaner and easier.
Step 3: Assemble the Ice Cream Cake
Line your 9-inch springform pan with plastic wrap, leaving plenty of overhang on all sides. This “sling” will be your best friend for removing the finished cake. Place the completely cooled orange cake layer into the bottom of the pan; it should fit snugly. Now, retrieve your ice cream mixtures from the freezer. Using an offset spatula or the back of a spoon, spread the orange creamsicle mixture evenly over the cake layer. Work quickly but gently to maintain distinct layers. Smooth the top. Return the pan to the freezer for 30 minutes to let this layer set firmly. Once set, remove and spread the vanilla ice cream mixture over the orange layer, creating the final, creamy top. Smooth it into an even, flat surface.
Step 4: Freeze and Top
Cover the assembled cake tightly with the overhanging plastic wrap. It’s critical to prevent ice crystals and freezer odors. Freeze for at least 6 hours, but preferably overnight, to ensure the cake is completely firm and sliceable. About 30 minutes before serving, prepare your whipped cream topping and slice your orange candy or fresh orange segments for garnish. Remove the cake from the freezer, release the springform pan sides, and use the plastic wrap sling to carefully transfer the cake to a serving plate. Decorate the top with piped whipped cream swirls and your orange garnishes. For the cleanest slices, dip a sharp knife in hot water and wipe it dry between each cut.
Nutritional Information
The following estimates are for one serving (1/12th of the cake) and are approximate. Values can vary based on specific brands and ingredient substitutions used.
- Calories: ~480 kcal
- Total Fat: 22g
- Saturated Fat: 14g
- Cholesterol: 85mg
- Sodium: 180mg
- Total Carbohydrates: 65g
- Dietary Fiber: 1g
- Sugars: 50g
- Protein: 6g
Healthier Alternatives
You can easily adapt this recipe for dietary preferences without losing its magical flavor. For a lower-sugar version, use a sugar substitute like monk fruit or erythritol in the cake, and opt for a no-sugar-added vanilla ice cream and orange juice concentrate. To reduce fat, choose a low-fat or fat-free vanilla ice cream and whipped topping. For a dairy-free and vegan Orange Creamsicle Cake, use plant-based butter and milk in the cake, and select high-quality vegan vanilla ice cream and coconut whipped topping. The orange juice concentrate is naturally vegan. You can also make the cake with whole wheat pastry flour or a gluten-free 1:1 baking flour for a nuttier flavor or to accommodate gluten sensitivities.
Serving Suggestions
This cake is a star on its own, but a few accompaniments can elevate it to a restaurant-quality dessert. Serve each slice with a drizzle of dark chocolate or white chocolate sauce for a decadent contrast. A sprinkle of toasted coconut flakes or chopped pistachios adds wonderful texture. For a fresh twist, serve with a small side of mixed berry compote or a few fresh raspberries. Pair it with a glass of sparkling Moscato or a cup of strong, black coffee to balance the sweetness. For a fun party idea, create a “sundae bar” with this cake as the centerpiece, surrounded by bowls of sprinkles, crushed cookies, and various sauces.
Common Mistakes
- Using Melted Ice Cream: Letting the ice cream become soupy will make layering impossible and result in a soggy cake. It should be soft-serve consistency.
- Skipping the Freeze Between Layers: Not freezing the first ice cream layer before adding the second causes them to blend together, losing the beautiful striped effect.
- Overmixing the Cake Batter: This develops gluten, leading to a dense, tough cake instead of a light, tender crumb.
- Not Lining the Pan: Skipping the plastic wrap sling makes removing the frozen cake incredibly difficult and risks breaking it.
- Cutting with a Warm Knife: Using a room-temperature knife will smash the layers. Always heat the blade for pristine slices.
Storing Tips
This cake stores beautifully. Keep