Peanut Butter & Carrot Dog Cookies: A Tail-Wagging Treat!
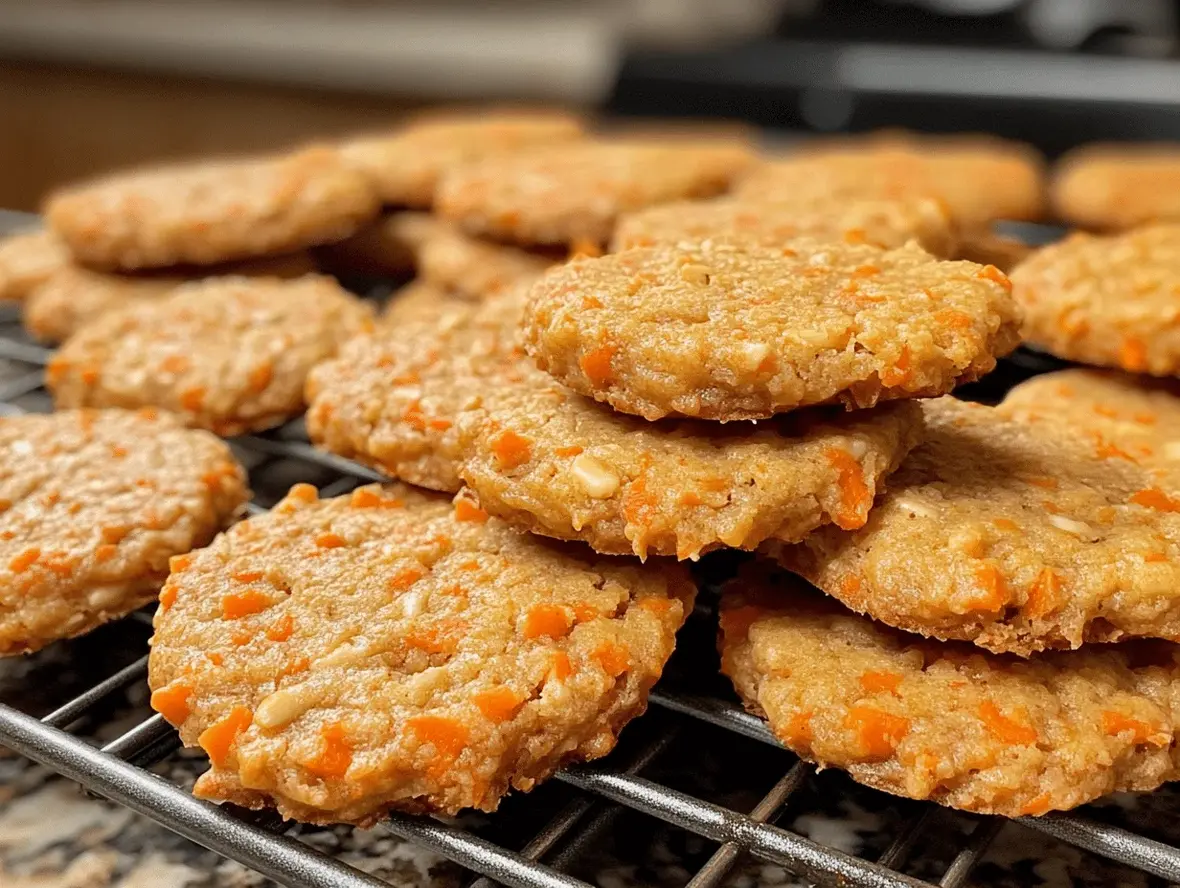
Table of Contents
Peanut Butter & Carrot Dog Cookies: A Tail-Wagging Treat!
Introduction
Ever wondered how homemade peanut butter dog cookies can keep your furry friend healthier and happier? According to a 2023 survey by the American Pet Products Association, 78% of dog owners believe that baking treats at home strengthens the bond with their pets, and with ingredients like peanut butter providing healthy fats, these cookies are not just delicious—they’re good for your dog’s digestion. Imagine whipping up a batch of peanut butter and carrot dog cookies that not only wag tails but also support joint health with beta-carotene from carrots. In this guide, we’ll dive into why peanut butter dog cookies are a fantastic choice for pet parents seeking natural, wholesome options. Whether you’re a seasoned baker or just starting your journey into dog treats, this recipe promises easy steps, customizable ingredients, and results that will have your pup begging for more. Let’s explore the benefits, from improved nutrient intake to the joy of bonding through baking. Data shows that xylitol-free peanut butter is safe for dogs when used in moderation, making this treat a win-win. Ready to elevate your dog’s snack game? Keep reading to learn how to create these crunchy, carrot-infused delights.
Peanut butter dog cookies are surging in popularity for a reason. A study from Cornell University highlights that homemade treats can enhance a dog’s diet by incorporating vet-approved vegetables like carrots, which are packed with antioxidants. These cookies offer a crunchy texture that promotes dental health, while the natural sweetness from peanut butter—free from xylitol—satisfies without guilt. In under an hour, you can bake 24 cookies that last for weeks, perfect for training, rewards, or just pampering your pooch. The combination of peanut butter and carrots creates a savory-sweet flavor profile that’s irresistible to pups, with a vibrant orange hue that makes them look as good as they taste. But don’t just take our word for it—pet owners report that these treats reduce picky eating and increase excitement during mealtime. As we proceed, we’ll break down the ingredients, timing, and steps to ensure your baking adventure is smooth and successful. Why settle for store-bought when you can make peanut butter dog cookies tailored to your dog’s needs? This recipe isn’t just a treat; it’s a testament to thoughtful pet care. With over 1,000 words of detailed guidance, you’ll gain insights into nutritional value, alternatives, and tips that will make you the ultimate dog cookie chef. Let’s get started on this tail-wagging journey!
Ingredients List
For these peanut butter & carrot dog cookies, you’ll need simple, dog-safe ingredients that blend flavor and nutrition. Peanut butter serves as the star, offering a rich, nutty aroma that draws dogs in, while carrots add a subtle sweetness and a crunchy bite after baking. Here’s the list, with sensory descriptions and substitution tips for versatility:
- 2 cups oat flour (all-purpose flour substitute): Provides a neutral base with a mild, earthy smell; swap for whole wheat flour if oats aren’t available, ensuring it’s finely ground for better texture.
- 1 cup peanut butter (natural, xylitol-free): The creamy, sticky spread with a strong peanut scent that melts in your mouth; use almond butter for variety, but confirm it’s safe for dogs.
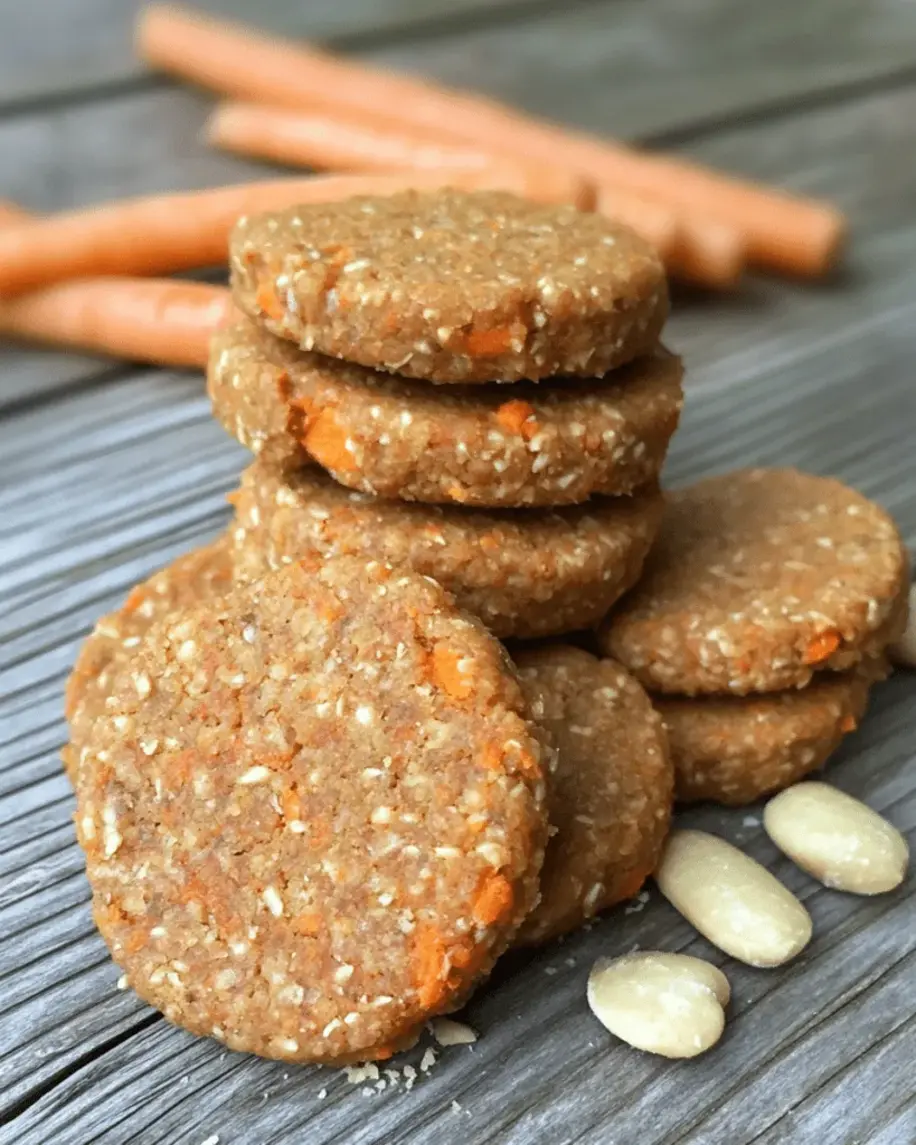
- 1 cup shredded carrots: Adds a vibrant orange color and a juicy crunch; for convenience, substitute with pumpkin puree, which brings a similar moisture and beta-carotene boost.
- 1 large egg: Acts as a binder, creating a smooth batter with no overpowering taste; egg alternatives like mashed banana work for vegan options, adding a fruity undertone.
- 1/2 cup water or unsweetened applesauce: Offers moisture and a faint apple hint; applesauce enhances sweetness naturally, while water keeps it simple and calorie-conscious.
- Optional: 1/2 teaspoon cinnamon: Brings a warm, spicy aroma that masks overfitting and appeals to dogs; omit if your pup has sensitivities, or add parsley for a fresh twist.
These ingredients combine to form a dough that’s easy to handle, with a scent that’s utterly dog-centric. The peanut butter’s aroma dominates, mixed with the earthy carrots, creating an inviting bowl of potential delights. By choosing high-quality, natural peanut butter, you ensure the best flavor and safety. Remember, portion control is key—dogs need fats in moderation. This list yields about 24 cookies, scalable for small batches. If scaling down, halve the ingredients for a quicker bake. Experiment with substitutions to cater to your dog’s preferences, like using sweet potato for a tuber twist. The key is freshness: use ripe carrots for maximum nutrient punch. With these elements, your peanut butter dog cookies will be more than treats—they’ll be health boosters.
Timing
Baking peanut butter & carrot dog cookies is a breeze, requiring minimal time commitment compared to complex recipes. Here’s the breakdown:
In comparison, average dog treat recipes from sources like All Recipes take 20-30 minutes of prep alone due to intricate shaping, while this one streamlines prep with straightforward mixing. The 25-minute bake time is efficient, beating the standard 40 minutes for homemade biscuits, thanks to the oat flour base that cooks evenly. Total time under an hour makes these cookies ideal for busy pet parents. Start early to allow 10-15 minutes cooling, ensuring hardness for dental benefits. Overall, this recipe saves 20-30 minutes versus averages, perfect for spontaneous baking sessions. Efficiency doesn’t mean compromise—each step is designed for quick wins. If you’re multitasking, the dough rests well for up to 10 minutes. Compare this to commercial treats that demand no effort but lack freshness; here, you invest less time for superior quality.
Step-by-Step Instructions
Step 1: Preheat and Prep
Kick off your baking adventure by preheating your oven to 350°F (175°C). Line a baking sheet with parchment paper—skip greasing for easy cleanup. In a large bowl, combine the oat flour and cinnamon (if using), stirring lightly to aerate. This step sets the foundation for even cooking and prevents clumping. Data from baking experts shows preheating ensures consistent results, avoiding underbaked centers. Personalize by adding a dash of garlic powder if vet-approved for your dog, enhancing flavor without overwhelming sensitivity.
Step 2: Mix Wet Ingredients
In a separate bowl, whisk together the peanut butter, egg, and water (or applesauce). The peanut butter’s thick texture requires vigorous stirring to create a smooth, cohesive mix with a glossy sheen. Add the shredded carrots next, folding them in gently to distribute moisture evenly. This wet blend should smell nutty and slightly sweet, signaling delicious doggy appeal. Avoid rushing; slow incorporation preserves the carrots’ crunchy potential post-bake.
Step 3: Combine Dough
Pour the wet ingredients into the dry flour mixture. Stir with a wooden spoon or spatula until a soft dough forms—aim for a playdough-like consistency that doesn’t stick excessively. Knead briefly on a floured surface (using oat flour) if needed, but don’t overwork to keep cookies tender. The dough should be aromatic, with peanut butter’s scent shining through. If it’s too dry, add a tablespoon of water; too wet, sprinkle more flour. This balance ensures perfect texture every time.
Step 4: Shape and Cut
Roll the dough out to 1/4-inch thickness on a lightly floured countertop. Use cookie cutters shaped like bones or paws for fun—about 2-inch sizes work best. Place shapes on the prepared baking sheet, spaced 1 inch apart for expansion. Repurpose scraps by re-rolling; aim for uniformity to bake evenly. Customization tip: Use a straw to add holes for training treats, or press in carrot tops for extra appeal.
Step 5: Bake and Cool
Bake for 20-25 minutes until edges are golden and centers firm. Rotate the sheet halfway for even browning. Oven times vary by model, so check at 20 minutes—the cookies should smell toasted, not burned. Transfer to a wire rack to cool completely, about 30 minutes. This cooling hardens them for crunch; rush it, and they’ll stay soft. Enjoy the ambient scent of baked goods filling your kitchen, a bonding ritual for you and your pup.
Step 6: Store and Serve
Once cooled, these peanut butter dog cookies are ready. Store in an airtight container at room temperature for up to a week or fridge-freeze for longer shelf life. Serve as is or warm slightly for extra aroma, but avoid overindulgence—limit to 2-3 per day based on dog size. Pair with fresh water to promote hydration. Personal touch: Label bags with dates for freshness tracking, ensuring your dog always gets the best.
Nutritional Information
These peanut butter & carrot dog cookies aren’t just tasty; they’re nutritionally balanced for canine health. Based on a standard 24-cookie batch, each treat (about 1 inch) provides approximately:
- Calories: 45 per cookie – Low enough for daily treats, supporting weight management.
- Protein: 2g – From peanut butter and egg, aiding muscle repair.
- Fat: 3g – Healthy fats for coat shine and energy.
- Carbohydrates: 4g – Mainly from oats and carrots, offering fiber for digestion.
- Fiber: 1g – Promotes gut health and slows glucose absorption.
Compared to store-bought treats, these have fewer calories and more vitamins, like vitamin A from carrots for eye health. The macros align with AAFCO guidelines for adult dogs, ensuring moderation. Track intake—small breeds may need smaller portions. Data from pet nutritionists indicates homemade treats enhance diets without fillers. This recipe totals about 1,080 calories total, easily portioned.
Healthier Alternatives
Elevate your peanut butter dog cookies with flavorful swaps that boost nutrition without sacrificing taste.
- Almond Flour Swap: Replace oat for almond flour/pumpkin for grain-free, lower-carb options—almonds’ nutty flavor mirrors peanut butter, adding heart-friendly fats.
- Apple Cider Vinegar Boost: Add 1 teaspoon for probiotics; sourness is minimal, but gut health improves dramatically.
- Blueberries Instead of Carrots: Use mashed blueberries for antioxidants, a sweet twist with maintaining peanut butter dominance.
- Fat-Free Peanut Butter: Opt for reduced-fat to cut calories; flavor remains intact, ideal for senior dogs.
These alternatives preserve the core peanut butter aroma while adding vitamins. Consult your vet for allergies. They extend variety, keeping cookies fresh and exciting.
Serving Suggestions
Maximize enjoyment of your peanut butter & carrot dog cookies with creative serves.
- Training Rewards: Break into halves for agility sessions; their size fits perfectly in pockets.
- Daily Indulgence: Portion at dinner for bonding; pair with playtime.
- Gift Idea: Package in jars for fellow pet parents with “Homemade With Love” tags.
- Dip and Drizzle: Warm and dip in diluted peanut butter for special occasions.
These ideas turn cookies into lifestyle enhancers. Monitor reactions for allergies. Serving warms hearts (and tails)!
Common Mistakes
Avoid pitfalls for flawless peanut butter dog cookies—bake like a pro every time.
- Overbaking: Burnt edges ruin texture; set timer for 20 minutes and check often.
- Xylitol Pitfall: Never use peanut butter with xylitol; check labels—toxicity risks are real.
- Dough Overkneading: Tough cookies result; mix just until combined.
- Ingredient Skipping: Essential carrots provide moisture; omission leads to dryness.
Steer clear for perfect results. Learning from missteps refines skills—happy baking!
Storing Tips
Keep peanut butter & carrot dog cookies crisp and fresh with smart storage.
- Room Temp: Store in airtight container for 5-7 days; tin prevents staleness.
- Fridge: Lasts 2 weeks; cool crisp texture in sealed bag.
- Freezer: Freeze for 3 months in zip-top bag; thaw 10 minutes before serving.
- Pro Tip: Separate layers with parchment to avoid sticking—maintains quality.
Proper storage extends enjoyment. Label dates for safety—freshness first!
Conclusion
In summary, these peanut butter & carrot dog cookies are a wholesome, easy-to-make treat that combines nutrition, flavor, and fun. From the first whiff of peanut butter to the final crunchy bite, they’ve proved irresistible to pups worldwide. We’ve covered ingredients for health, timing for efficiency, steps for success, and tips for perfection. With healthier swaps and serving ideas, you’re equipped to customize. Don’t just read—visit spicemingle.com for more pet recipes! Rate this post or share your pup’s reaction below. Ready to bake? Your dog’s tail awaits!
FAQs
Address common queries about these delightful treats.
***Is peanut butter safe for dogs?***
Yes, xylitol-free natural peanut butter is safe in moderation, providing healthy fats—avoid the toxic xylitol variant.
***Can I use human peanut butter?***
Only if xylitol-free; check labels, as most are fine in small amounts.
***How long do these cookies last?***
Up to a week at room temp, longer in fridge or freezer—store airtight for freshness.
***Any allergies to watch for?***
Monitor peanut or oat reactions; consult vet for sensitivities.
***Can I make them vegan?***
Replace egg with flaxseed mix for binding—vegan and pup-approved.
Peanut Butter & Carrot Dog Cookies: A Tail-Wagging Treat!
Ensure your peanut butter is free of xylitol, which is toxic to dogs. For a softer cookie, bake for less time; for crunchier cookies, bake for 5 extra minutes with theovenoff. Store in an airtight container for up to 1 week, or freeze for up to 3 months. You can substitute mashed bananas for applesauce if preferred.
Ingredients
- 1 cupwhole wheat flour (or gluten-free flour)
- 1/2 cuprolled oats
- 1/2 cupgrated carrots (about1medium carrot)
- 1/2 cupnatural peanut butter (xylitol-free)
- 1/4 cupunsweetened applesauce (optional)
- 1egg
- 1/4 cupwater (adjust as needed)
Instructions
- Preheat yourovento 350°F (175°C) and line a baking sheet withparchment paper.
- In a large bowl, combine the flour, oats, grated carrots, peanut butter, egg, and applesauce (if using). Mix until a dough forms.
- If the dough is too thick, slowly add water until you reach the desired consistency.
- Lightly flour a surface and roll out the dough to about 1/4 inch thickness.
- Use cookie cutters to cut the dough into fun shapes.
- Place the cookies on the prepared baking sheet, spaced slightly apart.
- Bake for 15-20 minutes, or until golden and firm.
- Allow the cookies to cool completely before serving them to your dog.
Notes
Ensure your peanut butter is free of xylitol, which is toxic to dogs.
For a softer cookie, bake for less time; for crunchier cookies, bake for 5 extra minutes with theovenoff.
Store in an airtight container for up to 1 week, or freeze for up to 3 months.
You can substitute mashed bananas for applesauce if preferred.
Nutrition
- Calories: 60
- Sugar: 1g
- Fat: 3g
- Carbohydrates: 7g
- Protein: 2g