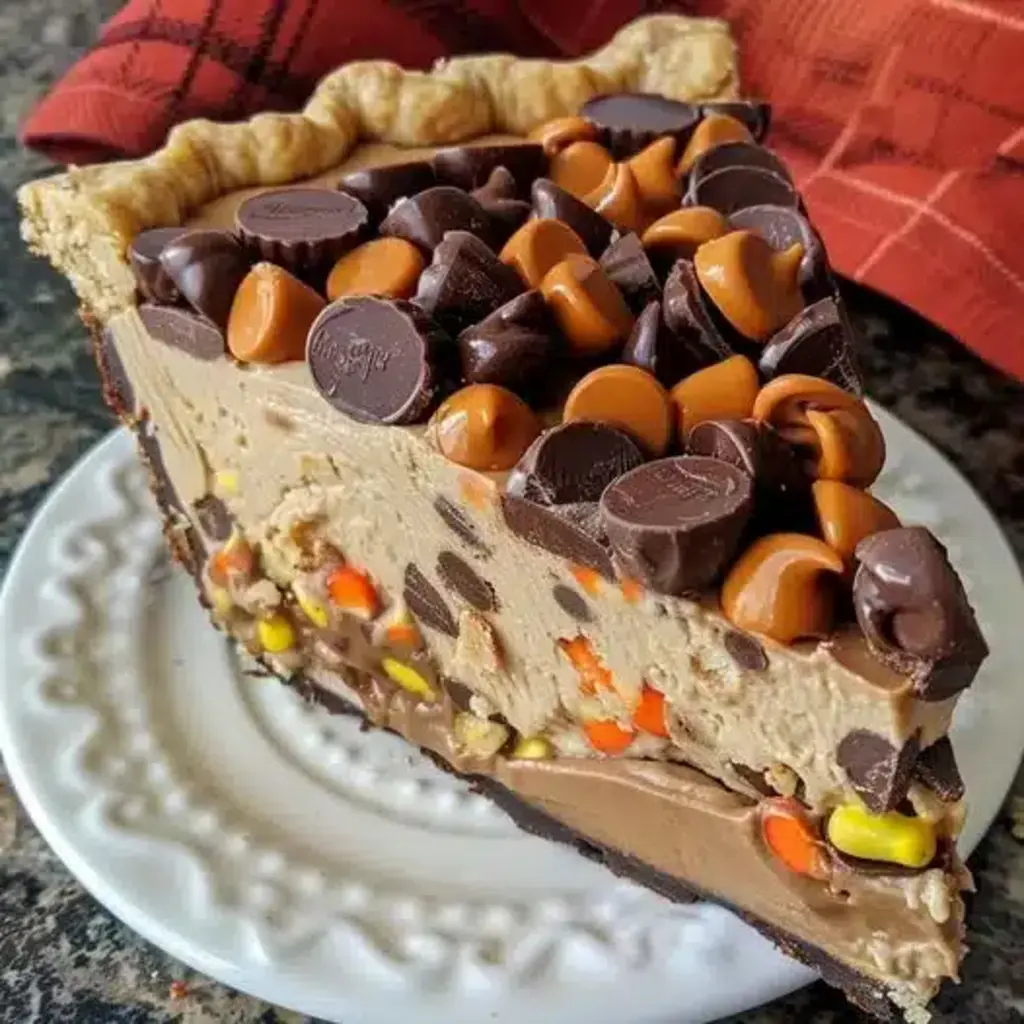
Peanut Butter Cup Pie: A Decadent Dessert Delight

“`html
Table of Contents
- Indulge in Decadence: The Ultimate Peanut Butter Cup Pie
- Ingredients for Pure Bliss
- Timing is Everything
- Crafting Your Masterpiece: Step-by-Step
- Nutritional Symphony
- Savvy Swaps for a Lighter Indulgence
- Serving Suggestions: Elevate Your Experience
- Common Pitfalls to Avoid
- Storing Your Slice of Heaven
- Frequently Asked Questions
Peanut Butter Cup Pie: A Decadent Dessert Delight
Indulge in Decadence: The Ultimate Peanut Butter Cup Pie
Are you looking for a dessert that is both incredibly delicious and surprisingly easy to make? If you’re like many home bakers, the beloved combination of peanut butter and chocolate is a top contender for your ultimate dessert fantasy. But what if you could have that in a pie that requires absolutely no baking? Our Peanut Butter Cup Pie is a harmonious blend of creamy peanut butter and luscious chocolate that promises to steal the show at any gathering. This Peanut Butter Cup Pie is not just a dessert; it’s a celebration of flavors that brings together the beloved combination of peanut butter and chocolate in a no-bake delight. Simple to prepare and visually stunning, this pie is your golden ticket to impressing guests and satisfying those dessert cravings. Get ready to experience pure dessert joy!
Ingredients for Pure Bliss
Every great dessert starts with great ingredients. For this no-bake wonder, we’re focusing on simple components that create an explosion of flavor and texture.
For the No-Bake Crust
- 2 cups Chocolate Cookie Crumbs: Think Oreos (filling removed for a less sweet base, or kept for extra decadence!) or chocolate graham crackers. These provide a rich, crumbly foundation.
- 6 tablespoons Unsalted Butter, melted: Acts as the binder, holding those glorious crumbs together.
- 1 tablespoon Granulated Sugar: Just a touch to enhance the sweetness of the cookie base. (Optional, depending on cookie sweetness.)
For the Creamy Peanut Butter Filling
- 1 ½ cups Creamy Peanut Butter: The star of the show! Use smooth, commercial peanut butter for the best creamy texture. Natural peanut butter can sometimes separate, but if that’s your preference, give it a really good stir.
- 8 ounces Cream Cheese, softened: Adds a delightful tang and a luxuriously smooth, creamy consistency. Ensure it’s truly at room temperature to avoid lumps.
- 1 cup Powdered Sugar: For sweetness and a silken texture. Sift it to prevent any graininess.
- 1 teaspoon Vanilla Extract: Enhances the overall flavor profile and adds a warm aromatic note.
- ½ cup Heavy Cream: Whipped to perfection, this lightens the filling and makes it airy.
- Mini Peanut Butter Cups, chopped: For pockets of pure peanut butter cup goodness throughout the filling. (About ½ to ¾ cup).
For the Luscious Chocolate Topping
- 6 ounces Semi-Sweet Chocolate Chips: The base of our decadent ganache. Use good quality chips for the best melt and flavor.
- ½ cup Heavy Cream: To create a smooth, pourable ganache that hardens slightly but remains luscious.
- 1 tablespoon Unsalted Butter: Adds a beautiful sheen and extra richness to the topping.
Timing is Everything
When comparing to similar no-bake pies, this recipe is right on par for prep time, with the majority of the commitment being dedicated to chilling. This isn’t a weekend project; it’s an evening’s effort for a show-stopping dessert the next day!
Crafting Your Masterpiece: Step-by-Step
Step 1: Prepare the Cookie Crust Foundation
In a medium bowl, combine your chocolate cookie crumbs, melted butter, and optional sugar. Stir until the crumbs are evenly moistened. They should resemble wet sand. Press this mixture firmly and evenly into the bottom and up the sides of a 9-inch pie plate. Using the bottom of a glass or a measuring cup can help create a compact and even layer. Pop this in the freezer while you prepare the filling.
Step 2: Whip Up the Dreamy Peanut Butter Filling
In a large bowl, beat the softened cream cheese with an electric mixer until completely smooth and lump-free. Gradually beat in the creamy peanut butter until well combined. Add the sifted powdered sugar and vanilla extract, mixing until just incorporated and smooth. In a separate, clean bowl, whip the heavy cream until stiff peaks form. Gently fold about half of the whipped cream into the peanut butter mixture to lighten it, then fold in the remaining whipped cream until no streaks remain. Stir in the chopped mini peanut butter cups.
Step 3: Assemble the Pie Layers
Remove the chilled crust from the freezer. Spoon the creamy peanut butter filling evenly into the prepared crust, spreading it smooth with a spatula. Ensure the filling reaches all the edges of the crust for a professional finish.
Step 4: Create the Irresistible Chocolate Ganache
Place the semi-sweet chocolate chips in a heatproof bowl. Heat the heavy cream in a small saucepan over medium heat until it just begins to simmer around the edges (do not boil). Pour the hot cream over the chocolate chips. Let it sit for 5 minutes without stirring. Then, gently whisk the mixture until it is completely smooth and glossy. Whisk in the tablespoon of butter until melted and incorporated, giving the ganache an extra sheen.
Step 5: Chill to Perfection
Pour the slightly cooled chocolate ganache evenly over the peanut butter filling. Gently tilt the pie plate to ensure the ganache covers the surface completely. Cover the pie loosely with plastic wrap and refrigerate for at least 4 hours, or until the filling is firm and set. For best results, chill overnight.
Nutritional Symphony
While this pie is a decadent treat, understanding its nutritional profile can be helpful. A typical slice (assuming 8 servings) contains approximately:
- Calories: 500-600 kcal
- Fat: 30-40g
- Carbohydrates: 45-55g
- Protein: 10-15g
- Sugar: 30-40g
(Note: Nutritional values are estimates and can vary based on specific ingredients used.)
Savvy Swaps for a Lighter Indulgence
Craving a lighter version? You can make delicious adjustments without sacrificing too much flavor!
- Crust: Swap chocolate cookie crumbs for graham crackers or even a crushed pretzel base for a salty-sweet contrast. For a whole-grain option, consider using crushed whole wheat graham crackers. Reduce butter slightly if the crumbs are already moist.
- Peanut Butter: Opt for natural peanut butter (well-stirred) to reduce added sugars and oils.
- Sweeteners: Reduce the amount of powdered sugar, or substitute with a sugar-free powdered sweetener. For the filling’s sweetness, you can also use a date paste, though this will alter the color and texture slightly.
- Chocolate Topping: Use dark chocolate (70% cocoa or higher) for less sugar. For a truly lighter topping, consider a whipped coconut cream topping with a sprinkle of cocoa powder.
Serving Suggestions: Elevate Your Experience
This pie is fantastic on its own, but here are a few ways to take it over the top:
- A dollop of Whipped Cream: A classic for a reason!
- A sprinkle of sea salt: Flaky sea salt wonderfully balances the sweetness.
- More chopped Peanut Butter Cups: Because you can never have too many.
- A drizzle of chocolate syrup: For extra chocolatey goodness.
- Fresh raspberries or strawberries: The tartness adds a refreshing contrast.
Common Pitfalls to Avoid
To ensure your pie turns out perfectly every time, steer clear of these common mistakes:
- Lumpy cream cheese: Always ensure your cream cheese is fully softened to room temperature before beating.
- Over-mixing the filling: Once things are combined, stop! Over-mixing can make the filling less stable.
- Not chilling long enough: Patience is key. A properly chilled pie will slice beautifully.
- Cutting too soon: Resist the urge to slice before the pie has had adequate chilling time.
Storing Your Slice of Heaven
Store any leftover Peanut Butter Cup Pie in an airtight container in the refrigerator. It will keep well for up to 3-4 days. Ensure it’s covered to prevent it from absorbing odors from other foods.

Frequently Asked Questions
What are the best cookies to use for the crust?
Chocolate sandwich cookies (like Oreos) are fantastic because they have a great crumb and flavor. Chocolate graham crackers are another excellent, slightly less rich option. The key is to have a cookie that crumbles well and holds together when mixed with butter.
Can I use natural peanut butter?
Yes, you can, but it’s crucial to stir it very well to reintegrate the oil before measuring and using it. Natural peanut butter can sometimes lead to a filling that is a bit softer or more prone to separation than commercial peanut butter. If you use it, ensure it’s at room temperature and you’ve combined it thoroughly with the cream cheese.
My filling has lumps. What did I do wrong?
This is usually because the cream cheese wasn’t softened enough. Ensure it’s at room temperature (you should be able to easily indent it with your finger) before beating it smooth. For an extra smooth filling, you can even sift your powdered sugar. If lumps persist, try beating the mixture a little longer, but be careful not to over-mix after adding the whipped cream.
Can I make this pie ahead of time?
Absolutely! This pie is actually best made a day in advance. Chilling allows the flavors to meld and the filling to set up perfectly. It can typically be made up to 2 days ahead and stored in the refrigerator.
How do I get clean slices?
A sharp knife is your best friend. For the cleanest slices, dip your knife in hot water and wipe it dry between each cut. This helps the knife glide through the chilled pie smoothly.
Peanut Butter Cup Pie: A Decadent Dessert Delight
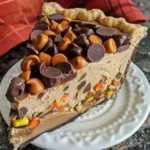
Indulge in the decadent world of desserts with our Peanut Butter Cup Pie, a harmonious blend of creamy peanut butter and luscious chocolate that promises to steal the show at any gathering. This Peanut Butter Cup Pie is not just a dessert; it’s a celebration of flavors that brings together the beloved combination of peanut butter and chocolate in a no-bake delight. Simple to prepare and visually stunning, this pie is your golden ticket to impressing guests and satisfying those dessert cravings.
Ingredients
- 1premade pie crust
- 2 cupsmilk chocolate chips
- 2 tablespoonsvegetable shortening
- 2 cupscreamy peanut butter
- 1 cupconfectioners’ sugar
- 1/2 cupcrushed peanuts
- 1 teaspoonvanilla extract
- 1 cupheavy cream, whipped
- Mini peanut butter cups and caramel drizzle for garnish
Instructions
- Begin by melting 1 cup of chocolate chips with 1 tablespoon of shortening in the microwave. Ensure to stir every 30 seconds until the mixture is smooth. Spread this evenly into the bottom of the pie crust and place it in the refrigerator to chill until set.
- In a mixing bowl, blend the peanut butter, confectioners’ sugar, crushed peanuts, and vanilla extract until the mixture is well combined. Carefully fold in the whipped cream to this mixture.
- Pour the peanut butter mixture over the set chocolate layer in the crust, using a spatula to smooth the top.
- Melt the remaining chocolate chips and shortening, then drizzle this over the peanut butter layer. Embellish with mini peanut butter cups and a caramel drizzle for that extra touch of elegance.
- Refrigerate the pie for at least 2 hours before serving to ensure it sets perfectly.
Notes
Serving Suggestions:This pie pairs wonderfully with a scoop of vanilla ice cream or a dollop of whipped cream for those who love extra creaminess.
Storage:Keep the pie refrigerated and consume within 3-4 days for the best taste and texture.
Variations:For a lighter version, substitute the heavy cream with a light whipped topping and use a reduced-fat peanut butter.
Decoration Tips:Get creative with the garnish! Use a piping bag for the caramel drizzle and arrange the mini peanut butter cups in a decorative pattern.
“`