Pink Velvet Raspberry Cheesecake Recipe
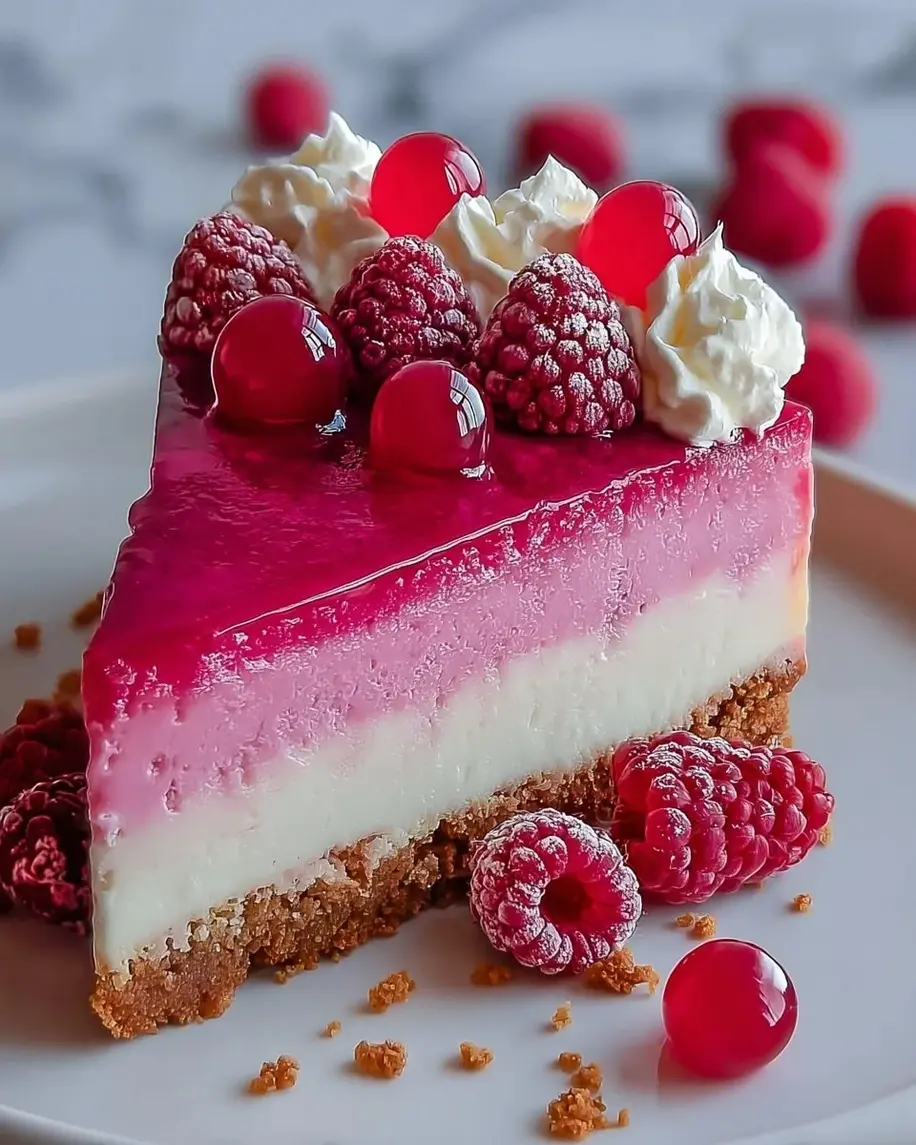
Table of Contents
Pink Velvet Raspberry Cheesecake Recipe
Introduction
Did you know that cheesecake is one of the most searched-for desserts on Google, with over 1.5 million monthly searches? This stunning Pink Velvet Raspberry Cheesecake is poised to become your new show-stopping favorite, blending the creamy indulgence of classic cheesecake with the vibrant, tart flavor of fresh raspberries. Perfect for Valentine’s Day, Mother’s Day, or any celebration that calls for a touch of elegance, this dessert is as delightful to look at as it is to eat. The secret to its mesmerizing pink hue and rich flavor lies in the perfect balance of high-quality cream cheese, real raspberry puree, and just a hint of color. Let’s dive into creating this masterpiece that will have your guests asking for the recipe before they’ve even taken the last bite.
Ingredients List
Gather these ingredients for a 9-inch springform pan masterpiece. For the best flavor and texture, use full-fat, room-temperature ingredients.
For the Graham Cracker Crust:
- 2 cups graham cracker crumbs (about 15 full sheets) – Provides a sweet, buttery, and slightly nutty base with a satisfying crunch. Substitution: Digestive biscuits or vanilla wafers work beautifully.
- 1/2 cup unsalted butter, melted – Acts as the binding agent, creating a cohesive, golden crust. Substitution: For a dairy-free version, use refined coconut oil.
- 1/4 cup granulated sugar – Enhances the caramel-like sweetness of the crust.
For the Pink Velvet Raspberry Filling:
- 24 oz (three 8-oz blocks) full-fat cream cheese, softened – The star of the show, delivering that iconic dense, creamy, and tangy texture. Critical: Must be at room temperature to avoid lumps.
- 1 cup granulated sugar – Sweetens the filling without making it cloying.
- 1 cup sour cream, room temperature – Adds a luxurious tang and helps create a silky-smooth filling that resists cracking.
- 3 large eggs, room temperature – Provide structure and a rich, custardy consistency. Add one at a time.
- 1/3 cup raspberry puree (from about 1 cup fresh or frozen raspberries, strained) – Infuses the cheesecake with authentic fruity flavor and natural pink color.
- 1 tsp pure vanilla extract – Deepens the overall flavor profile with warm, aromatic notes.
- 1-2 tsp pink gel food coloring (optional) – For that signature “velvet” pink vibrancy. Gel color is preferred over liquid as it doesn’t thin the batter.
- 1 tbsp all-purpose flour – A little secret for extra stability, ensuring a perfect slice every time.
For the Topping & Garnish:
- 1 1/2 cups heavy whipping cream, chilled – Whipped to soft peaks for a cloud-like, billowy topping.
- 3 tbsp powdered sugar – Sweetens the whipped cream without grittiness.
- 1 pint fresh raspberries – For a fresh, tart garnish that complements the sweet filling.
- Fresh mint leaves (optional) – Adds a pop of green color and a refreshing aroma.
Timing
Patience is key with cheesecake! While the active prep time is reasonable, the cooling and chilling stages are non-negotiable for the perfect texture. This recipe is about 30% longer than a standard no-bake cheesecake, but the baked result—a dense, creamy, crack-free top—is well worth the wait.
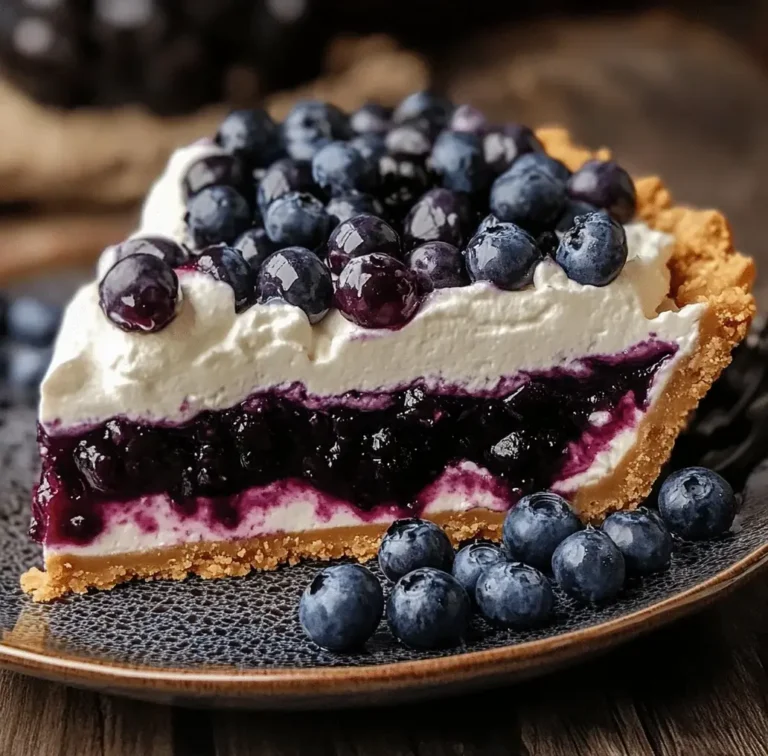
A stunning slice of Pink Velvet Raspberry Cheesecake, showcasing the creamy pink filling, buttery crust, and fresh berry garnish.
Step-by-Step Instructions
Step 1: Prepare the Crust
Preheat your oven to 325°F (163°C). In a medium bowl, combine the graham cracker crumbs, melted butter, and sugar. Mix until the texture resembles wet sand and the crumbs hold together when pinched. Press this mixture firmly and evenly into the bottom and slightly up the sides of a 9-inch springform pan. I like to use the bottom of a flat glass or measuring cup to achieve a perfectly compacted crust. Pre-bake the crust for 10 minutes, then remove it from the oven and let it cool on a wire rack while you prepare the filling. This step helps prevent a soggy bottom.
Step 2: Make the Raspberry Filling
Ensure your cream cheese, sour cream, and eggs are at room temperature—this is the single most important tip for a lump-free batter. In the bowl of a stand mixer fitted with the paddle attachment (or using a hand mixer), beat the softened cream cheese on medium-low speed for about 2 minutes until it’s completely smooth and creamy. Scrape down the bowl. Gradually add the sugar and beat for another minute until fully incorporated. Add the sour cream and vanilla extract, mixing until just combined.
With the mixer on low, add the eggs one at a time, mixing only until the yolk disappears into the batter after each addition. Over-beating the eggs incorporates too much air, which can lead to cracking. In a separate small bowl, whisk the tablespoon of flour into the raspberry puree until smooth. Gently fold this raspberry mixture into the cream cheese batter using a spatula. If using, add the pink gel food coloring a few drops at a time until you achieve your desired shade of pink. Remember, the color will deepen slightly after baking.
Step 3: Bake and Cool
Wrap the outside bottom and sides of your springform pan tightly with two layers of heavy-duty aluminum foil. This creates a watertight seal for the water bath. Pour the pink velvet batter over the cooled crust and smooth the top. Place the springform pan inside a larger roasting pan. Carefully pour hot water into the roasting pan until it comes about halfway up the sides of the springform pan. This water bath (bain-marie) is your insurance policy against cracks, as it provides gentle, even heat.
Bake for 55 to 65 minutes. The edges should be set, but the center should still have a slight jiggle—like Jell-O—when you gently shake the pan. Turn off the oven, crack the oven door open with a wooden spoon, and let the cheesecake cool inside the oven for 1 hour. This gradual temperature change further prevents cracking. Remove from the oven and water bath, run a thin knife around the edge to loosen it from the pan (this prevents it from pulling and cracking as it contracts), and let it cool completely on a wire rack. Then, cover and refrigerate for at least 8 hours, preferably overnight.
Step 4: Add the Toppings
Just before serving, prepare the whipped cream. In a chilled bowl, whip the heavy cream and powdered sugar until soft peaks form. Carefully remove the chilled cheesecake from the springform pan. Using a piping bag with a star tip or a simple offset spatula, decorate the top with the whipped cream. Artfully arrange the fresh raspberries and mint leaves on top. For a professional touch, you can lightly brush the raspberries with a simple syrup or melted apricot jam to give them a beautiful glossy sheen.
Nutritional Information
The following estimates are for 1 slice (out of 12) of cheesecake, including whipped cream and berry garnish. Values are approximate.
Healthier Alternatives
You can enjoy this decadent dessert with a lighter touch by making a few smart swaps without sacrificing the luxurious feel.
- Crust: Use almond flour or crushed nuts mixed with a touch of maple syrup and coconut oil instead of graham crackers and butter for a gluten-free, higher-protein base.
- Filling: Substitute half the cream cheese with Greek yogurt or low-fat ricotta for a protein boost and reduced fat. Use a natural sweetener like monk fruit or erythritol in place of granulated sugar. Omit the food coloring and rely solely on the raspberry puree for a beautiful, natural pink hue.
- Topping: Swap the heavy whipping cream for chilled coconut cream (the solid part from a can of full-fat coconut milk) whipped with a little vanilla. It’s dairy-free and equally luxurious.
Serving Suggestions
This cheesecake is a complete showpiece on its own, but a few accompaniments can elevate the experience. Serve each slice with a drizzle of raspberry coulis or a dark chocolate sauce for a bittersweet contrast. A scoop of vanilla bean ice cream or a dollop of lemon sorbet provides a delightful temperature and flavor contrast. For a brunch or afternoon tea, pair it with a glass of sparkling rosé, a flute of champagne, or a pot of Earl Grey tea to complement the berry notes.
Common Mistakes
- Using Cold Ingredients: This is the #1 cause of a lumpy batter. Ensure cream cheese, eggs, and sour cream are truly at room temperature (about 1-2 hours out of the fridge).
- Skipping the Water Bath: Baking without a water bath exposes the delicate custard to direct, harsh heat, almost guaranteeing cracks and a dry texture.
- Over-mixing the Batter: Once the eggs are added, mix on low and only until combined. Over-beating incorporates excess air, which expands and collapses during baking, leading to cracks and a less dense texture.
- Not Loosening the Sides: Forgetting to run a knife around the edge after baking causes the cheesecake to stick to the pan as it cools and contracts, leading to unsightly cracks and difficult removal.
- Rushing the Chill Time: Cutting into a cheesecake before it has fully set in the fridge results in a gooey, messy slice. Patience is mandatory for the perfect clean cut.
Storing Tips
This cheesecake stores beautifully,