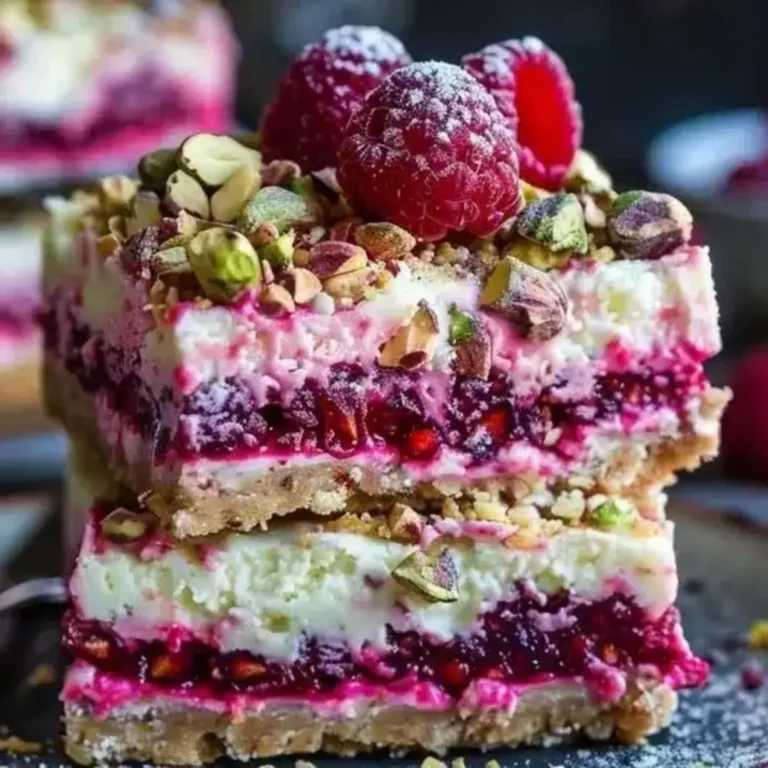
Raspberry Ripple Cheesecake Slice Recipe Guide
“`html
Table of Contents
Raspberry Ripple Cheesecake Slice Recipe Guide
Why Everyone Loves Raspberry Ripple Cheesecake Slices
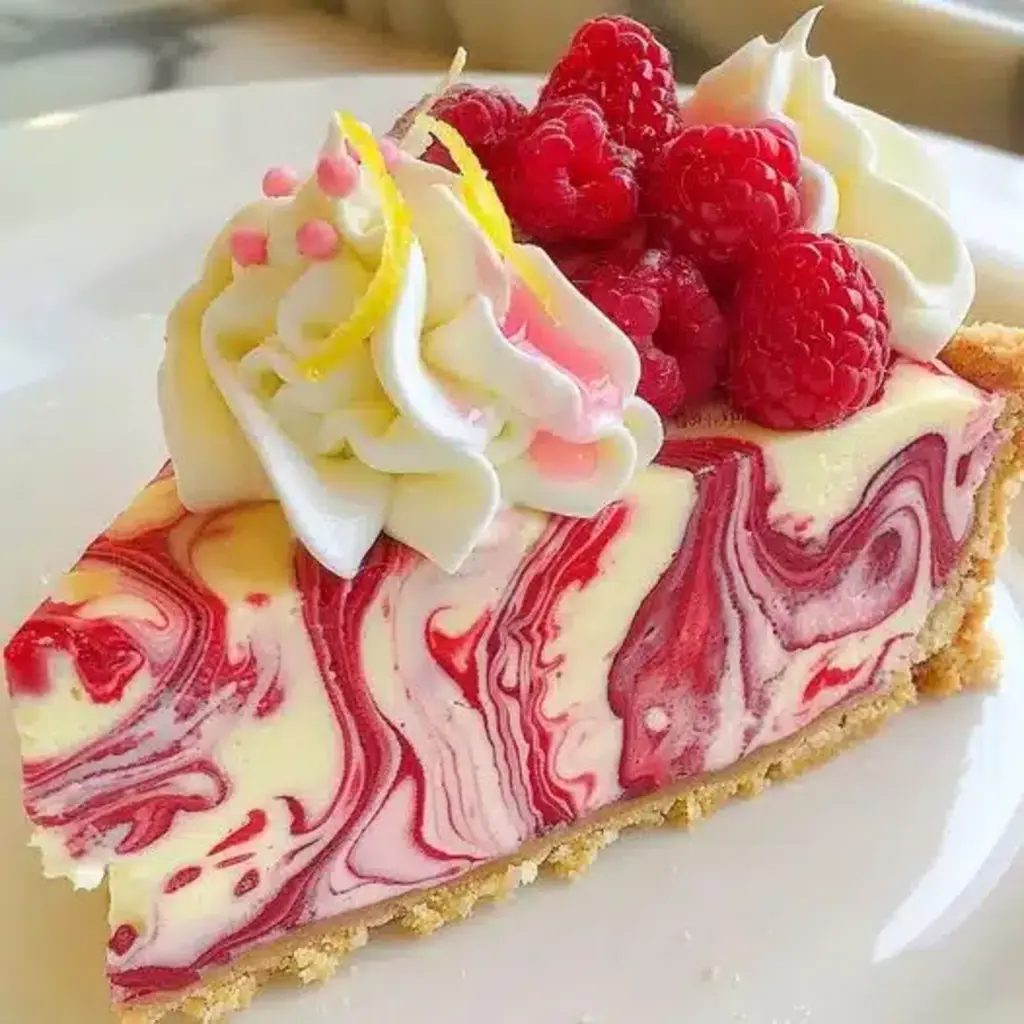
Are you searching for a dessert that offers a delightful balance of sweet and tart, with a creamy, dreamy texture that melts in your mouth? In the vast universe of sweet treats, the raspberry ripple cheesecake slice stands out as a perennial favorite. It’s a dessert that consistently ranks high in popularity surveys, often appearing in the top 5 for celebratory meals and casual get-togethers. This delectable treat masterfully combines the rich, velvety smoothness of a classic cheesecake with the vibrant, slightly tangy burst of fresh raspberries, all elevated by a subtle kiss of lemon. Whether you’re hosting an elegant dinner party or simply craving a comforting indulgence, this cheesecake slice is designed to impress, not just with its beautiful visual appeal, but with its wonderfully layered flavors that dance on your palate. Its versatility makes it a go-to for any occasion.
Ingredients for Your Perfect Raspberry Ripple Cheesecake Slice
Crafting the perfect Raspberry Ripple Cheesecake Slice requires a thoughtful selection of high-quality ingredients. Each component plays a crucial role in achieving that signature creamy texture and balanced flavor profile. Here’s what you’ll need:
For the Base
- 200g Digestives or Graham Crackers: These form a sturdy, slightly sweet foundation. For a gluten-free option, use your favorite gluten-free digestive biscuits. The crumbly texture is key!
- 100g Unsalted Butter, melted: Binds the crumbs together, adding richness and a hint of saltiness. Ensure it’s melted but not boiling hot.
- 1 tsp Granulated Sugar (optional): For a touch more sweetness in the crust.
For the Cheesecake Filling
- 600g Full-Fat Cream Cheese, softened: The star of the show! Use block cream cheese, not the spreadable kind, for the best texture. Room temperature is crucial for a smooth filling, free of lumps.
- 150g Caster Sugar: Balances the tang of the cream cheese and raspberries, creating a harmonious sweetness.
- 2 Large Eggs: Bind the filling and contribute to its rich, custardy texture. Ensure they are at room temperature for even incorporation.
- 1 tsp Vanilla Extract: Adds a warm, aromatic depth that complements all the other flavors beautifully.
- Zest of 1 Lemon: Provides a bright, zesty lift that cuts through the richness and enhances the raspberry flavor.
For the Raspberry Ripple
- 300g Fresh or Frozen Raspberries: These deliver that gorgeous color and delightful tartness. If using frozen, thaw them slightly before use.
- 2 tbsp Granulated Sugar: To sweeten the raspberries and help create a syrupy consistency.
- 1 tbsp Lemon Juice: Enhances the raspberry flavor and adds a touch more brightness.
Timing Your Raspberry Ripple Cheesecake Slice Masterpiece
Patience is a virtue when it comes to baking, especially with cheesecakes. Here’s a breakdown of the time commitment:
Compared to an average cheesecake recipe which might take 20-30 minutes of prep and 60-90 minutes of baking, our Raspberry Ripple slice has a slightly shorter bake time but requires significant chilling. This is common for recipes designed to be served in slices, as proper chilling ensures clean cuts and a firm, yet creamy, texture.
Step-by-Step Guide to Creating Your Raspberry Ripple Cheesecake Slice
Let’s dive into the fun part – creating this sensational dessert! Follow these steps carefully for a flawless result.
Step 1: Prepare the Base
First things first, let’s get that foundation ready. Preheat your oven to 160°C (140°C Fan/Gas Mark 3). Lightly grease and line a 20cm (8-inch) square or rectangular baking tin with parchment paper, leaving some overhang to help you lift it out later. In a medium bowl, crush your digestive biscuits into fine crumbs – you can use a food processor for this or place them in a zip-top bag and bash them with a rolling pin. Mix the biscuit crumbs with the optional sugar, then pour in the melted butter and stir until all the crumbs are evenly moistened and resemble wet sand. Press this mixture firmly and evenly into the base of your prepared baking tin. Use the bottom of a glass or a spatula to get a compact layer. Bake for about 10 minutes until lightly golden. Remove from the oven and let it cool while you prepare the filling. This pre-baking step helps prevent a soggy bottom.
Step 2: Create the Cheesecake Filling
Now for the heavenly cream cheese filling. In a large bowl, beat the softened cream cheese with an electric mixer on medium speed until it’s completely smooth and free of any lumps. Gradually add the caster sugar and continue beating until well combined and smooth. Scrape down the sides of the bowl as needed. In a separate small bowl, lightly whisk the eggs with the vanilla extract and lemon zest. With the mixer on low speed, gradually add the egg mixture to the cream cheese, beating until just combined. Be careful not to overmix at this stage; overbeating can incorporate too much air, leading to cracks. Once everything is just blended, give the bowl a good scrape down and give it one final gentle mix to ensure no unmixed ingredients are hiding.
Step 3: Make the Raspberry Ripple
Let’s create that signature ripple! In a small saucepan, combine the raspberries (if using frozen, break them up slightly), sugar, and lemon juice. Place over medium heat and cook, stirring occasionally, for about 5-7 minutes. The raspberries should break down and release their juices, forming a slightly thickened sauce. You want a lovely, vibrant sauce, not a completely smooth puree, as some texture is nice. Once it’s reached a saucy consistency, remove from the heat and let it cool slightly. You can strain out some of the seeds if you prefer a smoother ripple, but it’s entirely optional and often the seeds add a lovely authenticity.
Step 4: Assemble and Bake
Time to bring it all together. Gently pour about two-thirds of the cream cheese filling over the cooled biscuit base. Spoon dollops of the slightly cooled raspberry sauce over the cream cheese filling. Now, carefully pour the remaining cream cheese filling over the raspberries. Take a skewer or a knife and gently swirl the raspberry sauce through the cheesecake filling to create those beautiful ripple patterns. Don’t over-swirl; you want distinct ribbons of color. Carefully place the tin in the preheated oven. Bake for 35-45 minutes, or until the edges are set but the center still has a slight wobble. A gentle nudge of the tin should show a gentle movement in the very middle, like set jelly. This wobble is key to a creamy cheesecake; it will firm up as it cools.
Step 5: Chill and Serve
This is where patience truly pays off. Once baked, turn off the oven and leave the cheesecake inside with the door slightly ajar for about an hour. This gradual cooling helps prevent cracking. After an hour, remove the cheesecake from the oven and let it cool completely on a wire rack. Once at room temperature, cover it loosely with plastic wrap (try not to let it touch the surface) and refrigerate for at least 4 hours, or preferably overnight. This chilling period is essential for the cheesecake to fully set and develop its rich flavor and creamy texture. When ready to serve, use the parchment paper overhang to carefully lift the cheesecake out of the tin. Slice into squares using a sharp knife dipped in hot water and wiped clean between each cut for the neatest results. Drizzle with any remaining raspberry sauce if desired.
Nutritional Snapshot
While definitive nutritional information can vary based on specific ingredients and portion sizes, a typical Raspberry Ripple Cheesecake Slice likely contains:
- Calories: 350-500 kcal per slice
- Fat: 20-35g
- Saturated Fat: 10-20g
- Carbohydrates: 30-45g
- Sugars: 20-35g
- Protein: 5-10g
- Sodium: 100-200mg
(Note: This is an estimation. For precise details, calculate based on your specific ingredients.)
Healthier Swaps for a Lighter Treat
If you’re looking for a slightly lighter version without sacrificing too much flavor, consider these swaps:
- Crust: Use crushed whole-wheat biscuits or even a base made from oats blended with a little Greek yogurt and a touch of sweetener.
- Sweetener: Reduce the sugar in the filling and ripple, or use a natural sweetener like stevia or erythritol in moderation (adjust quantities as needed).
- Cream Cheese: Substitute half of the full-fat cream cheese with light cream cheese or even thick Greek yogurt for a tangier, lower-fat filling. This might alter the texture slightly, making it a bit softer.
- Raspberries: Stick to fresh raspberries, which are naturally low in sugar and high in fiber.
Serving Suggestions to Elevate Your Slice
A Raspberry Ripple Cheesecake Slice is a star on its own, but here are a few ideas to make it even more special:
- Garnish with fresh raspberries and a sprig of mint for a vibrant finish.
- Serve with a dollop of lightly sweetened whipped cream or Greek yogurt.
- A small drizzle of extra raspberry coulis can enhance the visual appeal and flavor.
- Pair with a cup of Earl Grey tea or a crisp sparkling wine for a delightful contrast.
Common Pitfalls to Avoid
Don’t let minor mistakes derail your cheesecake dreams! Here are common issues and how to steer clear:
- Cracking: Overmixing the batter, baking at too high a temperature, or cooling too quickly can cause cracks. Follow the gradual cooling method.
- Lumpy Filling: Ensure your cream cheese and eggs are at room temperature. Beat cream cheese until smooth before adding other ingredients.
- Soggy Base: Pre-baking the base and ensuring it’s well-pressed helps prevent this.
- Undercooked Center: A slight wobble in the center is good, but if it’s very liquid, it needs more baking time. However, don’t overbake, or it will become dry and prone to cracking.
Storing Your Delicious Cheesecake
To keep your Raspberry Ripple Cheesecake Slice tasting as fresh as possible:
- Always store leftover cheesecake in an airtight container in the refrigerator.
- It should stay fresh for up to 3-4 days.
- If you’ve cut slices but aren’t serving them all, store the remaining uncut cheesecake in the fridge.
- Cover cut edges with plastic wrap to prevent drying out.
Frequently Asked Questions
Got questions? We’ve got answers!
***Can I make this cheesecake without a water bath?***
Yes, you can! A water bath is often recommended to ensure even, gentle cooking and prevent cracking. However, this recipe is designed to be less prone to cracking with gradual cooling. Ensure you don’t overbake it.
***Can I use frozen raspberries?***
Absolutely! Frozen raspberries work wonderfully for both the ripple and as a garnish. Thaw them slightly before making the sauce, and they will release plenty of juice. Keep in mind they may be a little more watery.
***Why is my cheesecake still wobbly?***
A slight wobble in the very center indicates the cheesecake is perfectly cooked. It will continue to set as it cools and chills. If it’s excessively liquid, it may need a few more minutes of baking.
***How can I get clean slices?***
The trick is a sharp knife dipped in hot water and wiped dry between each cut. Letting the cheesecake chill thoroughly is also crucial for firm slices.
Ready to impress your friends and family with this stunning Raspberry Ripple Cheesecake Slice? Give this recipe a try and let us know how it turns out in the comments below! We love to see your creations!
Raspberry Ripple Cheesecake Slice Recipe Guide

Welcome to the delicious world of desserts, where today we spotlight the Raspberry Ripple Cheesecake Slice. This delectable treat combines the creamy texture of cheesecake with the fresh zing of raspberries, topped off with a hint of lemon. Perfect for any occasion, from a family dinner to a festive gathering, this cheesecake not only dazzles with its looks but also delights with its layered flavors.
Ingredients
- 1 1/2 cupsgraham cracker crumbs
- 1/4 cupunsalted butter, melted
- 2 tablespoonsgranulated sugar
- 16 ozcream cheese, softened
- 3/4 cupgranulated sugar
- 2large eggs
- 1 tablespoonlemon zest
- 1 teaspoonvanilla extract
- 1/2 cupsour cream
- 1 cupraspberries, fresh or frozen
- 3 tablespoonsraspberry jam
- Whipped cream, for garnish
- Additional raspberries, for garnish
- Lemon peel twists, for garnish
Instructions
- Preheat oven to 325°F (165°C).
- Base Preparation:Mix graham cracker crumbs, melted butter, and 2 tablespoons sugar. Press into the bottom of a 9-inch springform pan. Chill for 20 minutes.
- Filling:Beat cream cheese with 3/4 cup sugar until smooth. Incorporate eggs one at a time, followed by lemon zest and vanilla extract. Fold in sour cream.
- Layering:Pour half the filling over the crust. Dollop and swirl half the raspberry jam. Repeat with the remaining filling and jam. Top with raspberries.
- Baking:Bake for 45-55 minutes. The edges should be set, and the center slightly jiggly.
- Cooling and Garnishing:Cool to room temperature, then refrigerate for at least 4 hours. Garnish with whipped cream, additional raspberries, and lemon twists before serving.
Notes
Cheesecake Texture:For a smoother texture, ensure all ingredients are at room temperature before mixing.
Swirling Technique:Use a knife or toothpick for more intricate swirls in the cheesecake.
Serving Suggestion:Serve chilled. Pair with a light raspberry coulis or a scoop of vanilla ice cream for an extra special dessert.
Storage:This cheesecake can be refrigerated for up to 5 days or frozen for a month.
“`